
Quick Summary
- Dust and scratches are common issues when scanning analog photos, especially black-and-white negatives.
- While Lightroom and Photoshop have basic dust and scratch removal tools, I find they don’t always work well as simple one-click solutions.
- Here is the more precise method I use that leverages the power of Photoshop:
- Using the History panel to track changes.
- Applying the Dust & Scratches filter, adjusting the Radius and Threshold.
- Using the History Brush to selectively paint in the Dust & Scratches effect.
- Changing the brush mode to “Darken” for white spots or “Lighten” for dark spots.
- Dabbing the History Brush on specific dust spots and scratches to avoid overpainting the film grain.
When I’m scanning images — whether it’s film, slides, or prints — I almost always run into the problem of dust and scratches at some point. It’s simply an unfortunate fact of life with analog photography. No matter how carefully I wipe down film or slides before scanning them, it never seems to catch every last speck.
With color film (aka chromogenic film), scanners can often use a mix of hardware and software to clean the image during the scanning process itself. A proprietary form of that is known as Digital ICE, but there are other similar options used by various scanner software developers.
But those technologies generally don’t work with standard black-and-white film. But there’s a very good option that gives you even more control.1
Shortcomings of one-click Dust & Scratches removal tools
If you prefer to stay inside Lightroom Classic, I have a separate guide covering my workflow for removing dust and scratches in Lightroom. It does quite a capable job with its healing brush, but when I have a really stubborn scan, I find that Photoshop does an even better job and offers far more flexibility.
One option is to use Photoshop’s content-aware Spot Healing Brush. The downside I often run into, however, is that it can affect the texture of the area around the dust spot, sometimes creating its own eye-catching artifacts. I notice this most on scans that have prominent film grain or when editing fine textures like fabrics and foliage.
Photoshop also has a built-in Dust & Scratches filter. It’s tempting to assume that’s the beginning and end of the problem. But as you’ll see, applying the filter directly is a pretty heavy-handed approach that doesn’t work as elegantly as the name implies. Yes, it can obliterate dust spots and scratch marks, but it often makes the rest of the image horribly soft in the process.
A better method of removing Dust & Scratches
Here is the technique I prefer to use. It takes the best part of the filter (removing the dust) while avoiding the primary drawback (softening the underlying image).
I find this most effective on black-and-white photos — precisely the kind of images that automated scanning software usually struggles with.


It’s a workflow I picked up years ago from an early version of Martin Evening’s incredibly useful guide to Photoshop. If you’re looking to dive deeper into Photoshop’s capabilities, I highly recommend picking up a copy. I’ve found it to be an incredibly useful reference over the years across multiple editions.
The History panel
I start by opening the History panel (if it’s not currently showing, you can find it under Window > History). This panel logs every action taken on the image, and we’re going to put that tracking to use.
For this walkthrough, I’m using an old photo I took of Belém Tower in Lisbon, Portugal. The original was shot on black-and-white film, and over the years, the negative has picked up its fair share of dust and light scratches.

Apply the Dust & Scratches filter
My first step is to apply Photoshop’s built-in Dust & Scratches filter by going to Filter > Noise > Dust & Scratches.
There are two sliders in this panel. “Radius” applies to adjacent pixels, while “Threshold” targets the local contrast. If I set it to a Radius of 1 and a Threshold of 255, it basically just renders the original, untouched image.

It doesn’t take much to see the mess the Dust & Scratches filter can create if used globally across the whole frame. The example below is pushed to a radius of 46. As you can see, the image has become incredibly blurry and is totally unusable.
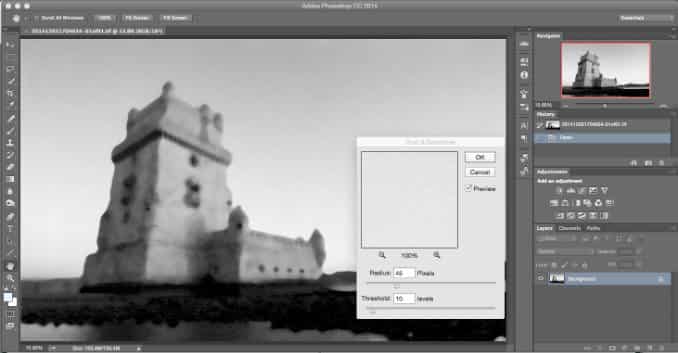
My goal here is to find the absolute lowest setting where the offending dust spots and scratches just barely disappear. That sweet spot varies wildly depending on the image content, the scan resolution, and how bad the markings are to begin with.
For my black-and-white images, I usually start with the threshold at about 10 and then slowly adjust the radius. To check the effect, I use both the 100% zoom loop (clicking around to check different areas) and the full image view. I often find it easiest to zoom in on the original image before opening the filter dialog.
In this example, I’m settling on a Radius of 14 and a Threshold of 10. The dust and scratches have mostly vanished, but the overall image is still far too soft. At this point, I just click OK to apply the filter anyway. Yes, the image looks terrible right now, but we’re going to fix that in the next step.

I’m going to zoom in here to make the remaining steps easier to see. As you can tell, the details are heavily blurred.

Put the History Brush to work
This is where the clever part comes in: we’re going to use the History Brush. Instead of painting with a color, this brush allows you to paint with past historical states of the image. Whoever dreamt up this tool back when Photoshop was being developed deserves a beer.
In the History panel, the very last line will show the Dust & Scratches filter that was just applied.

I start by going back to the previous step — the one right before the filter was applied. I do this simply by clicking on that specific line in the log. In my example here, it’s the “Open” line.

The image immediately reverts to its original version, bringing all the sharp details — and the dust and scratches — back into view.

Next, I need to tell the History Brush which state I want to use as my “paint.” Because I want to selectively apply the blur from the filter, I check the small box to the left of the “Dust & Scratches” line. A small History Brush icon will appear in that box.

I then grab the History Brush tool from the main toolbar on the left.

I adjust my brush size so it’s just slightly larger than the dust spots I’m targeting. Then, I change the blending mode. If I’m cleaning up white dust spots (like on a negative film scan), I set the mode to “Darken.” If I’m trying to remove dark spots (like on a slide or print scan), I set it to “Lighten.” This step limits the brush’s effect to only the pixels that actually need fixing, leaving the surrounding texture mostly untouched.

From there, I simply dab the History Brush over the dust spots and scratches. Even with the blending mode doing heavy lifting, I find it’s best to paint as selectively as possible. Indiscriminately swiping the brush around — especially over tight textures like heavy film grain or fabric — can still create noticeably smooth, unnatural patches. This particular image was shot on relatively fast film with prominent grain, so a careful, targeted approach yields much better results.

I just continue working my way around the frame, dabbing the History Brush on the remaining dust and scratch marks until the image is clean. Once finished, I can move right along to my regular editing workflow or simply save the file.
Why Digital ICE ruins standard black-and-white scans
The reason that this method is even needed is because most existing automated dust removal — at least, any that are any good — doesn’t work on standard silver-halide black and white film negatives.
If you’ve ever accidentally left your scanner’s infrared dust removal (like Digital ICE) turned on while scanning standard black-and-white film like Tri-X or HP5, you were probably rewarded with a garbled, heavily artifacted mess. I definitely learned this the hard way when I first started digitizing my archives.
The issue comes down to the physical chemistry of the film. Color negatives and slide film — as well as chromogenic B&W films like Ilford XP2 — use transparent dyes to form the image. Infrared light passes right through those dyes but gets blocked by physical dust and scratches on the surface, allowing the scanner hardware to accurately map and remove the defects.
Traditional black-and-white film, however, creates the image using actual clumps of metallic silver. That metallic silver is naturally opaque to infrared light. So, when the scanner fires its infrared channel, it can’t distinguish between a piece of surface dust and the silver grain that makes up the actual photograph. The scanning software essentially interprets the entire image as one massive defect and tries to “correct” it, ruining the scan in the process.
Notes & References:
- There are exceptions for films that are more closely related to color film than traditional black and white film. Ilford XP2 and Kodak BW400CN, for example, both work well with these scanner technologies because their dye layers are similar to color film. That, along with the convenience of regular C-41 processing, is one of the main appeals of shooting XP2 for me. [↩︎]



Am coming to this blog a bit behind the curve and greatly appreciate the advice provided here. I’ve been scanning some B&W images using my Optic Film 8100 and the provided SilverFast dust correction software. It is very efficient in quickly eliminating a large number of very small imperfections. However, when the imperfections are in the shadows (i.e. clear area of the negative), larger things are tough to eliminate. This article explained, at a number of levels, how a determined photographer can deal with them. I’ve ordered an older copy of Photoshop (6.0) that should run just fine on my older Win 7 laptop with 8gb of RAM. Will post to this blog as to how it works out. Cal C
Super helpful, thanks!
Thanks but it is way too time consuming to go through all these steps when Photoshop should have a much better method of removing Dust and Scratches. I am doing bulk scanning of slides and can not use this approach for thousands of images. I found a program BatchCrop that will remove most of the dust and seems to have no effect on image quality, unlike Photoshop.
I forgot to add, that by turning the picture into a smart object, (Layers -> Smartobjects -> Convert to Smart Object) applied filters automatically become smart filters. This way they are non destructive from the get-go, use their very own layer mask and can even be altered at any time. In this example I would be able to change the radius later if I would like to, even after all the painting is done.
Even better would be to use a layer mask, as it is nondestructive and therefore a lot more flexible.
1. Duplicate the base layer
2. Select the new layer (Layer 2)
3. Apply anti scratch filter on layer 2
4. Apply a layer-mask on layer 2 (press and hold alt while clicking, to fill the layer mask with black, or fill in the layer mask with black by using the bucket tool, or pressing alt+backspace or ctrl+backspace/apple + backspace on mac)
5. Select layer mask
6. Select brush tool
7. Paint in 100% white on the picture, while the layer mask is selected.
7.1. If you made a mistake, just select 100% black (press x to change active color swatches and d to restore black and white)
8. … Profit
Pros:
– Original picture is untouched
– Mistakes can be easily fixed
– Workflow is slightly faster
Cons:
File Size becomes slightly larger if layers a saved.
Cheers
Great tip–thanks for sharing.
Hi David,
Ive just come across your much needed post. I tried other remedies in PS to remove spots on images and by far this is the most non-destructive and time consuming approach yet. Like another person who commented, I too am book marking this for eternity. Your steps are easy to follow, well if i can follow they must be. Thank you very much for your effort
Glad it’s useful. Props to Martin Evening for the original.
Photoshop Elements can also use this layers-based approach to spotting even though it lacks a History Brush tool. Here’s how:
https://www.dpreview.com/forums/thread/414025#forum-post-4302576
It becomes easy as pie with your guide! Thanks to the use of the history brush as you showed, I could revive some of my cooking photos to their former selves.
Truth to be told, I am not a graphics or image expert by any means and dreaded the use of Photoshop for the technical jobs. I just so happened to bump into your guide and I am glad I did. Although not like the professionals, I handled the images well enough using the filter method and the history panel to my own liking.
I am bookmarking this blog right away! Thanks for making this process clear as a crystal.
Glad it’s useful! And a hat tip to Martin Evening and his book, from where I originally learned it.
I have just applied what I have learned in this blog and I am very impressed with the result.
By removing dust and scratches in my own way, I would always end up with a smooth, blank patch of pixels like you described in this article. That just wasn’t good enough for me. By using the method you describe, I can remove dust and scratches without leaving a soft, blank patch of pixels behind.
Thank you for sharing this article. I feel I am much closer to employing best practices, much closer to employing the full power of Photoshop now.
Awesome and simple, thanks! Having to click even 1 less of a key (control key while I was clicking spots while using healing brush) makes a huge difference. I was beginning to feel worn out these past few months of removing dust from hundreds of images – needed a more efficient workflow. I love working with analog, and post-processing can be grueling
Yeah, I’m a big fan of this method. All credit to Martin Evening.
Oh man! THANK YOU! It was frustrating me that no matter how much I cleaned my scanner glass with a microfiber cloth, there would still be dust and dog hairs (haha) on my art work. Your tutorial is god-send! Thank you again!
Glad it was helpful! And yes, sometimes now matter how much you clean or dust it you just can’t get it all. Especially with black and white film.
Sorry. I later discovered I had a lasso section sill active. The Dust&Scratch tool is working just fine, and the tip is working very well. Thanks.
I am using PS 2016 set to “Photography”. I have a scan of a b&W negative. I am following your instructions to remove dust and scratches, but when I bring up the Dust & Scratches tool and set the two sliders to 14 and 10 as suggested, or to any higher setting, nothing happens in the preview (Preview box is selected). Oddly, I can’t get the scratches and dust to modify at all. Any idea why this is? Until I get past this, I cannot move on to do the history brush as described.
How did I not know this existed?! Thank you, this is perfect!
Thank you sir!
Thanks David.
I just got a bunch of scans back from DigMyPics and was very disappointed. Then I found your tips and it’s amazing. Thank you so much. You’re a life saver.
A huge thank you! Works great on my photos of oil paintings. Lots of annoying specular highlights, but this procedure makes them so much easier to remove.
DUDE YES. awesome. thank you.
This worked like magic and was so much easier than the other things I was trying! Huge thanks for sharing!!
Glad it’s useful!
This is the technique I was trying to remember…THANKS