
Every image file carries metadata — camera model, shutter speed, GPS coordinates, copyright notice, color profile, and more — embedded silently at capture. Most of it is harmless, but some of it you might not want to travel with a file when you share it online. GPS coordinates are the obvious ones: a photo taken at home can reveal your address to anyone who knows where to look.
There are several good tools for stripping this data. If you read the companion guide to doing this with ExifTool, you’ll know that ExifTool is the better specialized tool for metadata work — it’s more thorough, more precise, and doesn’t re-encode the image at all. If you’re only stripping metadata and nothing else, ExifTool is usually the better choice, and I’d go with that.
So why use ImageMagick for this? Two reasons.
First, if you’re already using ImageMagick for other image operations — resizing, format conversion, color space changes — you can fold the metadata strip into the same command and process everything in a single pass.
Second, if you’ve set up macOS Folder Actions with ImageMagick, adding -strip to an existing action costs nothing. It’s the convenience argument, not the power argument.
I’m assuming you already have ImageMagick installed. If not, here’s the quick installation guide on Mac.
Stripping metadata from a single image
NB: These commands overwrite the original file. Work on copies.
Navigate Terminal to the folder containing the image and run:
magick mogrify -strip input.jpgReplace input.jpg with your filename.
If you want to create a new file rather than overwrite the original, use magick instead of mogrify:
magick input.jpg -strip output.jpgBatch stripping metadata
To strip metadata from all JPEGs in the current folder:
magick mogrify -strip *.jpgTo process multiple formats in one pass:


for file in *.{jpg,jpeg,png,gif,webp,heic,heif}; do
    magick mogrify -strip "$file"
done
Or combine the strip with other operations — resize and strip in a single pass, for instance:
magick mogrify -strip -resize 2048x> *.jpgThis is where ImageMagick earns its place over ExifTool for this task: combining operations means one pass through the file rather than two separate commands.
Automating with a macOS Folder Action
If metadata stripping is something you do regularly, a Folder Action is worth the five minutes of setup. Drop an image into the watched folder and it’s processed automatically — no Terminal required after the initial configuration.
- Open Automator and create a new Folder Action. Assign it to the folder you want to watch.
- Add a Run Shell Script action. Set Pass input to
as argumentsand the Shell to/bin/zsh. - Enter the following script:
for f in "$@"
do
    /usr/local/bin/magick mogrify -strip "$f"
done
Apple Silicon note: Automator doesn’t inherit your Terminal PATH, so the full path to magick is required. On Intel Macs, that’s /usr/local/bin/magick as shown above. On Apple Silicon (M1/M2/M3/M4) Macs, replace it with /opt/homebrew/bin/magick. If you’re not sure which you have, run which magick in Terminal and it’ll tell you.
- Save the action with a descriptive name.
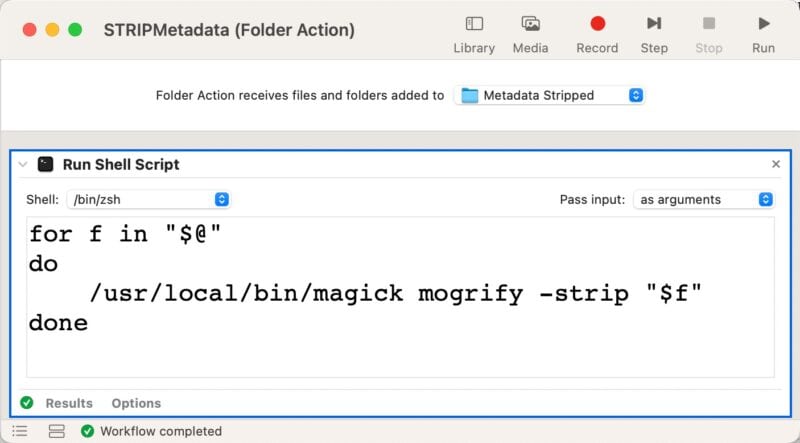
Any image dropped into the watched folder will have its metadata stripped automatically. As with the manual commands, this overwrites the originals — use it on copies.
Alternative: Create a droplet
There’s another option that gives you the same end result but goes about it in a slightly different way. It’s to use a droplet.
A droplet is a standalone Automator application that sits in your Dock or Desktop. Instead of dropping files into a folder, you drag them onto the app icon directly. I personally use the folder options, but some people find droplets to be more convenient than a watched folder.
To create one, open Automator and choose Application as the document type instead of Folder Action. Add the same Run Shell Script action with the same script — Pass input set to as arguments, Shell set to /bin/zsh:
for f in "$@"
do
    /usr/local/bin/magick mogrify -strip "$f"
done
Save it with a descriptive name — “Strip Metadata.app” or similar — and put it wherever is most convenient: Desktop, Dock, or a utilities folder. Drag image files onto it and it runs immediately, no Terminal required.
The same Apple Silicon path note applies here: replace /usr/local/bin/magick with /opt/homebrew/bin/magick if you’re on an M-series Mac. Run which magick in Terminal if you’re unsure which path to use.
Things worth knowing
-strip removes everything — including any copyright notice you’ve embedded via Lightroom’s export settings, and the ICC color profile. For most web-bound files in sRGB, losing the color profile is fine; browsers assume sRGB when no profile is present. But if you’re working with wide-gamut files or sending images to a print lab, strip the metadata in a separate step from the color profile, or use ExifTool’s more surgical --icc_profile:all= option to preserve it.1
The strip doesn’t re-encode the image, so there’s no quality loss. The pixel data is untouched; only the metadata wrapper is removed.
Alternatives
- ExifTool — the better specialized tool for metadata work. More thorough, more precise about which fields to keep or remove, and handles the ICC profile more cleanly. If metadata stripping is the primary task rather than an add-on to other processing, ExifTool is the right choice.
- ImageOptim — free Mac GUI app with drag-and-drop simplicity. Strips metadata as part of its image optimization workflow. Good option if you don’t want to use the terminal at all.
- EXIFPurge — a simple drag-and-drop app that does one thing: strip metadata. Worth checking current availability before relying on it.
Real-world case study: Preparing photos for social media
Here’s where combining operations in a single ImageMagick pass pays off most clearly. This workflow takes any image — including HEIF files straight from an iPhone — and produces a web-ready, privacy-clean JPEG in one command.
The requirements:
- Accept HEIF, PNG, or other formats as input
- Convert to JPEG
- Resize to fit within 1920px on the long edge — a reliable size across most platforms
- Convert to sRGB for consistent color rendering on unmanaged screens
- Strip all metadata — GPS, camera info, copyright, everything
The values used below — output dimensions, quality level, file formats — are sensible starting points, not fixed requirements. See the customization notes after the code for the obvious places to adjust things for your own workflow.
Single file
magick input.heic -resize 1920x1920> -colorspace sRGB -quality 85 -strip output.jpgWhat each flag does:
-resize 1920x1920>— fits the image within a 1920×1920 bounding box, preserving aspect ratio. The>modifier means it only downsizes — images already smaller than 1920px on both dimensions are left at their original size.-colorspace sRGB— converts to sRGB color space.-quality 85— JPEG compression level on a 1–100 scale.-strip— removes all metadata.- The output filename ends in
.jpg, which triggers the JPEG conversion regardless of input format.
Batch — all files in a folder
To process a mixed folder of HEIF, PNG, and JPEG files and output web-ready JPEGs into a subfolder called “social”:
mkdir -p social
for file in *.{heic,heif,jpg,jpeg,png}; do
    [ -f "$file" ] || continue
    basename="${file%.*}"
    magick "$file" -resize 1920x1920> -colorspace sRGB -quality 85 -strip "social/${basename}.jpg"
done
A few notes on what’s happening here:
mkdir -p socialcreates the output subfolder if it doesn’t already exist.[ -f "$file" ] || continueskips gracefully if a wildcard pattern matches nothing — without this, the loop throws an error on missing file types.${file%.*}strips the original file extension so the output filename gets.jpgregardless of input format.- Originals are untouched — all output goes to the
socialsubfolder.
As a drop folder or droplet
To wire this up as an Automator Folder Action or droplet, use the same script structure from the earlier sections, substituting this as the processing command:
for f in "$@"
do
    dir=$(dirname "$f")
    basename=$(basename "${f%.*}")
    mkdir -p "${dir}/social"
    /opt/homebrew/bin/magick "$f" -resize 1920x1920> -colorspace sRGB -quality 85 -strip "${dir}/social/${basename}.jpg"
done
This writes the processed file to a social subfolder alongside wherever the dropped file lives, leaving the original untouched. The mkdir -p line creates the subfolder automatically if it doesn’t exist yet.
Intel Mac note: The script uses /opt/homebrew/bin/magick, which is the correct path for Apple Silicon Macs. On older Intel Macs, replace it with /usr/local/bin/magick. Run which magick in Terminal if you’re unsure which applies to your machine.
Customization points
The scripts above are starting points. Here are the most obvious places to adapt them:
Output subfolder name: Replace social with whatever folder name makes sense for your workflow — web, instagram, client-delivery, and so on.
Input formats: The batch loop handles .{heic,heif,jpg,jpeg,png}. Add or remove extensions to match what you’re actually working with — tif, tiff, webp, avif, and most other common formats are all fair game.
Output dimensions: Replace 1920x1920 with whatever target size suits your platform. For a strict width constraint with no height limit, use 1920x. For a square crop, the geometry flags get more involved — but for simple resizing within a bounding box, adjusting the numbers here is all that’s needed.
JPEG quality: The -quality 85 setting is a reasonable default — good quality with meaningful file size reduction. Lower values (75–80) are often indistinguishable on social feeds and produce noticeably smaller files. Worth running a quick test on representative images before committing to a setting for large batches.
Output format: Changing the output filename extension from .jpg to .webp or .avif switches the output format. WebP and AVIF both produce smaller files than JPEG at comparable quality — useful if the destination platform supports them.
Sharpening: Downsampling softens images slightly. Adding -unsharp 0.5x0.5+0.5+0.05 before -strip applies a gentle unsharp mask after resizing. The four values control radius, sigma, amount, and threshold — the settings here are a conservative starting point; increase the third value to taste.
Notes & References:
- See the ExifTool metadata guide for the ICC-preserving command. [↩︎]



