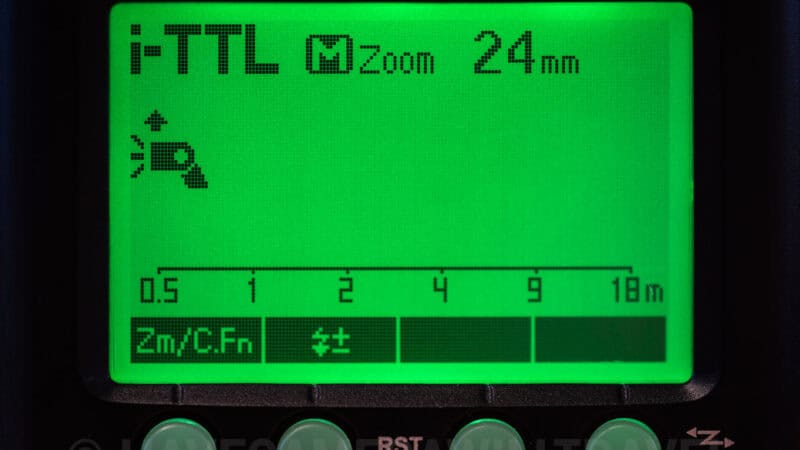
You’ve set your Godox trigger and flash to the same Channel and the same Group. You can see the settings are identical on both screens, yet when you press the shutter or the Test button, nothing happens. You’ve swapped batteries, reset the camera, and double-checked your hot shoe connection, but the flash remains silent.
This is an issue I ran into. And I’m guessing I’m not the only one, which is why I thought it might be helpful to post this. But the solution is often really simple, it turns out.
Why it’s happening
It turns out that the reason for a communication breakdown between a Godox trigger and a Godox off-camera flash often isn’t a hardware failure — it’s a protocol mismatch. It’s not enough only to match the channel and group — you also need to match the protocol.
Most modern Godox flashes are “multilingual.” That is, they can “speak” two entirely different wireless languages:
- Optical Trigger: Uses light to trigger the flash. This is useful if you want a platform-agnostic method of using one flash (or even a lightning bolt) to fire a remote flash. This is distinct from Nikon’s Creative Lighting System (CLS) or Canon’s wireless optical system, both of which use infrared pulses and encoded communication for TTL metering.
- 2.4GHz Radio (X-System): Uses radio waves that don’t require line-of-sight and work through walls. This is the newer system and likely the one you want to use.
And that’s where the problem probably lies — at least, it did for me.
If your trigger is sending a Radio signal but your flash is sitting in “Optical Slave” mode, the flash is literally looking for a flash of light to trigger it and ignoring the radio data hitting its antenna.
But the Godox flashes only use an icon to differentiate, and it’s not an especially clear one. Even more confusing, on some models, like the TT685n with which I originally ran into this problem, they use an almost identical icon for the wireless mode button. And for some reason, there’s no word-based indicator like there is for “slave.” It might be intuitive to some, but it wasn’t to me.
How to resolve it
To ensure your gear is on the same protocol, look for these specific visual cues on your flash LCD:
- The Color Code: * On many Godox flashes (like the TT685, V860, or V1 series), the backlight changes color to indicate mode.
- Green: The flash is in “Master” or “On-Camera” mode. It is looking to lead, not follow.
- Orange: The flash is in “Slave” or “Remote” mode. This is where it needs to be.
- The Icon Check (The Critical Step):
- Look at the top left of the LCD screen.
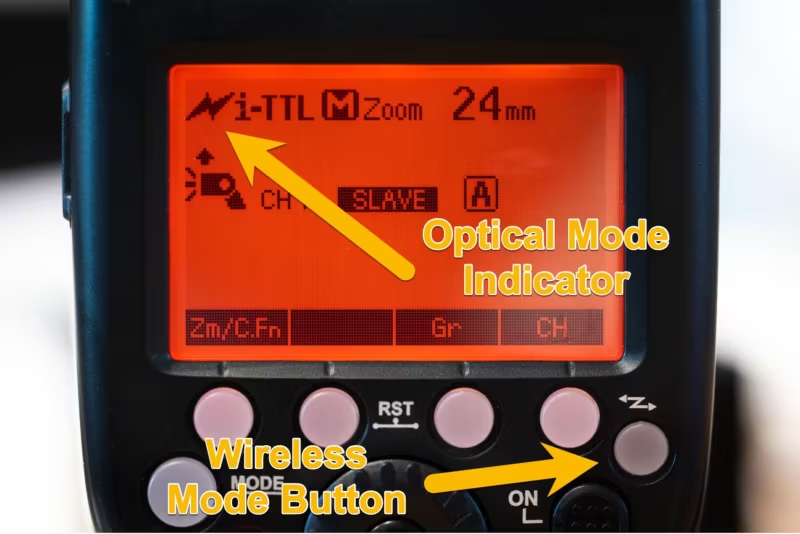
- Lightning Bolt Icon: This represents Optical Mode. If you see this, your radio trigger will not work.
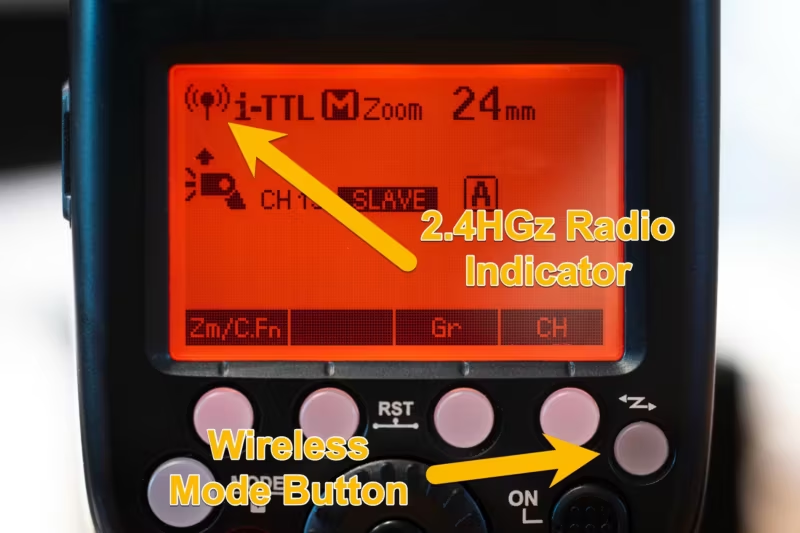
- Antenna/Radio Wave Icon: This represents 2.4GHz Radio Mode. This must be visible for your Godox X-series triggers (X1, X2, XPro, X3) to work.
- The Switch:
- Press the Wireless Mode Button (usually looks like a lightning bolt or a horizontal “Z”) repeatedly.
- Watch the icon change from a Bolt to an Antenna.
Here’s a visual example. The orange indicates its in slave mode (which is correct). But the icon in the top left indicates that it’s in optical trigger mode.
And here’s the same thing after pressing the wireless mode button on the right. It toggles it to the radio trigger mode.
Things worth knowing
- Wireless ID Mismatch: Even if you are in Radio Mode, Godox gear has a “Wireless ID” feature (01-99). If your trigger has ID 01 set and your flash has ID “OFF,” they will not talk. Ensure the ID matches on both or is turned OFF on both.
- The Proximity Bug: If your trigger is too close to the flash (less than 1 meter), the radio signal can swamp or overload the receiver. On your trigger, look for the “DIST” setting and change it to
0-30mto allow close-range firing. - Channel Interference: If you are in a crowded venue and getting unreliable triggering, it might be that the channel is congested with other 2.4GHz devices. If so, switch both the trigger and flash (remember to do both!) to a different number (the range of options available might differ for your specific flash). I often use 13 or 21 out of habit, but the key is that they have to match on both trigger and flash.
The “Recall Shooting Functions” / pro-tip
To quickly verify your connection without taking a photo, use the Test Button on your trigger. If the Test button fires the flash but the camera shutter doesn’t, the issue is your camera’s hot shoe or “Flash Mode” settings (ensure you aren’t in Silent Photography mode on some older mirrorless bodies, though the Z8 allows flash in electronic shutter).
If the trigger button doesn’t fire the flash, it’s a communication issue between the trigger and the flash that’s independent of the camera shutter.


