
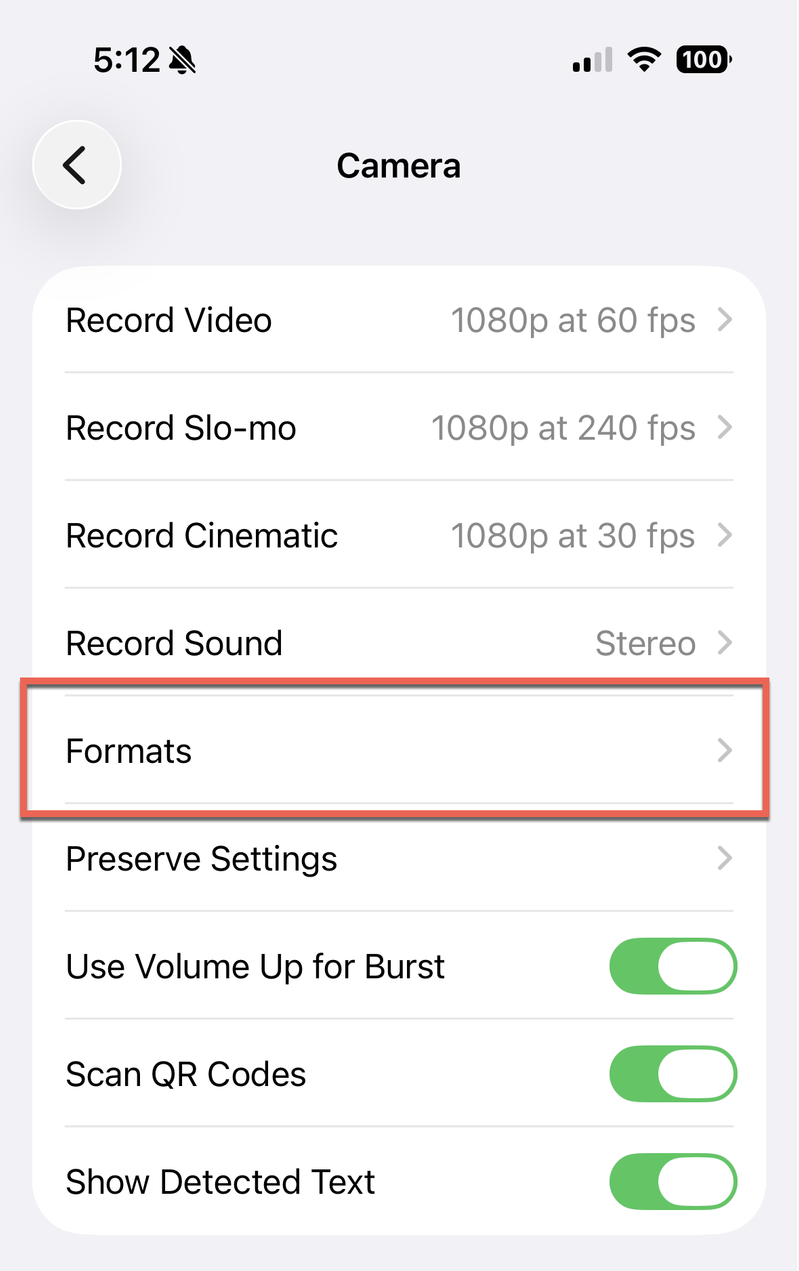
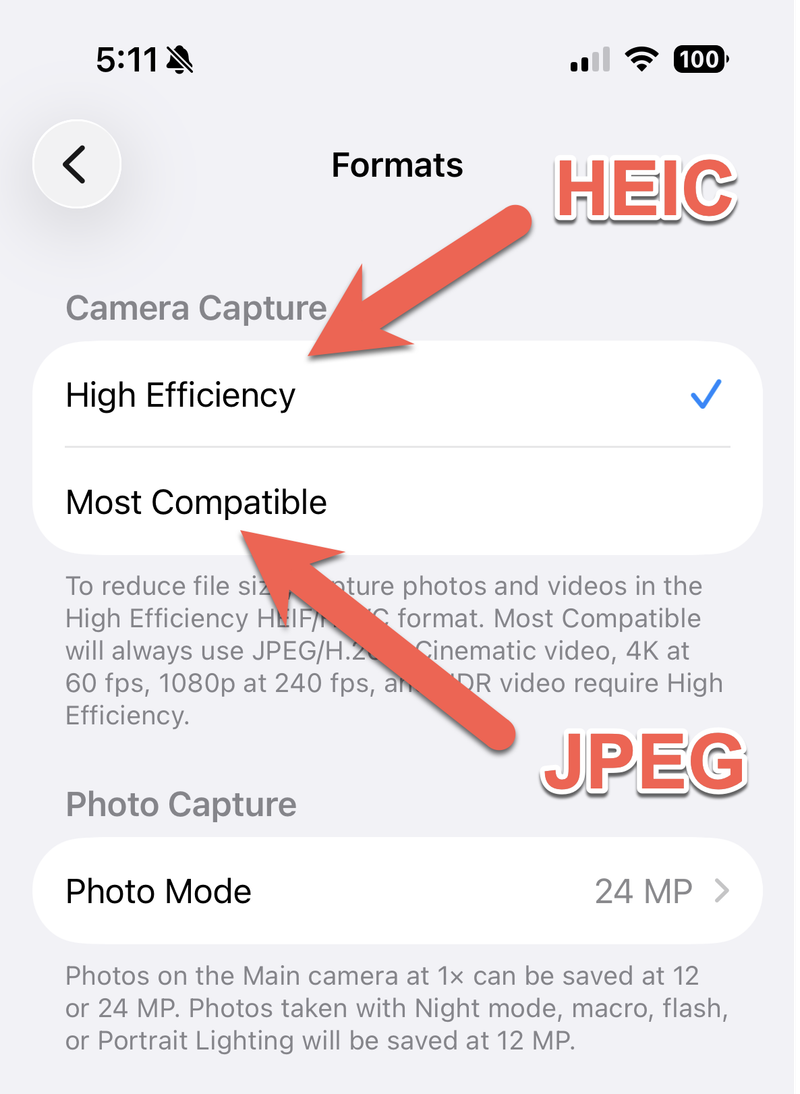
To make your iPhone shoot JPEG instead of HEIC: open Settings → Camera → Formats and choose Most Compatible.
(For how HEIC compares with JPEG, WebP, AVIF and the rest, see my guide to image file formats for photographers.)
From then on, new photos are saved as JPEG (and video as H.264) rather than HEIC/HEVC.
Photos you’ve already taken stay HEIC — convert those separately, or let the phone convert them as part of the transfer process (Settings → Apps → Photos → Transfer to Mac or PC → Automatic, or Settings → Photos on iOS 17 and earlier).
If you were just after that solution, that’s it, and Godspeed. The rest of this page is the why, the trade-offs (i.e., why you might actually want to use HEIC), and more detailed how-to guides.
The setting to shoot JPEGs on iPhones: Step by step
- Open
Settingsand tapCamera. - Tap
Formats. - Under Camera Capture, choose
Most Compatible. (High Efficiency is the HEIC/HEVC default.) - Take a photo. Its file is now a .jpg.
Keep shooting HEIC but transfer as JPEG
There’s another setting you can change if you want to maximize compatibility while also shooting with the benefits of HEIC.
That is, you can keep your photo format set to HEIC (aka High Efficiency) but have the iPhone convert the images to JPEG when it transfers.
You can find this setting under:
Settings → Apps → Photos → Transfer to Mac or PC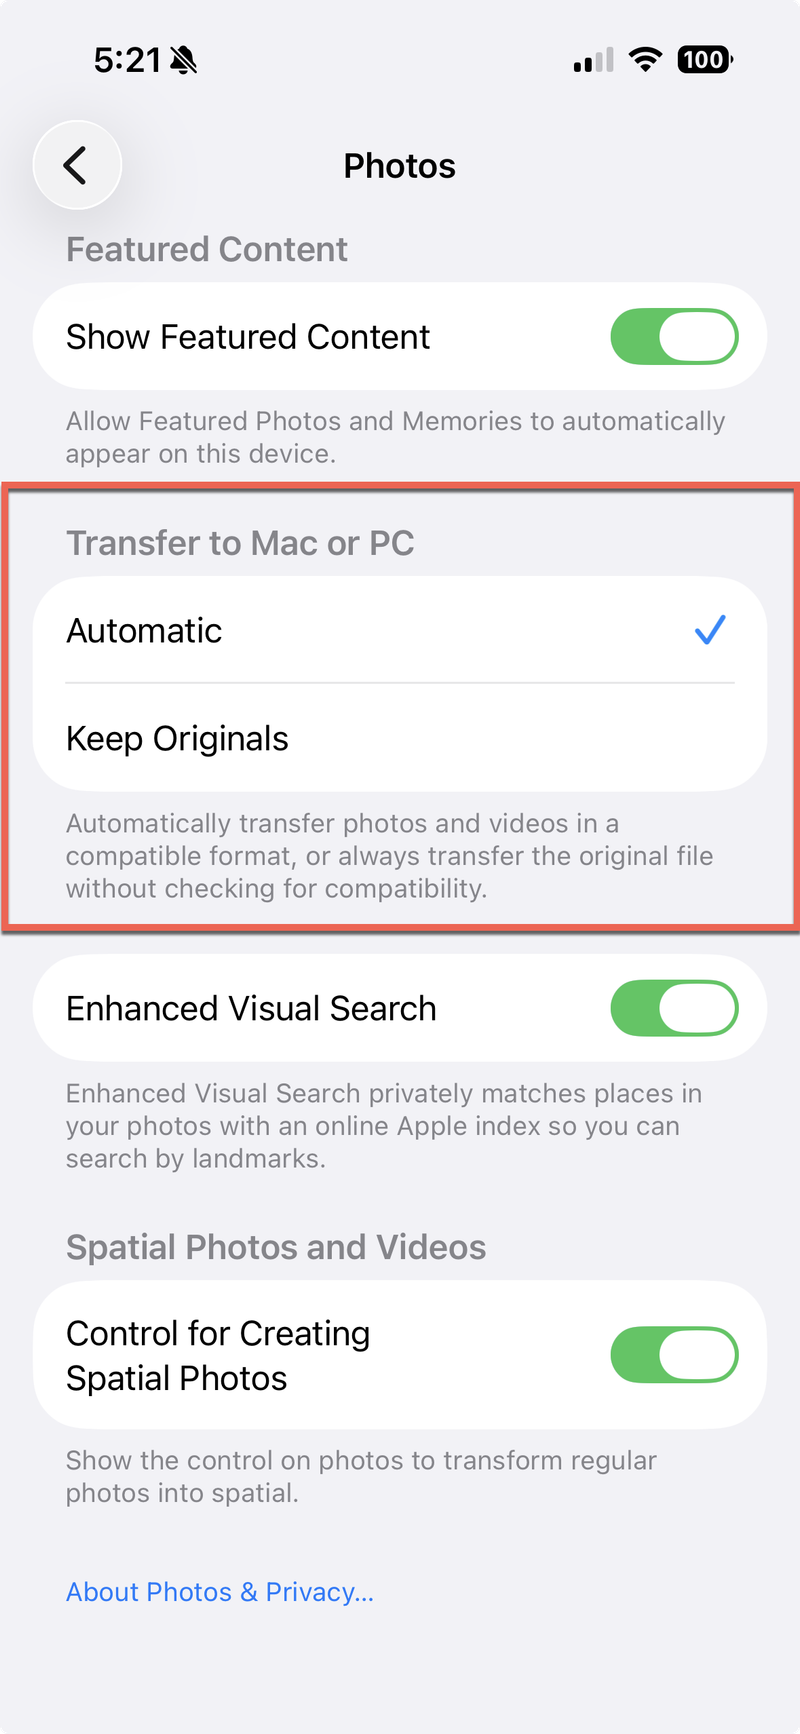
What HEIC is, and why Apple uses it
HEIC is a photo saved in the High Efficiency Image File format — the HEIF container holding an image compressed with the HEVC (H.265) video codec.
Apple made it the default on iPhones in 2017 because HEIC files are roughly half the size of a JPEG at the same quality, hold 10-bit color and Live Photos, and keep more editing latitude. (Live Photos are those weird little shot clips that are somewhere between a photo and a video clip. I’m not a fan myself, but I guess some people like them.)
The catch is that HEIC compatibility is nowhere near what JPG compatibility is. And you can run into that with older software, some websites and social media services, print labs, and older Windows or Android devices that don’t open HEIC. It’s a key reason that so many people run into trouble with “my photos won’t open.” (If that’s you, you are definitely not alone! And welcome!)
Should you turn HEIC off?
If your photos mostly stay inside the Apple ecosystem, HEIC is genuinely better — smaller files, more quality — and you can leave it on and rely on the Automatic transfer setting to hand out JPEGs when you copy to a PC. So by all means leave it on High Efficiency (aka the HEIC setting).
If you regularly send photos to people on older devices, upload to sites or services that choke on HEIC, or want files that open anywhere without thinking about it, Most Compatible (aka the JPEG setting) will reduce any potential hassle. You will pay extra in terms of storage space; JPEGs take roughly twice the space. Live Photos still work on Most Compatible — you just get a JPEG still paired with an H.264 movie instead of HEIC and HEVC.


Converting the HEIC photos you already have
Switching the setting doesn’t touch existing photos. To convert them: on a Mac, select the files in Preview and export as JPEG, or use the Automator quick action or drop-folder approaches I’ve written up.
On Mac or Windows, XnConvert (free) converts HEIC to JPG in batches. Or just AirDrop/share from Photos — the share sheet can send JPEGs.
Common questions
Will Most Compatible reduce photo quality?
Slightly, in theory — JPEG is 8-bit and uses older compression — but at the iPhone’s quality settings you won’t see it in normal use. Or, for that matter, most uses. The visible difference is manifested mostly in file size, not image quality.
Does it change my existing photos?
No. It only affects photos taken after you change it.
Does it affect video?
Yes: Most Compatible also switches video from HEVC (H.265) to H.264, and disables some high-frame-rate/4K60 options that require HEVC on some models.
If you shoot a lot of 4K video, consider leaving High Efficiency on and converting photos as needed instead.
Can I convert HEIC to JPEG without changing the setting?
Yes. Go to Settings → Apps → Photos → Transfer to Mac or PC → Automatic (on iOS 17 and earlier it’s Settings → Photos). That converts on transfer, and any of the tools above convert existing files.


