Quick Summary
- To export a PNG from Lightroom Classic go to
File → ExportThen in File Settings, set Image Format to PNG, Color Space to sRGB, and Bit Depth to 8 bits (16 only if you’re handing the file to another editor).
PNG is lossless, so files are large; for photographs, a high-quality JPEG (or AVIF) is smaller and looks identical. So I recommend only using PNG for uses that play to its strengths: graphics and screenshots, anything needing transparency (which Lightroom can’t produce anyway), or quirky platforms that recompress JPEGs harder than PNGs (we’re looking at you, Facebook!).
| Setting | Use | Why |
|---|---|---|
| Image Format | PNG | Lossless |
| Color Space | sRGB | The only safe choice for sharing and the web |
| Bit Depth | 8 bits/component | 16-bit doubles the size and nothing on the web uses it |
| Image Sizing | Resize to your destination | PNGs of full-resolution photos run tens of MB |
Early versions of Lightroom didn’t include the ability to export files as PNG. And there was good reasoning behind it: as an image file format, PNG is better suited to graphics and generally not well suited to photos. And, well, Lightroom is all about photos.
But Adobe’s developers relented and added support for exporting PNG files directly from Lightroom.1
As a rule of thumb, PNG is better for graphics. That’s why graphics and illustration apps for web graphics, such as Canva, default to PNG output. For photos, you’re generally better off using JPG.
But there are exceptions. They generally have to do with quirks of where you’re sending the file rather than with the image formats itself. Facebook, for example, has quirks that mean that PNGs are often displayed better on their and get less compressed than JPGs that you upload.
How to export PNG files from Lightroom
Now that support for PNG exports is baked directly into Lightroom, there’s no need to use plugins or fancy workarounds for it. You can just use Lightroom’s regular Export process.
As you would with any other image, go to export it: File > Export
In the File Settings panel, choose PNG from the Image Format drop-down.
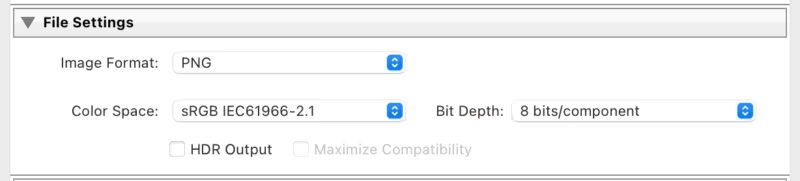
For Color Space, use sRGB.
That’s by far the best colorspace to use for images that’s you’re going to be sharing on the web, and I can’t think of any situation where you’d want to use any of the other options for this particular purpose (if you want the fuller picture on color spaces, I have a guide to that).
If you apply further image optimization, as I recommend below, it will actually strip out the colorspace and leave the browser to assume it’s sRGB, which is also a safe option.
Which bit depth for PNG files?
For the Bit Depth option, you can choose either 8-bit or 16-bit.
For photos or most other uses: use 16-bit.
Only use 8-bit for simple graphics, logos, and illustrations.
Basically, the bit depth refers to how much color information will be used in the file. The lower the bit depth, the less color information will be available for the exported file. Which is why an 8-bit image works well enough for many basic graphics files but doesn’t work as well for the kinds of detail and rich tones of most photos.
One thing to be aware of, though, is that 16-bit files will be much larger in file size than a corresponding 8-bit version. And this brings up back to something I said at the outset: PNG is rarely the best image format to use for photographs.


Things worth knowing
Lightroom’s support for PNG is basic. You don’t get options for dealing with transparency (alpha channels), narrowing the color palette, or omitting colorspaces.
If you need those kinds of PNG features, you’ll be better off exporting the file from Lightroom as a JPG or a TIFF and then converting it to PNG in a software with more flexible PNG options.
If you’re using Lightroom, a natural option will be Photoshop. But there are many other good options. One good free and cross-platform option is XnConvert. If you’re having to do it a lot, there are numerous other tools, including some scripts you can add to automate the process.
Side-by-side comparisons
I’ve mentioned filesize here a few times, and that’s a crucial consideration. Another is image quality.
For a side-by-side comparison, I’ve exported several files from Lightroom. Just for fun, I’ve included a couple of other up-and-coming image file formats that are especially well suited to use on the web and seem destined to replace PNG.
These all originate from the same photo (shot with a Nikon Z8 in RAW). For the most part, these use the same settings (sRGB, same default sharpening). All use the same output dimensions. But, as you can see, the file sizes end up being wildly different
It also illustrates why PNG is rarely a good choice for photographs. That’s especially true with images like this one, which has a wide variety of colors, tones, and smooth gradations.
To compare the image quality, you can click on the links in the Image Format Type column to download the corresponding file.
| Image Format Type | Settings Used | File Size |
| JPEG | Quality: 80 | 493 KB |
| PNG 8-bit | 8-bit | 3.3 MB |
| PNG 16-bit | 16-bit | 3.3 MB |
| AVIF | Quality: 70 | 129 KB |
| JPEG-XL 8-bit | 8-bit / Quality: 70 | 181 KB |
| JPEG-XL 16-bit | 16-bit / Quality: 70 | 179 KB |
You can make the PNG files even smaller
The PNG files that come out of Lightroom aren’t necessarily as small as you can get them. And since you’re most likely using these PNG files on the web, size matters.
In general, I find that Lightroom-exported PNGs are actually pretty well optimized already. But it still might be possible to squeeze more savings out of them.
For that, you’ll need to feed the PNG files through an optimization tool. There are a number of ways you can do that, many of them free.
If you’re using Mac, I highly recommend the free ImageOptim app, which you can run on your own computer and works well with large batches of images. Once you set up the options, it’s just a drag-and-drop panel that’s about as simple as it gets.

One of the several things I like about ImageOptim is that you can use it in tandem with Lightroom, as an export action, to automatically optimize images you export from Lightroom. I have a guide on setting that up here.
If you’re just doing a few images here and there, several online services work well. One I like is ShortPixel, which has some of the best optimization algorithms around. You can find their free optimization tool here.
AVIF as an alternative file format to PNG
Newer versions of Lightroom Classic offer another file format that’s even better than PNG for these purposes: AVIF.
I won’t go into the ins and outs of AVIF here (but I have elsewhere), but the gist is that it’s a newer, highly efficient image file format that is especially well suited for photos and graphics shared on the web. (WebP also falls into that category, but Lightroom doesn’t support exporting directly to WebP.)
The catch, though, is that compatibility is so far nowhere near as broad. So you’ll need to confirm that wherever you plan to use the image supports AVIF (Facebook and Instagram, for example, don’t (yet)).
Lightroom’s AVIF export gives you a simple slider. In general, you probably want to aim for as low as you can get without impacting image quality perceptibly. Precisely where that point is will vary based on the image itself and your quality preferences. A good starting point to experiment with is probably around 70.
Common questions
Why is PNG grayed out or missing in my Export dialog?
PNG export arrived in Lightroom Classic 7.x; older versions don’t have it. Update Lightroom, or export a TIFF and convert.
Can Lightroom export a PNG with a transparent background?
No — Lightroom has no transparency; every PNG it writes is fully opaque. For transparency you need Photoshop or another editor.
8-bit or 16-bit PNG?
8-bit for anything you’ll share or publish. 16-bit only as an intermediate file for further editing, where the extra precision helps and size doesn’t matter.
Notes & References:
- Support for exporting PNG files from Lightroom was added in 2019. Support for importing was added long before that. [↩︎]