
It is very possible to use a GoPro HERO7 Black, HERO6 Black, or HERO5 Black as a webcam or for real-time capture to a computer.
But it’s not quite as simple as just plugging your camera in via USB, which is something you can do with the HERO8 and newer cameras.
Compatibility Warning: This method works ONLY with the Black editions (HERO7 Black, HERO6 Black, and HERO5 Black).
It will not work with the HERO7 Silver/White, or the HERO5 Session. Those models lack the physical HDMI-out port required to send a live video signal.
There are different ways of doing it. If you’re looking for a mobile version for on-the-go live streaming or vlogging, the built-in live streaming option that flows through the GoPro mobile app will be a better fit. However, that wireless method introduces significant lag that makes real-time conversation impossible, and it isn’t directly compatible with most video conferencing tools. If you want to use your GoPro as a high-quality, lag-free webcam for Zoom, Teams, or OBS, you need a wired connection. And with these cameras, that means HDMI.
So, to be clear: what I’m focusing on here is connecting your camera to a computer via HDMI. Newer cameras (HERO8 through HERO13) have a “Webcam Mode” that works over a simple USB-C cable. The HERO7, 6, and 5 predate that technology, so the HDMI port is your only high-quality option.
The hardware checklist
Before you can start using your HERO7, 6, or 5 Black as a webcam, there’s some extra hardware that you’ll need to make it work:
- HDMI-to-USB Video Capture Card
- Micro-HDMI to HDMI Cable (Note: Micro, not Mini or USB-C)
1. HDMI-to-USB video capture
Your computer cannot simply “read” an HDMI input like a webcam. It needs a device to convert that HDMI signal into a USB webcam signal. That’s where an HDMI-to-USB video capture device comes in.

Have Camera Will Travel Newsletter
Practical field notes, hands-on gear tests, and the fun of exploring the world with a camera in hand.

The gold standard: Elgato Cam Link 4K
If you want the best possible quality with zero lag, the Elgato Cam Link 4K is the industry benchmark. It essentially looks like a large USB thumb drive. You plug your HDMI cable into the back, and plug the stick into your computer. It requires no drivers and works instantly on Mac and PC.
The budget option: Generic capture sticks
If you don’t need 4K broadcast quality, you can save significant money by buying a generic “HDMI Video Capture” stick.
These have flooded the market in recent years (especially since Covid when everyone started working from home) and can often be found for $15–$30. While the color and detail aren’t quite as rich as the Elgato, and they might have more lag that would be noticeable in gaming, they work surprisingly well for Zoom calls and general webcam use, where all of those attributes are less critical. You can find many options on Amazon.
2. The micro-HDMI cable
The capture devices don’t usually come with an HDMI cable, so you’ll probably need to pick one up separately.
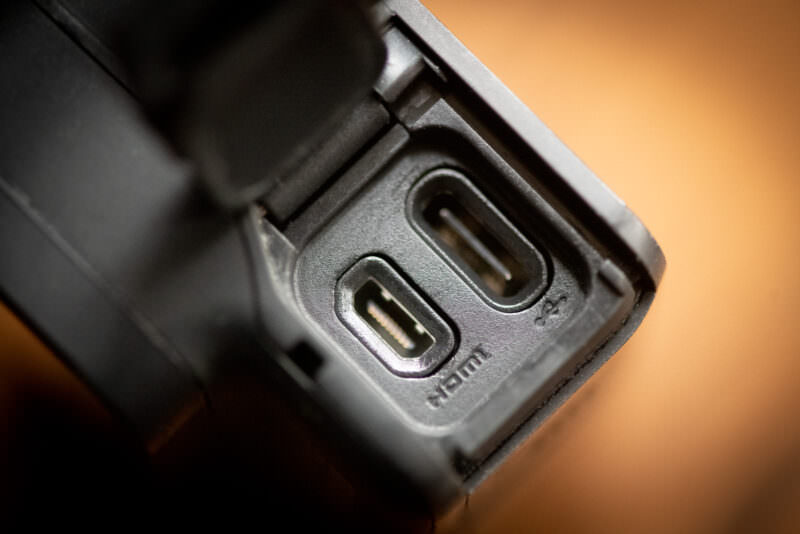
The port on the HERO7, 6, and 5 Black is a Micro-HDMI (Type D) connector. It is the smaller port right next to the USB-C port.
Step-by-step setup guide
Once you’ve got the hardware, the setup is straightforward. However, there is one crucial setting you must change to avoid showing battery icons on your video feed.
1. Set the “Clean” HDMI Output
Before connecting your camera, turn it on and go to Preferences.
- HERO7 & HERO6 Black: Go to
Preferences > Input/Output > HDMI Output > Live - HERO5 Black: Go to
Preferences > HDMI Output > Live
Why is this important? If you leave this on “Monitor” or “Media,” your audience will see your battery life, SD card space, and recording timer overlaid on your face. Switching to “Live” creates a clean video feed.
2. Connect everything
Plug the Micro-HDMI cable into your camera (the left/bottom port in the photo below), plug the other end into the Capture Card, and plug the Capture Card into your computer’s USB port.
3. Select your video source
Open your software (Zoom, Teams, Skype, OBS).
Go to Video Settings. You will not see “GoPro” listed. Instead, look for the name of your capture device (e.g., “Cam Link 4K” or “USB Video”). Select that, and you should see your GoPro’s view.
Crucial tips for best results
External Power is Mandatory. Streaming video drains the battery incredibly fast. For meetings longer than 45 minutes, I highly recommend removing the internal battery and running the camera via USB power. You can use the USB-C port to power the camera while using the HDMI port to stream video. For more details on safe power sources, check out my Guide to GoPro Charging Cables.
Fix the “Fisheye” Look. The standard “Wide” lens on these cameras is great for action, but it makes office walls look curved and distorted. Go into your camera’s video settings (before connecting HDMI) and change the FOV (Field of View) to Linear. This removes the distortion and looks much more professional.
Use a Separate Mic. While HDMI carries audio, the built-in microphones on these older models can sound distant when processed through a capture card. For a professional setup, use a separate USB microphone (like a Blue Yeti) or your headset mic as your Audio Source in Zoom, while keeping the GoPro as your Video Source.


