
Most cameras can only do what’s known as a quick format of the memory card, which leaves the actual data in place. That’s good if you’ve accidentally deleted photos and videos and want to recover them. But it’s not so good if you want to make sure the data is gone forever and can’t fall into someone else’s hands. For that, you’ll want a secure wipe.
So how can you do that?
There are some cameras that can do this, but they’re not especially common. You generally want to look in the menu system for something like “full format.” That will securely overwrite the card, and it has the added benefit of being a very useful first step in addressing any glitches you might be experiencing with the card.
Some cameras can do a full format (or low-level format), but most don’t.1
If your camera doesn’t have a full format option, you’ll need to do this on a computer. And for this post, I’m focusing on Mac.
The good news is that there are very reliable free tools for this on Mac, so there’s no need to buy any software for it. And it’s those free tools that I’m mostly focusing on here.
And even better for this, many Macs come with a built-in SD card slot. If you have one of those, you’re all set to go. If you don’t, you’ll need an SD card reader (you don’t need a fancy one, but make sure it has the right USB plug for your Mac).
Pros & cons of secure wiping an SD card
Pros
- Securely wipes data
- Can help revive a memory card that is glitching due to corrupted sectors
Cons
- Slower
- Adds more wear and tear on the card
- More cumbersome because it typically requires a computer
Why would you want to do this?
The most obvious reason a photographer might want to securely wipe the data on an SD card is if there is confidential or sensitive data on the card.
There are many scenarios this might come up, but let’s say, for argument’s sake, that you’ve done a sensitive NDA shoot for a client. It could be as simple as a pre-release product or in a secure facility. You might not want to risk that memory card getting into the studio rotation or going to someone else. Or you might be a photojournalist or blogger working in a place that is allergic to transparency. Or maybe it’s just a case of plain old privacy.
Another good reason for doing this has less to do with the security aspect and more to do with its thoroughness.
Most cameras only do what’s known as a quick format or high-level format. (There are some cameras that also give you the option of a full format, but that’s a minority of them. ) What that does is basically delete the table of contents that says where the data is, but it doesn’t actually wipe the underlying data.
But a full format doesn’t just wipe the underlying data, it also checks the memory card for errors and can correct some basic issues. So if your memory card seems to be glitching, a full format is a great first troubleshooting step.
Options on Mac for secure wiping of memory cards
The most powerful Mac app for doing a full format on an SD card — or any compatible storage type, for that matter–is the built-in Disk Utility that is part of macOS.
I’ll get to that in a moment, but I’m going to start with another option that is simple, free, and ideally suited to SD cards.
SD Card Formatter
If you’re using an SD card, my top recommendation would be to use the free SD Card Formatter app from the SD Association (that’s the organization that develops, maintains, and enforces the development of SD card standards). You can download it here.
One of the great things about this app is just how simple it is to use. It filters out most external hard drives, making it much harder to format the wrong drive accidentally compared to Disk Utility. However, be aware it will still see other USB thumb drives, so unplug those first. And it’s specifically designed to set the card up exactly according to the specs, so you can be confident that you won’t be using the wrong settings that could create problems in your camera.
By default, the SD Card Formatter is set up to do a quick format. And that’s the process I’ve written about before. But what I’m focusing on here is the option under that: Overwrite format. Both will delete your data, free up space, and set your SD card up for use in your camera.
The difference between them is how securely and thoroughly they go about it.
Using the Overwrite format will, well, overwrite the actual data rather than just deleting the table of contents pointing to it. You might come across this described as initializing. That will make the data, for all practical purposes, unrecoverable as well as reveal and correct basic SD card corruption issues.
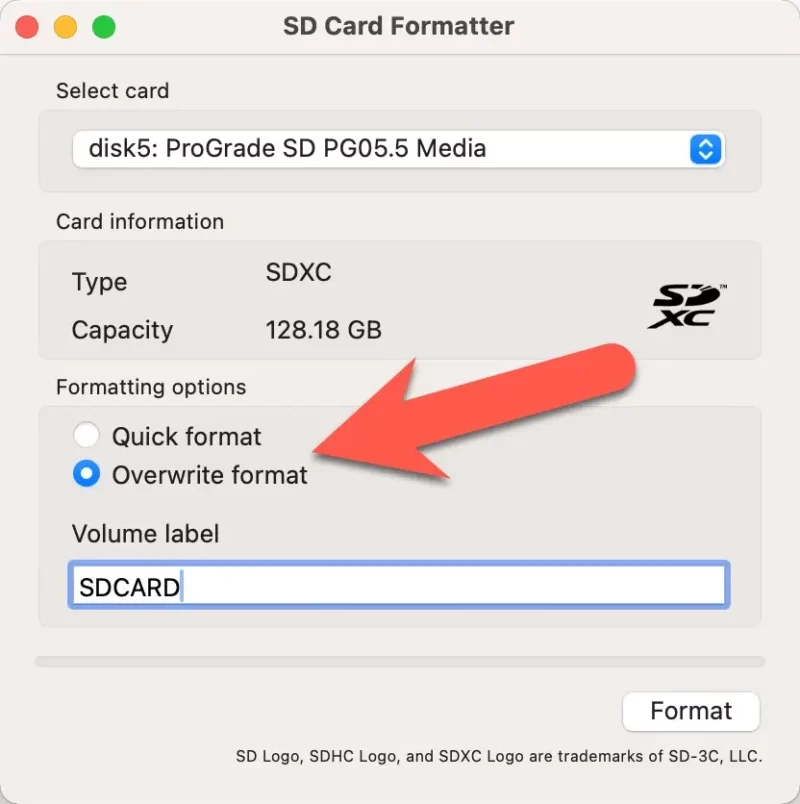
That process, being more thorough, does take longer. How long will depend on a few things, including the power of your computer, the speed of your memory card reader and cable, and the speed of the SD card itself. But count on it taking significantly longer than the default quick format.


Securely wiping a memory card with macOS Disk Utility
This option is best if you want maximum flexibility or do not want to download another app. But a plus is that this works for all types of storage media, including other types of memory cards used by cameras as well as thumb drives and external hard drives (and internal hard drives, too, if you want to live dangerously!).
MacOS also has a powerful app called Disk Utility that comes included as part of the operating system. You can find it under:
/Applications/Utilities/Disk Utility.appDisk Utility includes more options and settings. The catch, of course, is that with that extra power comes an increased possibility of using an incorrect configuration.
You can, for example, use a file system that doesn’t conform to the SD card specs (eg. exFAT on a 32GB card). And that, in turn, does create some risk of it causing issues in the camera. So you’ll be wanting to exercise extra care if you go down this route. Formatting a 64GB+ card as MS-DOS (FAT) won’t break the card, but it will impose a 4GB file size limit, which will split your long video files into chunks — a headache you don’t want in post-production.
Select the SD card to format
Disk Utility works on all the storage in your Mac or physically attached to it. So you’ll need to make sure you’re working on the correct volume. The SD card will be under the External section of the left panel, but you might see the name of your memory card reader rather than something that matches the SD card itself.

Once it’s selected, choose the Erase button at the top.

Give it a name, something simple, short, and identifiable.
Choose the filesystem: exFAT or MS-DOS (FAT)
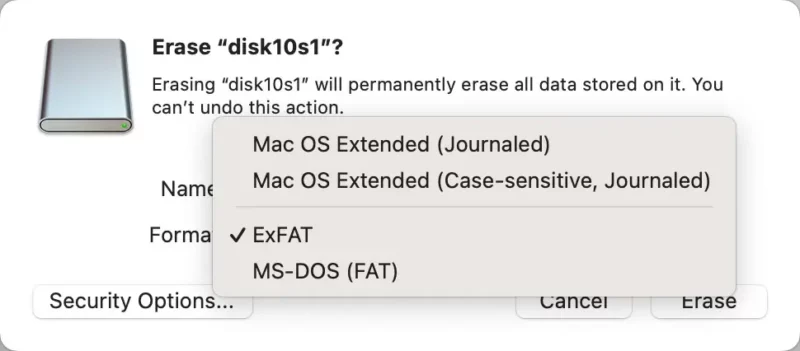
Then, from the Format drop-down, you’ll have several options. This is where you’re choosing the filesystem, and it’s one of the more important parts of this process if you plan to use the card in a camera.
Ignore the two Mac OS Extended options here–those are for different situations. For an SD or microSD card, you want either exFAT or MS-DOS (FAT) (which is otherwise known as FAT32).2 You can know which to use by looking at the storage capacity of your SD card.
If your SD or microSD card is 32GB or lower, use MS-DOS (FAT).
If it is 64GB or higher, use exFAT.
Choose the type of wipe
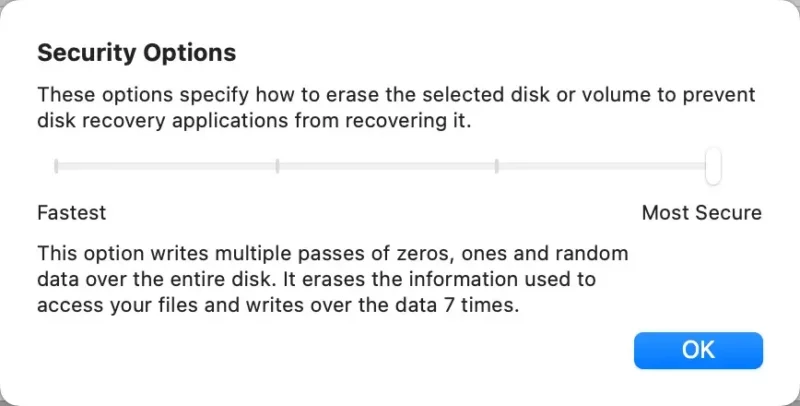
The next thing to change is the Security Options. By default, it’s set to Fastest, which is the same as a quick format that doesn’t delete underlying data.
Change it to at least the next one to the right; it does a pass of random data and then a single pass of zeroes over the entire disk.
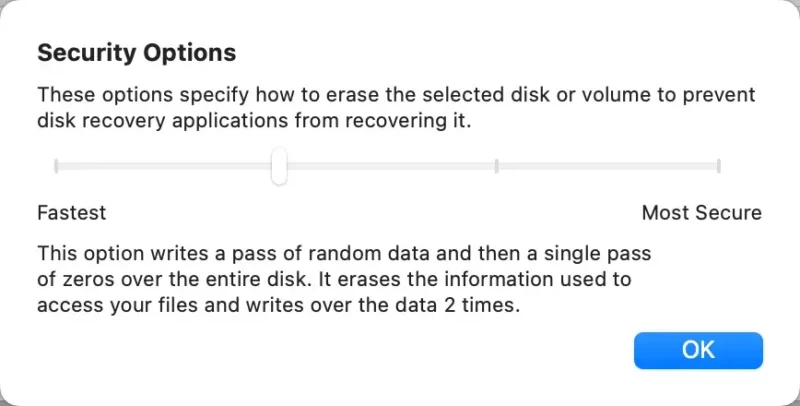
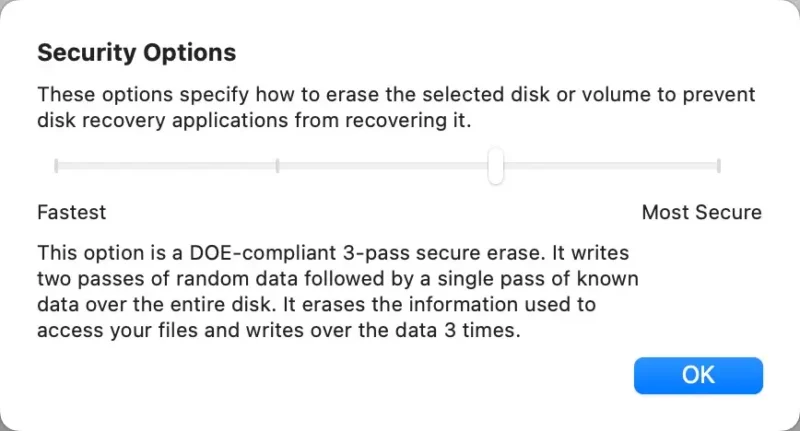
That’s pretty secure, but you can ramp it up to more passes of data if you want to be extra, extra, extra sure. Bear in mind that the more passes you do, the longer it will take.
Each option will give you an explanation of how many passes and what kind of data writes it performs.
(Recommended) final step: Format the memory card again in your camera
This is, in some respects, an optional step, but I like to do it purely as a precaution.
The SD card should be ready to go right away, but the reason I like to also do a quick format in the camera is that it sets the card up exactly how the camera wants it. That includes creating the folder structure and adding the files it expects and wants, and, in the case of Sony cameras, setting up the image database system.
Other alternatives for targeted secure wipe
The methods I’ve outlined above format the entire SD card. But it’s also possible to target individual files or parts of the storage memory more specifically. This is done with other software, and they tend to be paid apps.
- An example that’s a popular choice that many Mac users already use is something like CleanMyMac. Amongst its many tools is a Shredder tool. Just specify the file or files you want wiped, choose the “Remove Securely” option, and then press the Shred Button. It’ll then overwrite that specific data but leave the rest in place. CleanMyMac is a paid app. You can either license it individually or get it through the Setapp bundle subscription (which is what I do).
- Stellar File Eraser (from the same Stellar that produces one of my top recommendations for recovering deleted files from SD cards) gives you some more options, including whether to wipe files and folders, unused space, and traces.
There are also other dedicated apps that can do this, but those are the two that I’ve used most regularly and can recommend.
How secure is a secure wipe of a memory card?
A secure wipe will make the data unrecoverable for practical purposes. And that word “practical” is important, because forensic data security is a complicated business, and flash memory is particularly problematic when you get down into the nitty-gritty.3
And just as importantly, security is a sliding scale that’s relative. There’s a reason that one of the most reliable encryption mechanisms widely used is known as Pretty Good Privacy rather than something more absolute like Perfect Privacy. My benchmark here is whether it is reasonably beyond the means of an average user to recover using off-the-shelf data recovery options.
Whether the NSA could do it is an entirely different kettle of fish, and if you think you might have an intelligence service breathing down your neck and targeting your data, I doubt you’re spending time reading this.
If you’re looking for absolutely-never-not-possible-to-recover security for your SD card, you’re probably going to want a hammer or bonfire rather than a software wipe. (Although, even that might not always be enough, as it happens.) If your data is classified as national security or some other extraordinarily sensitive information that involves mandated security protocols, then that’s beyond the scope of what I’m talking about here, and for that, you’ll really need to consult a specialist digital security professional.
What I’m talking about here are the kinds of scenarios photographers might routinely come up against in their work. Things like shoots for clients that require NDAs and you don’t want to risk the memory card doing the rounds on your studio’s gear, or photojournalists or bloggers working in situations that are not welcoming to photos being taken of it. That kind of thing.
Given that SD cards aren’t expensive, if your situation requires anything more than that, it might be more practical to render the card completely unusable with good old analog brute force and simply buy a replacement.
Notes & References:
- Sony cameras, for example, often bury a ‘Full Format’ option deep in the settings menu, while Canon cameras often have a checkbox for ‘Low Level Format’ right on the format screen. [↩︎]
- As a technical matter, MS-DOS (FAT) can be either FAT16 or FAT32, depending on the storage capacity of your SD card. But FAT16 is for the original SD cards, which maxed out at 2GB. I’m going to assume that you’re not using one of those because they’re not practical in today’s cameras. [↩︎]
- The Electronic Frontier Foundation provides this useful explanation of why flash memory is so difficult to wipe, which I think is worth quoting at length: “As we mentioned above, SSDs and USB flash drives use a technique called wear leveling. At a high level, wear leveling works as follows. The space on every disk is divided into blocks, kind of like the pages in a book. When a file is written to disk, it’s assigned to a certain block or set of blocks (pages). If you wanted to overwrite the file, then all you would have to do is tell the disk to overwrite those blocks. But in SSDs and USB drives, erasing and rewriting the same block can wear it out. Each block can only be erased and rewritten a limited number of times before that block just won’t work anymore (the same way if you keep writing and erasing with a pencil and paper, eventually the paper might rip and be useless). To counteract this, SSDs and USB drives will try to make sure that the number of times each block has been erased and rewritten is about the same, so that the drive will last as long as possible (thus the term wear leveling). As a side effect, sometimes, instead of erasing and writing the block a file was originally stored on, the drive will instead leave that block alone, mark it as invalid, and just write the modified file to a different block. This is kind of like leaving the page in the book unchanged, writing the modified file on a different page, and then just updating the book’s table of contents to point to the new page. All of this occurs at a very low level in the electronics of the disk, so the operating system doesn’t even realize it’s happened. This means, however, that even if you try to overwrite a file, there’s no guarantee the drive will actually overwrite it, and that’s why secure deletion with SSDs is so much harder.” [↩︎]


