Thumbnails come in handy in all sorts of places in Wordpress. The most obvious is on the homepage with a list of blog posts. You can also use them in the content of a post. And depending on your theme, they can also be used on category listings, tag listings, search resplults, or even widgets. Wordpress gives you some basic options baked into the admin dashboard, but you can also specify extra thumbnail image sizes. Here’s a guide to doing that.
When you’re setting the thumbnail sizes you have a choice of how you want your thumbnails cropped. Perhaps you want to fit into a specific part of your page. Perhaps you want squares or very wide but narrow thumbnails. Or maybe you want to make sure that the entire image always shows up. So here’s a guide to the different crop modes for thumbnails available in Wordpress.
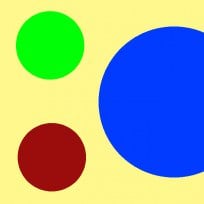
For this example I’m going to use this simple graphic so that you can easily see which portions of the image are being cropped with the various crop modes. Because landscape (horizontal) and portrait (vertical) images are not always handled the same way with the same function, I’ve included both here. These are the original files uploaded. Both were uploaded as 1024px by 600px jpg images.


Soft Crop
The Soft Crop in Wordpress is the same as what’s commonly known as a Fit crop and is what we’d normally think of as a pure resize. It’s proportional, so the entire area of the image is retained. The entire image will be fit in a box of the dimensions you specify without cutting any of the image. So if the shape of the image is not exactly the same as the shape of the box, you’ll end up with blank space.
There are two ways you can specify hard crop. One of them is in the Wordpress dashboard under Settings > Media. When you set the thumbnail size on that page you have a checkbox for “Crop thumbnail to exact dimensions (normally thumbnails are proportional)”. Keeping that unchecked is setting a soft crop.
If you’ve added extra image sizes through your functions.php file with the add_image_size function, you specify the soft crop with the FALSE attribute, like this:
add_image_size( 'wordpress-thumbnail', 200, 200, FALSE );
With that, you end up with this for the landscape image:

and this for the portrait image:

In this example (and the ones below), you’d change the name, width, and height to whatever you want. If you’re after more information how to use add_image_size in functions.php, check out my post on How to Resize Wordpress Thumbnails.
Hard Crop
The hard crop will fill a box of whatever dimensions you specify and cut out any other parts of the image that don’t fit in that box. If you want to create square thumbnails from rectangular images, make the width and height the same. You can see different types of square and rectangular hard crops available on my homepage. It has the virtue of making sure all the thumbnails are the same shape, which I prefer for its tidiness.
There are two ways you can specify hard crop. One of them is in the Wordpress dashboard under Settings > Media. When you set the thumbnail size on that page you have a checkbox for “Crop thumbnail to exact dimensions (normally thumbnails are proportional)”. Checking that is setting a hard crop.
If you’re specifying it in functions.php, it looks something like this:
add_image_size( 'wordpress-thumbnail', 200, 200, TRUE );
With that, you up with this for the landscape image:

And this for the portrait image:

Using Array Crops
The hard crop and soft crop are the most common types of crop used for Wordpress thumbnails. By default, the hard crop focuses on the middle of the image and cuts equally from each side for an image in landscape (horizontal) image or equally from top and bottom for an image in portrait (vertical) orientation.
But what if you want to focus on a different part of the image? That’s where the array crop modes come in. With these, you specify the x-axis (left, center, right) and y-axis (top, center, bottom). These are different flavors of hard crops.
From those, it sounds like the image should be divided up into 9 pieces (eg. top left corner, bottom right corner, etc). But that’s not how it works in practice. Because of the way Wordpress handles cropping and tries to fill at least one dimension, not all of these x-axis and y-axis instructions are relevant to all images. That is, the relevant instructions for a landscape (horizontal) image are different than for a portrait (vertical) image. While it sounds like ‘top left’ should be just a corner, for example, it doesn’t work that way. In practice, instead of 9 pieces, the image is divided up into 3 pieces. Whether the x- or y-axis instructions are relevant depends on whether the image is in landscape or portrait orientation.
To illustrate, I’ve included what happens in both orientations below.
Array crops aren’t available through the regular Wordpress dashboard. To use them you specify them in your functions.php file using the add_image_size function. [Here’s more information on that.]
Top Left
This is how you’d focus the hard crop on the top left:
add_image_size( 'wordpress-thumbnail', 200, 200, array( 'left', 'top' ) );
This is what happens with an image in landscape (horizontal) orientation. As you can see, it’s the functional equivalent of just using the left side:

And this is what happens with an image in portrait (vertical) orientation. It just takes the top:

Top Center
This is how you’d focus the hard crop on the top center:
add_image_size( 'wordpress-thumbnail', 200, 200, array( 'center', 'top' ) );
This is what you get with a landscape image. It takes the middle of the image, which is the same as the default hard crop:

And this is what you get with a portrait image. It takes the top of the image:

Top Right
This is how you’d focus the hard crop on the top right:
add_image_size( 'wordpress-thumbnail', 200, 200, array( 'right', 'top' ) );
This is what you get with a landscape image. It takes the right side of the image:

And this with a portrait image. It takes the top of the image:

Center Left
This is how you’d focus the hard crop on the center left:
add_image_size( 'wordpress-thumbnail', 200, 200, array( 'left', 'center' ) );
This is what you get with a landscape image. It takes the left side:
And this with a portrait image. It focuses on the middle, making it the same as the default hard crop:

Center
This would focus on the absolute center. In reality, it’s redundant because it’s exactly the same as the default hard crop above.
add_image_size( 'wordpress-thumbnail', 200, 200, array( 'center', 'center' ) );
This is what you get with a landscape image:

And this with a portrait image:

Center Right
This is how you’d focus the hard crop on the center right:
add_image_size( 'wordpress-thumbnail', 200, 200, array( 'right', 'center' ) );
This is what you get with a landscape image. It takes the right side:

And this with a portrait image. It takes the center, which is the same as the default hard crop:

Bottom Left
This is how you’d focus the hard crop on the bottom left:
add_image_size( 'wordpress-thumbnail', 200, 200, array( 'left', 'bottom' ) );
This is what you get with a landscape image. It takes the left:

And this with a portrait image. It takes the bottom:

Bottom Center
This is how you’d focus the hard crop on the bottom center:
add_image_size( 'wordpress-thumbnail', 200, 200, array( 'center', 'bottom' ) );
This is what you get with a landscape image. It focuses on the center, which is the same as the default hard crop:

And this with a portrait image. It takes the bottom:

Bottom Right
This is how you’d focus the hard crop on the bottom right:
add_image_size( 'wordpress-thumbnail', 209, 209, array( 'right', 'bottom' ) );
This is what you get with a landscape image. It takes the right:

And this with a portrait image. It takes the bottom:

Adding to your Functions.php File
These commands go in your functions.php file, which will be in your theme’s directory. Below is some example code, but first some words of caution.
If you mess up your functions.php editing you can end up with a blank white screen that makes your site inaccessible. For that reason, I’m hesitant to recommend doing it if you’re not already comfortable with it.
So always, always save a backup copy that you can restore if need be. Simply replace the new, faulty version with the old, working version and the site should pop back up as normal. If you’re having trouble getting code snippets to work, here are some great tips to help you troubleshoot. First, check that you’re using straight quotes and not curly quotes–that’s a common problem.
It usually makes sense to add these snippets towards the end of the file in case the theme developer has some functions already added. But the very last characters in a functions.php file should be “?>”, so make sure the code snippet goes before them.
Another option if you’d prefer not to mess with editing the functions.php file directly is to use a plugin. Here’s an example of one that adds that functionality.
Sample:
//* Add new image sizes

add_image_size( 'after-post', 160, 160, TRUE );

add_image_size( 'home-bottom', 200, 200, TRUE );
Also, it’s worth bearing in mind that the functions.php file is part of your theme, so if you change themes these alterations you’ve made will no longer work unless you copy them into your new theme’s functions.php file.
Tips
If you try using multiple crops with the same dimensions you’re going to run into an issue. The filenames for the new thumbnails use the dimensions to differentiate themselves from other sizes of the same image. But they don’t use the crop type. So if you try to add a thumbnail size with a crop of 200×200 with, say, a hard crop and another thumbnail size with an array crop of bottom right also at 200×200, you’re only going to end up with one–whichever is last in the list. That’s because the filename for both will become something like this:
/files/2018/01/photo-200x200.jpg
As you can see, there’s nothing in the filename that specifies which crop mode. When you embed the thumbnail through the Media Library it will insert a bit of code that does specify the crop mode, but that information is basically courtesy information and doesn’t control which actual file is displayed on the page.
If you find that your cropped thumbnails keep cropping off people’s heads, take a look at the face detection plugin My Eyes Are Up Here.
More to Check Out
If you enjoyed this, these might also be of interest: