The culling process of deciding which images from a shoot to keep and which to delete can be tedious.
But selecting the keepers from hundreds or even thousands of photos from a shoot is an essential step at the start of your photo processing workflow.
The most obvious tool Lightroom provides to help is by rating them with Lightroom’s simple but effective flags tool.
For keepers, or those you want to highlight, you can use the Picks flag simply by pressing P. That will add the small white flag icon to the image thumbnail.
But there’s also a corresponding Rejects flag, which possibly isn’t as well known. With it, you can reject an image (or images) simply by pressing X.
The thumbnail will then be grayed out in both the thumbnail grid and the thumbnail strip at the bottom. And instead of a white flag, you’ll get a black flag with a small white cross (it looks a little like a pirate flag at first glance).

How you use that depends entirely on your own workflow preferences.
Maybe you use it as a first pass to filter out files that are unusable, such as ones that out of focus or the subjects eyes are shut. So you might end up with keepers, maybes, and rejects. Or maybe instead of choosing picks you’re using the reject tool for everything that’s not a keeper.
But an important thing to know is that rejecting an image isn’t the same as deleting it.
Sure, the thumbnail does get grayed out to make them visually separate, but they remain visible in the catalog and on your hard drive. That’s a very handy safety precaution so that you can review and undo it if needed. And you can even continue working on them as normal, if you like.
Alternative methods of applying the reject flag
I tend to use the P, X, and U keys for applying flags. But there are alternative ways to do it as well:
- CMD+Up Arrow or CMD+Down Arrow to change the flag status (that’s on Mac; on Windows it’s CTRL+Up Arrow or CTRL+Down Arrow). This works especially well with the Auto Advance option so that it automatically moves to the next image after you flag the image. You can enable that by using caps lock or through the top menu (Photo > Auto Advance).
- SHIFT+X flags the image as a reject and then advances to the next image.
- Use the top menu to go to
Photo > Set Flag. - Use the rating toolbar just above the bottom filter toolbar.
How to delete rejected images
But what if you want to delete the rejected images?
Sure, you can select them individually and delete them. You can also use the filters to isolate just the rejects and delete those.
But there’s a quicker way, using the built-in delete rejected files function. There are two ways to do it:
- Use keyboard shortcut CMD+DELETE (Mac) or CTRL+BACKSPACE (Windows).
- Use the top menu item:
Photo > Delete Rejected Photos. It’s right at the bottom of the Photo menu.

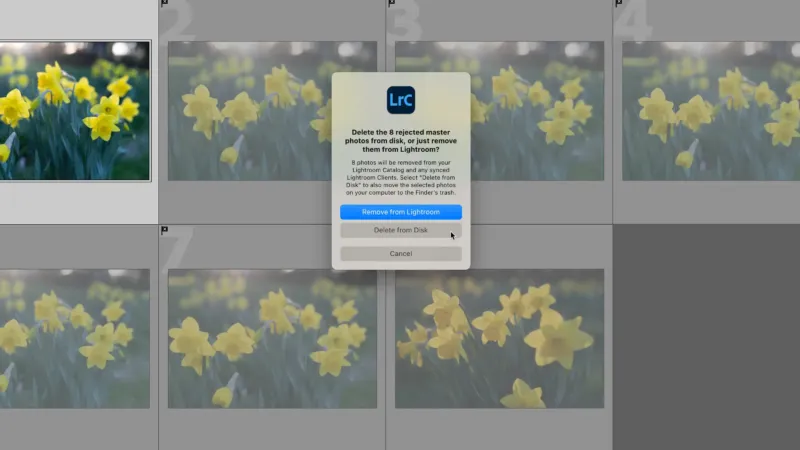
When you do that, it will automatically filter all of the reject-flagged images, and you’ll get a pop-up asking you want you want to do.

The popup is asking whether you want to remove the images or delete them from the disk.

That’s an important distinction and a useful safety precaution.
- Removing the images from Lightroom will remove them only from Lightroom’s catalog, but the original files will remain in the same place on your hard drive. So you could reimport them back into Lightroom later.
- Deleting them from your disk takes it a step further by removing them from Lightroom and deleting the original files. But it’s still not an absolute end-game because deleting the files will actually send them to your operating system’s trash (Mac) or recycling bin (Windows), from where you can recover them if need be.
How to filter rejected images
As I mentioned earlier, applying a reject flag to an image doesn’t by itself delete the image. And that opens up other workflow possibilities.
For instance, you might use the reject flag just as a regular filter without any intention of using it to delete files.


There are two ways you can filter by the reject flag. The quickest is to use the toolbar above the thumbnail filmstrip (if it’s not visible, press T). It’s the third of the three flags (it’s quite faint when inactive).

When you click on it, it will become brighter.
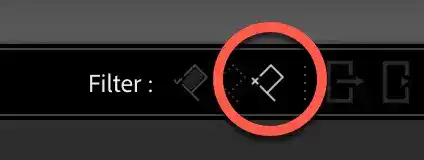
You can also find a corresponding filter through the Library filter bar under the Attribute tab.

Things worth knowing
To clear the flag, whether it’s a pick or a reject, you can press U. That creates what is essentially a third flagged state: Unflagged (along with Pick and Reject).
You can also filter by the flag, including rejects, by using the filter selector in the toolbar just above the filmstrip (press T to toggle the display of the toolbar if you don’t see it).
These flag tools now work globally. What I mean by that is that if you apply a flag to an image, it will stay with that image whether you’re looking at them in a folder or a collection or a publish service. The reason I mention this is that some of the much older versions of Lightroom were context-dependent, meaning that the flag was tied to how you were viewing the image.
Related keyboard shortcuts
| Action | Mac | Windows |
| Flag Image as Pick | P | P |
| Flag Image as Pick & Advance | SHIFT + P | SHIFT + P |
| Flag Image as Reject | X | X |
| Flag Image as Reject & Advance | SHIFT + X | SHIFT + X |
| Unflag Image | U | U |
| Delete Rejects | CMD + DELETE | CTRL + BACKSPACE |
| Auto Advance Mode | CAPS LOCK | CAPS LOCK |
| Increase / Decrease Flag State | CMD + Up Arrow / CMD + Down Arrow | CTRL + Up Arrow / CTRL + Down Arrow |


