
GoPros rely heavily on automatic exposure to get good results most of the time. In fact, you have to really try quite hard if you want to override the automatic exposure and use something close to manual exposure.1
There are different ways that cameras can look at a scene and calculate the automatic exposure settings.
The most common method — and usually a better choice for everyday, general shooting — is to base that decision on most or the entire scene. That usually gives pretty good results. But it doesn’t work every time — it really depends on the scene you’re shooting and what effect you’re trying to get.
But another option is known as spot metering. So if you’re wondering what the GoPro spot meter does, here’s a quick explanation.

Have Camera Will Travel Newsletter
Practical field notes, hands-on gear tests, and the fun of exploring the world with a camera in hand.

What is the spot meter on a GoPro?
The short version is that the spot meter on GoPro cameras uses a very small area of the frame to calculate the automatic exposure.
This is different from the default behavior where the whole frame is used to calculate the exposure.
The spot meter is useful when you have uneven lighting across the frame but want a specific area of the image or video to be exposed correctly or in a particular way.
GoPro’s spot meter explained: The original version
Now, the longer version. And I’m using here the original iteration of the Spot Meter, which used a fixed point in the center of the frame. The fundamental idea is the same, but on newer GoPros it’s implemented in a more flexible way with a spot that you can move via the touchscreen (more on that below).
The basics of the spot meter
The spot meter relates to the way in which the camera calculates the automatic exposure.
In the default setting, GoPros look at the entire scene that’s hitting the camera’s sensor and calculate the correct exposure by averaging that entire scene. (Some earlier models use center-weighted average instead, which is similar but puts more emphasis on the middle area of the frame.)
So it uses the whole frame, like this:

That gives good results in most shooting situations. It works well outdoors and indoors under fairly even lighting conditions most of the time.
But it doesn’t work in every situation. If you’re filming from a dark place looking out — inside a house or car, for example, looking through windows out at a brighter scene (brighter than inside the car) — you can end up with the view out the window being far too bright because it’s overexposed.
You can also get the reverse — underexposed — if you’re shooting from a brighter area out to a darker scene. It can also be useful in conditions like sun on snow because correctly exposing for the snow can cause people’s faces in shadow to become underexposed.
The example photos I’ve used here illustrate that to some extent — by exposing correctly for most of the frame, the person is underexposed. It happens to work here, but that’s not always what you want.
That’s where the spot meter comes in. Instead of calculating the exposure across the whole frame, it uses a small, defined spot in the center of the frame and ignores the rest of the frame. Like this:

So you might want to put a person’s face in the middle of the frame, or the scene out the window.
This is one of those settings that you really only want to turn on when you need it.
In most shooting situations the default method is going to work better (ie. spot meter off). You’ll get more reliable results that way.
The spot meter is really for when you need very precise control — such as when an interview subject’s face is in shadow, for example — and will give unexpected results in many shooting situations.
Spot metering on newer GoPros (Exposure Control)
Since the HERO5 Black, the Spot Meter has evolved into a more flexible and powerful feature called Exposure Control that takes advantage of the touchscreen on back that became standard around then (earlier models mostly didn’t have a built-in screen, which is why it only made sense to have a fixed spot meter in the center of the frame).
The general concept is still the same — it lets you designate a specific, small part of the frame to use for the automatic exposure. The difference is the way in which it’s implemented. Rather than being a fixed spot in the center of the frame, as it was with earlier models, it’s now possible for you to select from elsewhere on the frame. You can still use the center of the frame if you want to, but you’re not limited to just that.
To use it, just tap and hold anywhere in the frame when shooting. You’ll see some square brackets with a dot in the middle come up, along with the label “Spot Meter.” You can drag that anywhere on the screen, and then tap on the checkmark to select or the X to cancel.
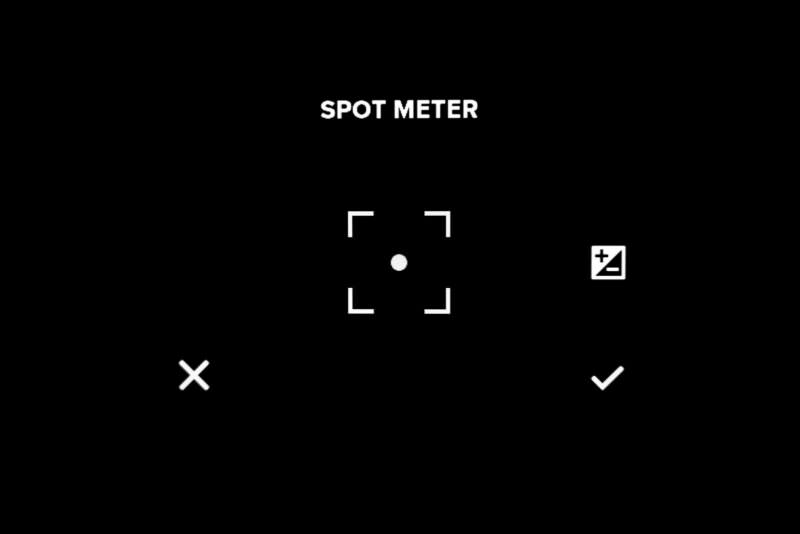
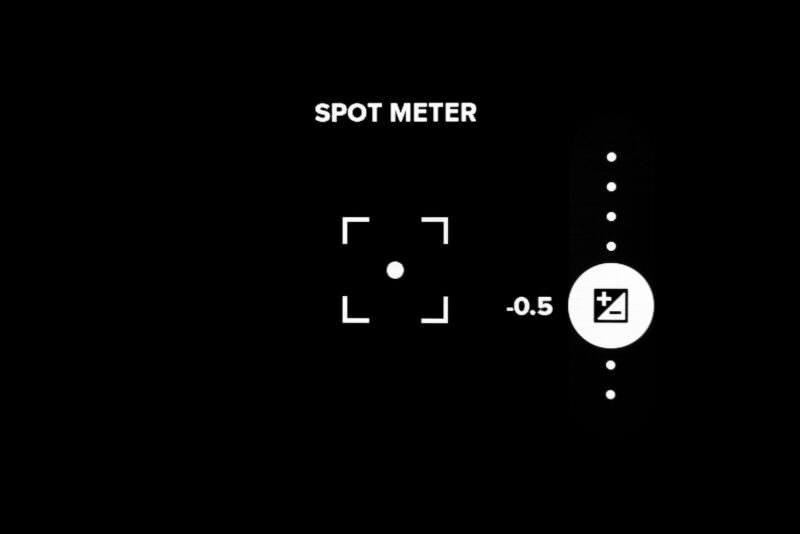
A useful addition is the exposure compensation tool directly on this screen. That’s the small exposure icon on the right. If you tap and hold that, you’ll get a vertical slider, where you can adjust the exposure compensation up or down up to 2 stops to make the scene brighter or darker.
One thing that catches people out on the recent models: if you tap and hold and nothing happens, or Exposure Control is greyed out in the menus, check the photo Output setting. SuperPhoto and HDR don’t work with Exposure Control, and SuperPhoto is the default output, so a camera straight out of the box can have the feature effectively switched off. Set Output to Standard or RAW and the brackets come back. It’s by design, not a fault.
GoPro models that do & don’t have the spot meter feature
Nearly every GoPro has some version of the spot meter. What changes is where it lives in the menus.
On models from the HERO5 Black on, it falls under the Exposure Control feature. That’s where GoPro’s manuals first describe letting you “select an area that you want the camera to prioritize when determining exposure”, and the HERO7 manual still calls the brackets themselves the Spot Meter.
On earlier models — the HERO4 Black and Silver, HERO3+, and HERO3 — it’s a standalone feature just known as Spot Meter, switched on or off in the camera’s settings.
Worth knowing on those older cameras: the setting is per capture mode. GoPro’s HERO4 manual spells it out — changing Spot Meter in Video mode applies only to video capture, and you have to set it again in the photo settings if you want it there too. And since most of those models have no screen to tap, the spot is always the center of the frame, so you aim the middle of the lens at whatever you want exposed correctly and recompose if you need to.
GoPros that do not have spot meter
There’s a small number of GoPros that don’t have a spot meter.
- HERO10 Black Bones. A stripped-down version designed for FPV drones, with no built-in screen to tap.
- HERO11 Black Mini. No touchscreen, so there’s nothing to tap and drag.
- HERO (2024) and the LIT HERO. Neither one’s manual documents a spot meter or an exposure-area setting.
Notes & References:
- You can’t change the aperture on GoPro cameras — that’s fixed. But you can force other parts of the exposure triangle — specifically, the shutter speed and ISO — to get a version of manual exposure. [↩︎]


Wow! Shoutout love! This is INCREDIBLY helpful, thank you guys!
Nice post. I was checking constantly this blog and I’m impressed! Extremely helpful information specially the last part ? I care for such info much. I was seeking this certain information for a long time. Thank you and good luck.
Informative post, this spot meter is importent and i will only buy the camera that support it, so thanks for providing this vital information.
I really like and appreciate your post.Thanks Again. Keep writing
Really it must be said to you first I am wondering because I am unable to understand what the GoPro spot meter does but reading and analyzing it makes me able to clearly understand about. really it is a good explanation.
Appreciable example. Thanks