
A quick workflow note: This guide covers the specific connection and software requirements for the Fujifilm X100V. If you are shooting with the newer X100VI, the process has changed significantly — specifically regarding native webcam support and cloud transfers. You can find the dedicated Fujifilm X100VI connection guide here.
There are two main options for connecting a Fujifilm X100V to a computer. The more flexible and faster option involves using a USB cable. But for some operations, you can also establish a wireless connection.
Here’s a rundown of the options.
USB cable for the Fujifilm X100V
Whether you’re looking to download images to your computer, charge the camera using a computer’s USB, or manage your X100V’s camera settings, there’s a good chance you’ll need a USB cable.
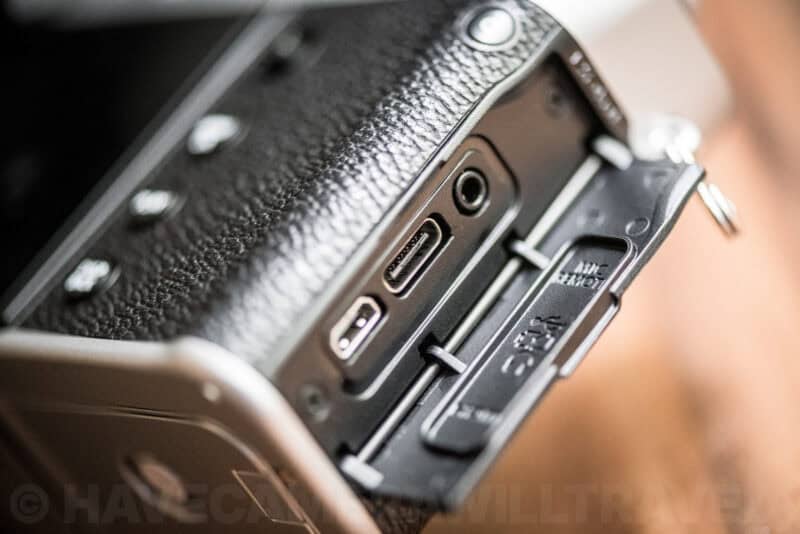
The X100V comes with one. If you need a spare or replacement, you’re looking for a cable that has a Type-C USB connector to go into the camera’s port.1
The connector on the other end of the cable will depend on your computer. The traditional standard is known as a Type-A connector. Newer computers are using USB-C, which is smaller.
One thing to watch with USB cables is that some are suitable for charging but not for data transfer. So you’ll need a cable that’s suitable for both charging and data transfer.
Downloading images from Fujifilm X100V to a computer
There are three main ways to download images from your X100V to your computer. Only one of them requires a separate USB-C cable. One uses a wireless connection.
Downloading Directly from the Camera. Using a USB-C cable, connect the camera directly to your computer’s USB port. This essentially treats the camera as a memory card reader (albeit a rather fancy one!).
The computer’s operating system should automatically detect the camera and treat the SD card as attached external storage (the camera needs to be powered on for this).
For handling the downloading, there’s a wide variety of apps and software that can take care of it. You can manually copy across using your operating system’s file management software (such as Finder on Mac or Explorer on Windows). You can use an image organization app like Lightroom. Or you can use Fujifilm’s own free app called Fujifilm X Acquire.
Using a Memory Card Reader. Another option is to use a separate SD memory card reader (sold separately) that’s connected to your computer. So you take the card out of the camera, put it in the card reader, and the computer treats it much like an external storage drive. You can then use your computer’s operating system or an image app like Lightroom of X Acquire to transfer the images to your hard drive.
An advantage of this method is that, with the right card reader, it can be faster. And some memory card readers will even allow you to download from multiple memory cards simultaneously.
Wireless. There is also a wireless option for downloading images from the X100V to a computer over wifi using the Fujifilm PC AutoSave app. It’s free and available for Windows and Mac. You can download it here.
Processing images with Fujifilm X RAW Studio
With Fujifilm X-series cameras, there are a couple of reasons that you might want to connect the camera to a computer that you might not necessarily run into with other cameras.
One has to do with a unique feature of Fujifilm’s X RAW Studio image processor.
With most RAW image processors, you download the images to your computer and process them using an app on the computer — such as Lightroom or an alternative — that uses the computer’s CPU processing power.
X RAW Studio does things a little differently. It uses the camera’s image processor for the heavy lifting.


That brings a few advantages. For one, it’s quick. The camera’s image processor is designed for only one thing — it’s not a bloated processor that has to be good for all sorts of processes. And it does that one thing well.
It also means that you take advantage of the camera’s own quality and film simulations. You’re not relying on a third party’s interpretation of those results that are designed to be as close as possible and translated into whatever app you’re using — they’re the originals.
And finally, and probably most practically, it’s an especially good option if you’re using an underpowered laptop on the road. With nearly all of the processing power being done on the camera, it frees up the computer’s processor.
You can find more information about X RAW Studio here. It’s available for Windows and Mac, and it’s free to download. Something worth noting, though, is that it will only work on images taken with the type of camera that’s attached to the computer. So you can’t process X-T5 images with an X100V attached, for example.
Saving camera settings with Fujifilm X Acquire
Fujifilm has another dedicated app for X-series cameras known as Fujifilm X Acquire. I’ve mentioned it above for downloading images to your computer. But it has another feature that lets you back up and restore camera settings from your computer via USB.
Connecting the Fujifilm X100V as a webcam
There is yet another reason you might want to connect your X100V to a computer: to use the camera as a webcam for Zoom/Skype calls or to live stream from the camera.
Fujifilm has released a dedicated app for this called Fujifilm X Webcam. It’s free, and there are versions for Windows and Mac.
Two things worth noting:
- This is streaming via USB. While more convenient and cheaper, it’s often a bit less effective than streaming via HDMI. One of the big issues is that there’s often a bit of lag.
- You’ll need to make sure that you’re using updated firmware. Compatibility with X Webcam was added to the X100V with firmware version 2.00 in early 2021. (Here’s a guide to updating the X100V’s firmware that I put together separately.)
Notes & References:
- At the time of writing, Fujifilm’s official compatibility page for the X100V lists the USB cable type as a USB2.0 (Micro B). That’s incorrect. The camera has a USB-C connector, and it comes with a USB-C cable. There’s another socket next to it that looks like a mini-USB connection, but that’s actually a mini-HDMI socket that’s used to output a video stream. [↩︎]


