
Quick Summary
- Methods to download photos and videos:
- Nikon D3400 USB Cable: Use the micro-USB cable that comes with the camera. Ensure the camera is powered on and the battery charged. Use software like Lightroom, Nikon Transfer 2, Finder (Mac), Explorer (Windows), or others to transfer files.
- Memory Card Reader: Remove the SD card from the camera and use a card reader connected to the computer. This method can be faster and allows for shooting while downloading.
- Wireless via Mobile App: Using the SnapBridge app, transfer photos to a mobile device, then to a computer. This method is slower and more tedious.
- After downloading, the SD card can be formatted in the camera to free up space.
The Nikon D3400 is what’s known as an entry-level DSLR. For users, it’s an especially good option for stepping up from a smartphone camera or compact camera. DSLRs give much more flexibility, are excellent platforms for becoming a better photographer, and have the potential for much better image quality. And, I’d argue, because of the extra worlds and possibilities they open up, they an be much more fun!
For camera manufacturers, that means it’s the simplest and cheapest in their range. They’re generally the simplest to use and have a trimmed-down set of features compared to their higher (and more expensive models).
In practical terms, that means that for many owners, it might be their first DSLR. It might be your first “real” camera stepping up from a smartphone or point-and-shoot. And because DSLRs work a little differently from smartphones or even many compact cameras, it might not be self-evident how to get the photos and videos from the camera to a computer, whether that’s a laptop or desktop, Mac, Windows, or Unix. That’s where this guide comes in.
There are a few ways to download your photos and videos from a Nikon D3400 to a computer. None of them is particularly complicated or difficult, although some methods require a separate accessory memory card reader. But there are also good ways to do it without buying another accessory.
So, here’s a rundown of various options for downloading your photos and videos from a Nikon D3400 to a computer, including using wired connections and wireless.
And just so everyone’s on the same page, it’s worth saying that with a DSLR like the D3400, the images are stored on the SD card in the camera. That’s different from a smartphone, for instance, where photos and videos are typically stored in the device’s own internal memory.1
So, we’re really talking about downloading the photo and video data from a memory card to your computer with all these methods. And in the D3400’s case, it takes SD cards; if you’re wondering what the best kind of memory card for this camera is, I have much more detail on which SD cards to get for the D3400, here.
There are two other approaches to getting images and video streams from your D3400 to a computer. One is to use the D3400 as a live-streaming video webcam; I have a detailed guide on that here. The other is similar but is known as tethering. That lets you connect a camera to your computer, either with a USB cable or with the SnapBridge mobile app, to control some of the camera’s features from the computer (and download the images/video in near real-time). But those are both more specialized operations that work a bit differently from what I’m describing here.
Method 1: Connect your Nikon D3400 to a computer with a USB cable
This is the simplest method for downloading photos and videos from your D3400 to your computer. And it doesn’t require buying another accessory. It just uses the micro-USB cable that comes with the camera.
If you’ve misplaced that original cable and need a new one, replacements are easy to find and not expensive. But there is a bit of a catch: not all micro-USB cables will work with the data transfer that the D3400 needs.

Try any others you have lying around to see if the camera mounts to your computer. If it doesn’t, you can pick up replacement transfer cables like this aftermarket version or this one. If you’d prefer to get the Nikon original, the model number you’re after is UC-E20, and you can find them at camera specialists like B&H Photo.
Many cameras can charge the battery directly when you plug in the USB cable, but the Nikon D3400 isn’t one of them. On this camera, the USB is used only for data transfer, not charging. Which suits our purposes here just fine, even if it’s a bit of a nuisance for charging.
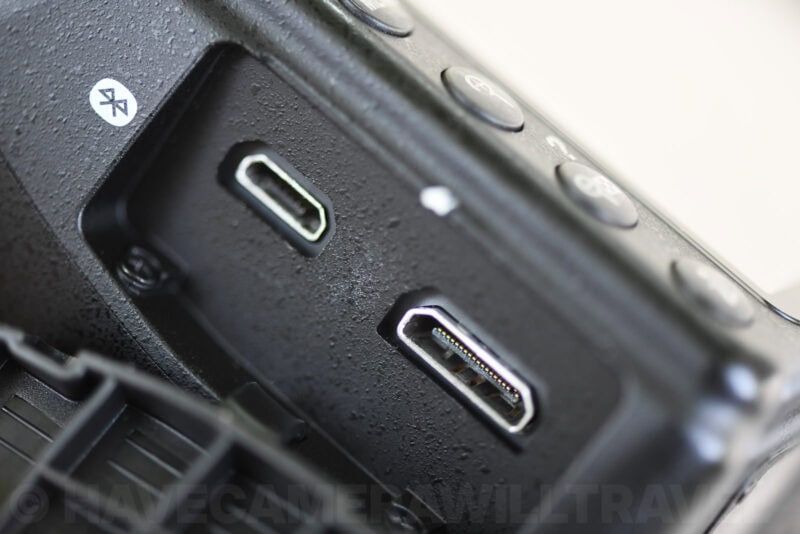
So, you plug the larger end of the USB cable into your computer’s USB port and the other end into your camera’s micro-USB port.
One thing to watch is that you have it in the correct port. The micro-HDMI port is a similar size and shape, but the cable won’t fit snugly in that (don’t try to force it). Another thing to watch: make sure that the camera is powered on and the battery charged. If the camera is powered off, the computer won’t be able to see the card.
Image editing computer software apps
The rest is handled by software on your computer. There are any number of software apps that will work for this, from something like Lightroom to Adobe Bridge to the built-in camera and file browser apps (e.g. Finder (Mac) or Explorer (Windows)).
You don’t need software that’s specific to a Nikon D3400; nearly any file management software can handle the basic process. You’ll be looking for an “import” or “ingest” function on many of the more advanced image editing apps. On the file browsers like Finder and Explorer, you’ll be treating the files as normal files. Look for the files under the DCIM / 101D3400 folder/directory.
Here are some good options for image-downloading software, ranging from standard file browsers to more advanced image-management apps:
- Nikon Transfer 2. This is the software that Nikon develops and recommends, although you by no means have to use it. Nikon Transfer 2 is no longer distributed as a standalone download — it’s now bundled with Nikon’s free NX Studio software, which installs Nikon Transfer 2 alongside it. It’s free, and there are versions for Windows and Mac.
- Finder (Mac) / Explorer (Windows). The SD card inside the camera should mount as a regular disk in Finder. From there, you can copy and move files just like you would with any other files.
- Lightroom. Lightroom’s approach is slightly different, in that the process is actually a more comprehensive “ingest” or “import” that brings the files into the Lightroom database (catalog) simultaneously with copying the files to your hard drive. If you’re shooting many photos, Lightroom or one of its alternatives is well worth learning. There are free alternatives if Lightroom’s subscription model isn’t your cup of tea. With any of these image organizing apps, there’s a bit of a learning curve at front, but it opens up incredible opportunities for processing and organizing your images that will reap more benefits the more photos you shoot. Once you get a few hundreds or thousands of photos in your collection, you’ll be glad you went this route.
- Camera App / Photos (Mac). This is a Mac app that’s built into the operating system. It’s designed to automatically detect a camera device and then transfer the images to the computer’s hard drive.
- PhotoMechanic. This is an app that many sports and press photographers use for a very efficient and streamlined approach to ingesting and culling large number of images. But it gives you powerful tools for renaming, sorting, and backing up photos, as well as managing metadata — and that’s just in the ingest/copying process. It’s overkill for most D3400 shooters, but I’m including it here because, well, why not? I don’t recommend just going out and buying a license — besides, it’s not cheap — but if you’re curious about what’s possible and want to try it out, you can download a free trial.
There are ways you can tweak this process in your workflow by incorporating renaming the files, sorting them, and automatically applying processing, but those are more advanced topics beyond the scope of what we’re doing here. For now, we’re just trying to get the images from your camera to your computer.
There’s not really any downside to this method. It’s not the fastest in terms of transfer speed — using a memory card reader can potentially give faster transfer speeds, but that depends heavily on the combination of memory card, card reader, and computer. And it also means that you can’t be shooting with the camera while you’re downloading. But neither of those are big issues for most shooters.
There are a few things to watch, though:
- Don’t use a USB hub. While some might work, it’s a common area where the process can break, either from an underpowered hub or some kind of miscommunication along the data transfer chain. So it’s best to plug the USB cable directly into one of the main USB ports on the computer itself.
- The camera’s battery will need to be charged. You will need to have the camera powered on.
- If the camera doesn’t mount when you connect the cables, make sure that the camera is turned off when you make the connection. Then power the camera on.
Method 2: Take the memory card out & use a memory card reader
This is fundamentally the same method as above, except that instead of using the camera directly, you remove the memory card from the camera, put it in a memory card reader that’s connected (or, in some cases, built-in) to your computer. The rest is the same: you still use software on the computer to copy or ingest the images from the memory card to your computer. You can use the same software options I outlined in the previous method.
Many laptops — and even some desktops — come with a SD card reader built-in. But even if yours doesn’t, the good news is that they’re cheap. You don’t need a fancy or expensive card reader. Something simple like this one will work perfectly well here.
This one has a few extra ports, useful if you’re using cameras or devices that have different-sized memory cards.
And this a much higher-end option. It’s probably overkill for most shooters, but if you want the top-of-the-line and have the computer hardware to take advantage of it, this is it.
After many years of shooting digitally and with many different cameras, using a memory card reader is still the way I find the easiest. The data transfer speeds are quick, because it’s going over a cable rather than wifi. So, it doesn’t matter how full the card is. And it’s reliable. There’s no need to be messing with connecting wifi apps or selecting images. And if you have multiple memory cards, you can be downloading from one while shooting with the other.
The biggest upsides of this method are:
- It’s potentially faster. The transfer speed you get in real-world conditions is dependent on the combination of the SD card, the memory card reader, and the computer. But with the right setup, you can get faster download speeds. That’s not much of an issue with a few images, but can make a real difference if you come back from a shoot with full memory cards.
- You can potentially download from multiple cards at once. This is purely a convenience and speed thing, but if you’re coming back from a trip with multiple full SD cards of images and videos, you can download from them simultaneously. This won’t work with most memory card readers or even most downloading software. But there are ways to make it work; I have an example here.
- You can keep shooting while you’re downloading images. For many shooters, this is never really an issue, but there are times you might want the camera to be available even while you’re backing up images from the memory card.
Method 3: Connect wirelessly with a mobile app
Right off the bat, I’ll say that this method rarely makes much sense for downloading photos and videos from a D3400 to a computer. It’s much slower, much more tedious, and much more cumbersome. But since it does technically work, I’ll include it here.
The Nikon D3400 does have Bluetooth wireless capabilities, but they’re pretty limited. And using them to transfer photos to a laptop or desktop is tedious and convoluted. It makes much more sense for downloading images from your camera to a mobile device like a phone or tablet. The only time it makes much sense to me to do it this way is if I’m on the move and want to select which images I want to work on later without opening up my laptop. In other words, a kind of on-the-move intermediate step.
The D3400’s wireless features only work with the SnapBridge app. And I’m not much of a fan of the SnapBridge app. Over the years, I’ve run into far too many bugs and glitches with it. But it’s also free, and it’s designed to work specifically with the Nikon D3400.
When you connect your D3400 to the SnapBridge app (I have a detailed guide on how to do that here), you’ll get the options to download media or to control the camera. For our purposes here, we obviously want the download option.
That will then download the image from the camera’s memory card to your phone’s camera roll. Once it’s on your phone, you can use other methods to transfer the data to your computer. There are a number of different ways to do that depending on the phone and its operating system. On some phones, you can connect the phone directly to the computer using a cable. Or you might be able to do it wirelessly. Or you might be able to use an intermediate cloud service like iCloud or Dropbox.
So, it has a few extra steps to go from the memory card to the computer. And it’s slow — downloading just one image over Bluetooth will take more than a few seconds. So, it becomes quite impractical for large numbers of images or video files. But, as I said, it is technically possible.
How to format an SD card in a Nikon D3400
Once you’ve downloaded your files from the memory card, it’s ready to be formatted. This frees up space, preps the card, and is an opportunity to identify any issues with the card.
I’ve put together a more detailed guide on formatting SD cards in a Nikon D3400, but the quick version is that you can find the format function in the camera’s menu system under:
Setup Menu (wrench/spanner icon) > Format memory cardNikon D3400 Explorer
Here’s a fun interactive tool I put together to help find which button and dial is where on the camera (and just as importantly, what Nikon calls it).

Notes & References:
- There are some cameras that do have their own onboard memory storage in addition to the memory card. The D3400 is not one of them. Like most DSLR and mirrorless cameras, the D3400 does have what’s known as a buffer memory, but that’s purely a temporary working memory space that acts as an intermediate storage bucket while the data is being written to the memory card, and it is not used for storing media long-term. [↩︎]


