Quick Summary
- Nikon Z cameras allow you to manually enter data for non-CPU (manual focus) lenses.
- This feature is essential for accurate In-Body Image Stabilization (IBIS) performance with manual lenses.
- It enables more effective Auto ISO calculations by knowing the focal length.
- It embeds focal length and maximum aperture into the image EXIF data for better organization.
- Find it at
Setup Menu > Non-CPU lens data.
While it might not be the most obvious choice, you can certainly use manual-focus lenses on a Nikon Z camera.1 And there are often good reasons for doing that. It might be because you want to use a lens with distinctive optics, or a type of lens that Nikon doesn’t make yet (like a Z-mount fisheye lens or macro tilt-shift). It opens up a whole universe of glass well beyond Nikon’s own offerings.
In some cases, autofocus lenses will actually become manual focus on Nikon Z bodies. Nikon’s own AF-D lenses are examples — they’ll work with rangefinder on-screen manual focus, but they won’t work with autofocus.
But what I’m talking about here are completely analog lenses. They don’t have autofocus, they don’t let the camera control the aperture, and they don’t transmit any EXIF information.
In jargon, these are known as non-CPU lenses. They’re analog manual-focus lenses that don’t have any electronic components — no CPU chip, no electronic contacts, no way to communicate with the camera. These are typically older manual-focus lenses from the film era, though some modern manual-focus lenses also fall into this category (like some third-party Z-mount lenses that I’ve reviewed recently here and here).
While it’s not essential to use this feature if you’re using manual-focus non-CPU lenses on your Nikon Z camera, there are three good reasons to do so:
- The focal length is used to aid the camera’s in-body stabilization (IBIS)
- The focal length is used as the basis of the dynamic auto ISO settings.
- It embeds basic lens EXIF information into image metadata, which can be useful for filtering image collections.
Reasons to use the non-CPU lens data feature
In-Body Stabilization
If you’re using a non-CPU lens, the lens itself won’t have stabilization features. But when you’re using it on a camera that has in-body stabilization, the focal length is used to calibrate the camera’s in-body stabilization.
In short, adding a focal length to the non-CPU setting will make the camera’s stabilization more effective. If the camera thinks you have a 24mm lens attached but you actually have a 100mm lens, the stabilization will be too weak. If it thinks you have a 100mm but you’re using a 24mm, the sensor will jump around too aggressively, actually creating blur.
One caveat that catches people out: stabilization and manual glass don’t always get along. Nikon’s own warning is that depending on the lens, on-camera VR may cause a drop in peripheral illumination or otherwise fail to produce the results you want. So if corners darken unexpectedly with a manual lens, switch stabilization off as a diagnostic step before you start blaming the lens.
I have a list of the Nikon Z cameras with in-body stabilization, or IBIS, in the table below.
Auto ISO calculation
If you’re using the Auto ISO feature, it’s based on a minimum shutter speed for the focal length of the lens.
With a wider focal length, you can often get away with a longer shutter speed and still have little to no camera shake blur before it’s necessary to increase the ISO.
For instance, the baseline for a 24mm lens might be 1/30 second. But with a longer focal length, you’ll need a correspondingly faster shutter speed to avoid camera shake blur. With a 300mm, for example, a shutter speed of 1/30 would be problematic; you’ll probably want something of at least 1/250 second or even faster.2
Non-CPU lens = no EXIF metadata
Probably the least obvious aspect of these lenses, and arguably a less important issue, is that they don’t communicate any EXIF information to the camera.
So when you import your images into Lightroom or other editing software, the lens information field will show up as 0.0 mm f/0 or remain completely blank.
Maybe that matters to you, or maybe it doesn’t. But there are some implications of that:
- If your camera has in-camera IBIS (In-Body Image Stabilization), the focal length in the EXIF field helps the IBIS system tailor its performance to that focal length.
- It means that there are no embedded lens profiles for automatic optical lens corrections (though you can still apply corrections manually in post-processing).
- You can’t filter by lens fields. That’s not necessarily going to be a big deal for everyone, but I have several hundred thousand images in my main Lightroom catalog, and I use all sorts of metadata filters a lot.
How to use Nikon’s non-CPU lens feature
If you’re shooting with non-CPU lenses and want at least some EXIF information associated with each lens, Nikon Z cameras have a really useful feature that addresses part of this problem.
It’s known as the non-CPU setting, and it allows you to manually enter basic lens information into your image metadata. While this doesn’t solve the lens profile issue or report the actual aperture you used, it does provide valuable organizational and historical information that makes managing your images much easier. And if you add the focal length (optional), it can be used to tailor IBIS performance.
The available options
Not every Z-series camera works exactly the same way with this feature.
I’m using the Z8 for the examples in this guide, which is particularly relevant because the Z8 includes the ability to add a custom lens name — a feature that’s only available on newer third-generation Z cameras. If you’re using an earlier camera like the Z5, Z6, Z7, or Zfc, you’ll have the core functionality but without the lens name field. Check the compatibility table below to see exactly what your camera supports.
Nikon Z camera compatibility
| Camera Model | Has Non-CPU Lens Data | Lens Name Field | IBIS Benefit |
|---|---|---|---|
| Full-Frame Models | |||
| Z9 | ✓ Yes | ✓ Yes | ✓ Yes |
| Z8 | ✓ Yes | ✓ Yes | ✓ Yes |
| Z7 II | ✓ Yes | ✗ No | ✓ Yes |
| Z7 | ✓ Yes | ✗ No | ✓ Yes |
| Z6 III | ✓ Yes | ✓ Yes | ✓ Yes |
| Z6 II | ✓ Yes | ✗ No | ✓ Yes |
| Z6 | ✓ Yes | ✗ No | ✓ Yes |
| Zf | ✓ Yes | ✓ Yes | ✓ Yes |
| Z5 | ✓ Yes | ✗ No | ✓ Yes |
| APS-C Models | |||
| Z50 II | ✓ Yes | ✓ Yes | ✗ No IBIS* |
| Zfc | ✓ Yes | ✗ No | ✗ No IBIS |
| Z50 | ✗ No | ✗ No | ✗ No IBIS |
| Z30 | ✗ No | ✗ No | ✗ No IBIS |
* The Z50 II doesn’t have mechanical sensor-shift IBIS, but it does have Electronic VR when shooting video. And the focal length data is used for that.
Data fields you can enter
| Field | Range/Options | Purpose | All Compatible Cameras |
|---|---|---|---|
| Lens Number | 1-20 | Organizational identifier | ✓ Yes |
| Focal Length | 0.1mm – 9000mm | EXIF data + IBIS calibration | ✓ Yes |
| Maximum Aperture | Full f-stop range | EXIF maximum aperture data | ✓ Yes |
| Lens Name | Up to 36 characters | Custom lens identification | Only 3rd-gen+ cameras |
How to set it up
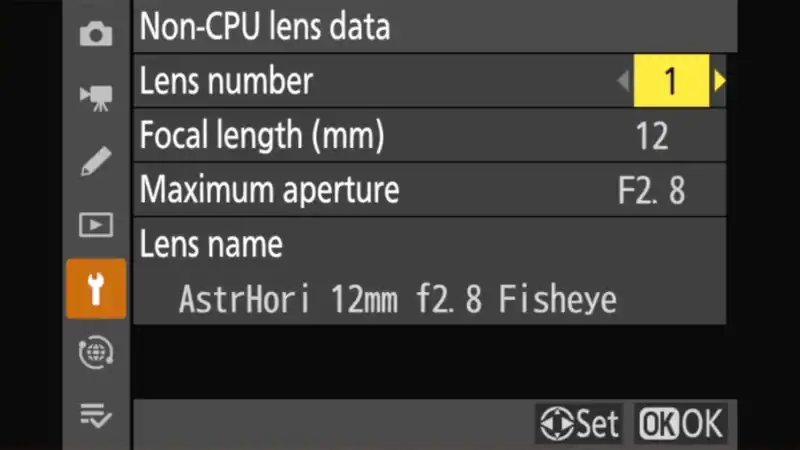
Once you enter details about a new lens, it will save in one of 20 assigned slots.
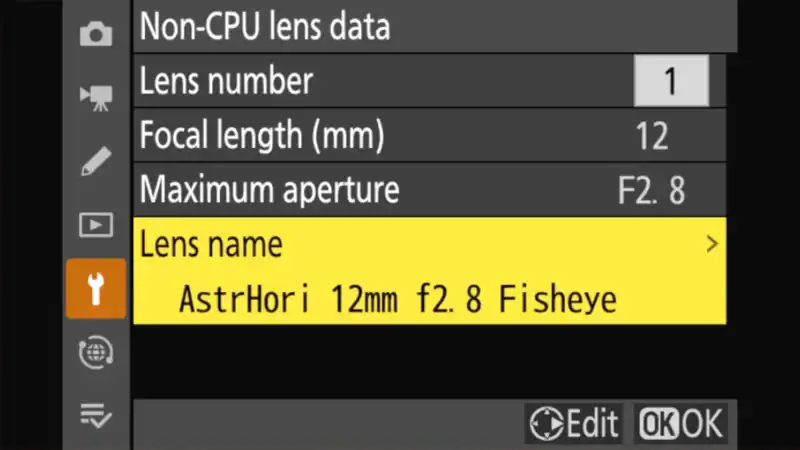
To enter the information for the first time, go to:
SETUP MENU > Non-CPU lens data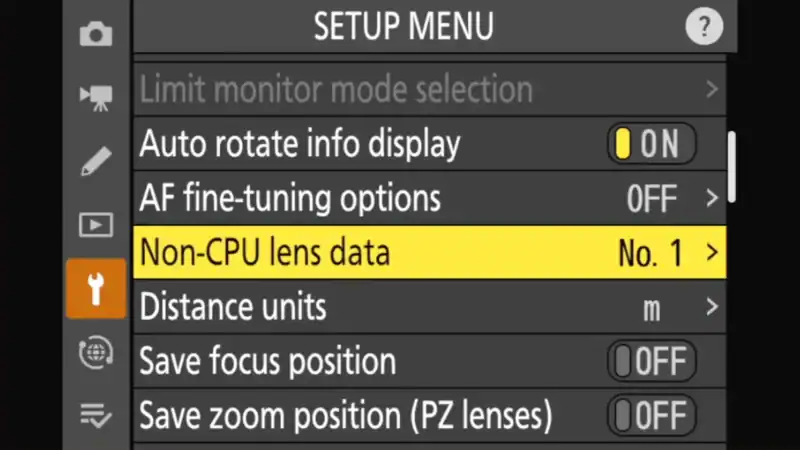
The first field is the slot number. You can store up to 20 lenses. Scroll through the slot numbers to find a blank one or one you’d like to write over.
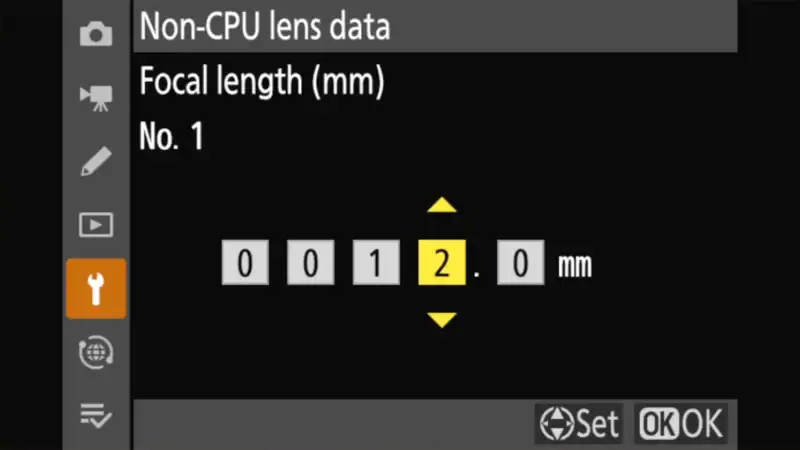
Enter the focal length of the lens. You can only enter one value here, so it won’t allow you to enter a zoom range. Choose the widest focal length of the lens (or your most commonly used focal length). If unsure about the exact focal length of a vintage lens, err on the shorter side. IBIS moves more aggressively with longer focal lengths, and overcorrecting causes more problems than undercorrecting.
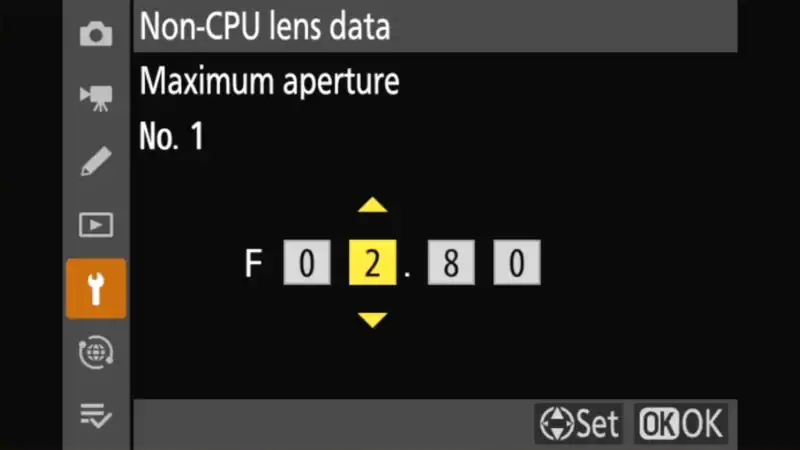
Enter the maximum aperture. Again, you can only enter one value here, so enter the value of the maximum aperture at the widest zoom if you’re using a zoom lens.


If you’re on older firmware, this part of the menu may behave differently than the screenshots here. On the Z8, focal length and maximum aperture were fixed picklists until firmware 2.00, which changed both to free numeric entry. That’s why an odd lens — a 21mm f/3.4, say, or a 10mm Heliar — can now be entered exactly instead of rounded to whatever value happened to be on the list.
The last field — the lens name — isn’t available on all Nikon Z cameras, only newer models (introduced with EXPEED 7 processors). You can check which models it’s available on in the chart above.
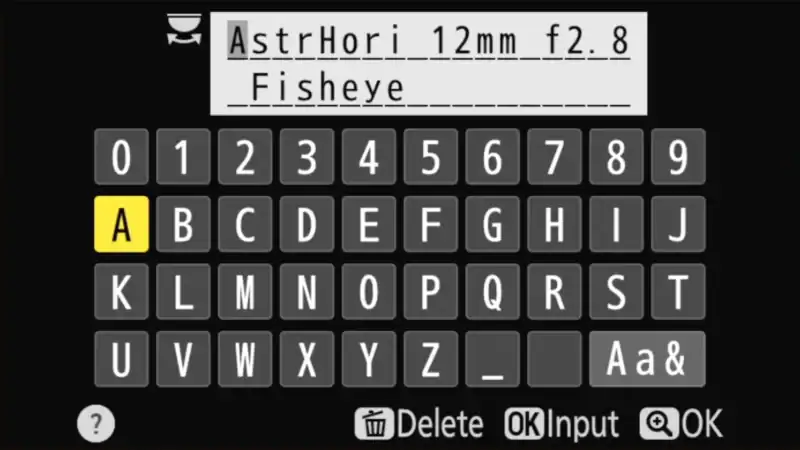
The information will then be saved. To add another lens, just change the Lens number field to the next blank panel.
Quick access setup: Assign to function button (highly recommended)
Probably the weakest link in this feature is the fairly strong risk of user error in changing the assigned lens information if you’re switching between multiple non-CPU lenses. This is something that trips me up a lot — I just forget to change it.
To make it a little easier and faster, you can assign this setting to a custom button. To do that, go to:
Custom Settings Menu > f2 Custom ControlsAlternatively, but along the same lines, you can add it to a spot in your My Menu settings:
Setup Menu > My MenuThings worth knowing
This feature is useful, but it’s also imperfect in a workflow sense, and there are some things worth knowing:
- The camera doesn’t automatically detect which lens is mounted. You have to manually select the correct lens number each time you change lenses. There’s no way for the camera to know which non-CPU lens you’ve attached. This is the part I forget to do too often!
- IBIS uses focal length data on full-frame cameras. On cameras with IBIS (all full-frame Z models), the focal length you enter calibrates the in-body image stabilization. Accurate focal length input is essential for proper stabilization performance. On the Zfc and Z50 II, which don’t have sensor-shift IBIS, it’s for EXIF recordkeeping — plus the electronic VR data on the Z50 II. The Z50 and Z30 don’t have the menu at all.
- No automatic lens profile corrections. Even with non-CPU lens data entered, you won’t get automatic distortion, vignetting, or chromatic aberration corrections when you import the images into something like Lightroom or Capture One. You can, of course, still make manual corrections, but they won’t be lens-specific.
- The actual aperture used usually isn’t recorded. On the Z8 the system only embeds the maximum aperture you’ve entered, not the f-stop you actually shot at, so the EXIF shows that maximum regardless of where the aperture ring is set. The Zf is the exception: it has a
Choose aperture to recordoption at the bottom of the Non-CPU lens data menu, and with that turned on you set the aperture you’re using with a command dial and the camera writes that value into the EXIF, up to 8 stops down from the maximum aperture you entered. The dial and the lens aperture ring aren’t linked, so you have to keep the two in step yourself. - Zoom ranges are not supported. For manual zoom lenses, you can only enter a single focal length. The camera doesn’t track zoom position, so your EXIF will always show the focal length you entered during setup.
- You can configure lenses that aren’t currently mounted. Because you can enter whatever you want, there’s no need for the lens to be attached to enter the information.
- Up to 20 different lens configurations. This should be plenty for most photographers. Beyond that, you’ll need to reuse one of those 20 slots. You can’t move the slots around, unfortunately, so I try to put my most-used lenses bunched together at the front.
- EXIF data helps with image management. In Lightroom or other software, you can filter and organize images by focal length, making it easier to analyze your shooting patterns or find images shot with specific lenses.
- No impact on exposure or focus performance. Entering lens data is purely for metadata purposes and doesn’t affect how the camera operates, including on shooting aids like focus peaking or split-screen.
- Third-party software may benefit. Some RAW processors can use focal length information to provide better default settings or suggest appropriate lens corrections. And if not now, it might become useful in the future.
- Entry-level APS-C cameras lack this feature. The Z50 and Z30 don’t have Non-CPU Lens Data in their menu systems at all. The Zfc and Z50 II are the exceptions among APS-C cameras — they have the feature (without IBIS integration, purely for EXIF data). If you’re using manual lenses with Z50 or Z30, you’ll have to manage lens information through post-processing software tagging.
- Lens naming is available on newer cameras. The Z8, Z9, Z6 III, Zf, Z5 II, and Z50 II support a lens name field (up to 36 characters). Earlier cameras like the Z5, Z6, Z7, Z6 II, Z7 II, and Zfc only have the basic fields. Use descriptive names when available.
- If you use a manual lens with electronic contacts (like Voigtlander Z-mount), the camera detects it automatically. You do NOT need to use this menu.
There’s also a hardware version of this idea if your manual glass is Leica M mount. TTArtisan’s M-Z 6-bit adapter runs about $89 and carries a focal-length dial on the adapter body, so it writes focal length and aperture into the EXIF and gives you focus confirmation without going near the camera menu. TTArtisan lists some exceptions — no EXIF with the Steel Rim Summilux reissue or the Summarit 35mm f/2.4, for instance — but if forgetting to switch lens slots is your main problem, it sidesteps it entirely.
It doesn’t bring matrix metering back, because you never lost it. This one gets repeated a lot, and it’s a leftover from the DSLR days. On F-mount DSLRs a separate metering module needed lens data before it could run matrix metering, so registering a non-CPU lens genuinely unlocked it. Z bodies meter off the imaging sensor at working aperture, so all the metering modes work with a non-CPU lens whether or not you’ve entered anything. The one documented exception is narrow: with AI, AI-modified, and Series E lenses on an FTZ adapter, if you select highlight-weighted metering the camera quietly uses center-weighted instead.
Adding or fixing lens EXIF information in post
If you’re using Lightroom Classic, there are some plugins that can come in extremely helpful here. They won’t solve the problem of forgetting to change the lens selection at the time of shooting, but they’re great for adding or correcting that information after the fact.
- LensTagger is the simplest of them, and it’s the most targeted to this specific problem. It’s donationware and requires ExifTool to be installed separately (and then make sure to provide the correct path to ExifTool or you’ll get an error). Simple but super effective.
- Capture Time to Exif is a much more comprehensive plugin. The name rather undersells just how powerful this plugin is — it does way more than changing the image capture time, and it can also change the capture device EXIF. It’s by John Beardsworth (maker of so many super-useful Lightroom plugins), and it’s a paid plugin (but very reasonably priced).
Notes & References:
- Not every lens is compatible, but many are. There are too many variations to list here, but compatibility is definitely something to check with your lens and camera combination. [↩︎]
- Many cameras let you tweak the Auto ISO feature by a relative increment faster or slower than the baseline. I usually leave mine on a step above the basic baseline, which forces a slightly faster shutter speed than the default. That, of course, means that it will also force a slightly higher ISO. [↩︎]



Hello,
thank you for the article.
I have a Z6 II with FTZ II adapter, but the LENS NAME field is missing, do you have any idea why? Last firmware is installed.
I’ve also another adapter for Yashica lenses, but LENS NAME is missing too.
Regards
Hi Alessandro,
After digging some more, it looks like Z6 II doesn’t have that field after all. It was introduced with the EXPEED 7 processors. So it’s in the Z6 III but not in the Z6 II. I’ve corrected the table above.
So you can’t insert the lens name in the camera, but you can add it in post-processing using something similar to the Lightroom plugins LensTagger or Capture Time to Exif (see the end of this post) or some custom use of ExifTool.
Sorry for any confusion, but thanks for the heads up so I can make the correction for that model.