In late-2015, Sanho released a new model: the ColorSpace UDMA3. You can find my detailed review here.
If you’re looking to back up your photos and videos on the go without using a computer, a memory card backup device might be just what you need. They combine a battery-powered hard drive with a memory card reader and provide a lightweight, portable option to backing up your photos while traveling without a laptop or even creating a safety backup during an important shoot like a wedding. They’re small enough to keep in your camera bag and provide a lot more assurance that you’re going to make it home with all your images intact.
I’ve been putting the best ones through their paces, and this is another in that series. You can find my detailed reviews of the NEXTO DI ND2901 here and the Digital Foci Photo Safe II OTG here.
The ColorSpace UDMA2 is the most feature-rich of the offerings. Depending on the configuration you go for, it can also be the most expensive in this range before you jump up to an entirely different price range with field backup devices designed for video (like these).

It’s marketed in the US by Sanho and falls in their HyperDrive range. Sanho is probably best known these days for its Mac accessories, in part because they ran into trouble with Apple about them, but their original memory card backup drive predates the release of the original iPad. So they’ve been in this space for a while now.
I’ve had the previous model, the ColorSpace UDMA, since it was originally released in 2010. It still works well, but thanks to a hardware limitation that can’t be fixed with a firmware update, it doesn’t read exFAT-formatted cards like SDXC cards. But it still works well for CompactFlash cards and SD cards that are 32GB or smaller.
The new version is fundamentally the same. There aren’t any major overhauls to its exterior, but there’s been some freshening up under the hood in its software and features. And it works with SDXC cards.
I’ve been putting it through its paces recently side-by-side with the NEXTO DI ND2901, and here’s my hands-on review.
Memory Cards
There are two memory cards slots on the device: a CompactFlash slot on the top that accepts CompactFlash Type I cards and an SD-sized slot on the side that accepts SDXC, SDHC, SD; in other words, any SD card from 2GB up through at least 512GB will work. That slot also accepts MMC cards, although that’s not especially useful these days because that format has fallen by the wayside (and besides, most SD slots will work with them).
The ColorSpace UDMA2 doesn’t accept microSD cards directly, but you can use an SD adapter cartridge in the SD slot. If you’re using a microSDXC card formatted in a GoPro, there’s a special beta firmware update to address compatibility issues with the exFAT formatting. You can find more information here.
One thing to note, though, is that you can’t use both slots simultaneously. You should have a card in one or the other, but not both at the same time. Otherwise, you can end up with some odd behavior as the device gets confused.
And if you find that your ColorSpace UDMA2 isn’t working with SDXC cards, you might have a copy that’s been sitting on a shelf for a while and hasn’t shipped with the latest firmware installed. Version 23 of the firmware added support for SDXC, and there have been several updates put out since then. Updating it is straightforward, and you can find instructions as well as the latest firmware version here.


File Formats
In terms of copying and basic file operations, the device is mostly format-agnostic. It will copy any standard format it encounters. It will copy photos and videos or, for that matter, most other types of files you might want to download off your memory card.
In terms of rendering image files on its screen, it can work with JPG and RAW files–it can’t play video files or preview other types of files. The catch is that camera manufacturers sometimes come out with new formats with their new cameras, but the if the ColorSpace UDMA2 can’t render newly released RAW formats immediately, it’s something that can be addressed by Sanho through a firmware update. So there might be a bit of a lag between the release of the camera and the ColorSpace UDMA2’s ability to decode the new RAW format, but it is something that can be addressed.
Basic Operation: Backing Up Photos
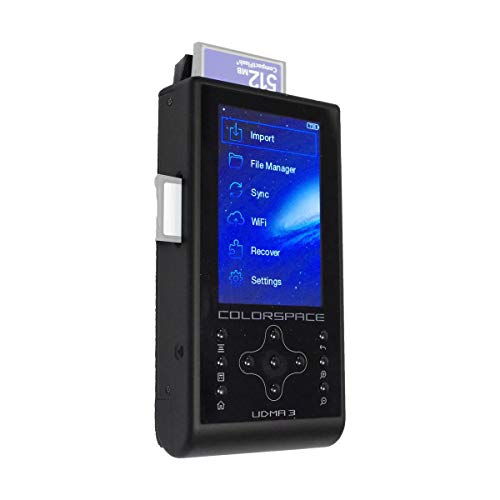
To back up photos from a memory card, you simply insert a memory card into one of the slots and hit the Import option on the main menu. It’ll then quickly scan the memory card and give you a report on how much data is on the card and how much free space you have on the internal hard drive. You can then choose to import with our without visual previews (it’s quicker and uses less battery power without) or specify different partitions on the drive to save to. Once you’re happy with the settings, you begin the transfer process.
If you have the previews disabled, during the transfer process you get a visual progress bar, a speed readout, and the number of files copied. If you have the previews enabled, you’ll also see a thumbnail of each image as it’s copied. Turning the thumbnail preview option on slows down the import process slightly.
Once the photos are backed up, you’ll get a message that the import was successful (or failed, as the case may be). You can then browse through the file structure to look at the photos as thumbnails or in full-screen. There are also some basic file management functions baked in.

Basic Operation: Downloading Images and Videos to a Computer
To download the photos from the ColorSpace UDMA2 to your computer, you simply connect the device directly via the included mini USB cable. It’ll show up on your computer just like any hard drive.
Unfortunately, it only has USB 2.0, not USB 3.0, so this part of the process isn’t as quick as it could be and has a theoretical maximum transfer speed of up to 480MB/s (though usually slower in practice). It’s also possible to do this part over wifi, although that’s quite a lot slower still, maxing out at 3 MB/s.
Screen and Controls
The large and detailed color screen is something that has long set the ColorSpace devices apart from its main competitors (well, at least since the Epson P3000 was discontinued, anyway). It’s a 3.5″ TFT screen that displays at 480px by 320px.
It’s not a touchscreen–you still have to use the buttons below it–but it’s closer to the kind of thing we’ve become accustomed to with today’s smartphone displays.

The buttons are quite usable and logically laid out. They’re not quite as responsive as they could be–sometimes you have to push a button a couple of times to get action–and the four labeled buttons are labeled in dark print, but overall it feels intuitive and logical and does what it needs to do.
The menu system is simple enough, with the usual drill-down category approach.
For viewing photos, the screen is by far the best among its competitors. Obviously, it’s not going to give you the kind of size or resolution of an iPad or laptop, but it’s good enough to see whether you got the shot. Being able to add histogram overlays, etc, is also a nice touch.
Real-World Performance
The manufacturer, Sanho, claims that from a fully charged battery you can get up to 2 hours importing photos or up to 3 hours viewing photos. But that’s not an especially useful way to describe the battery performance. What’s much more useful is what it means for how much data you can copy in real-world use. And in real-world use, I’m getting much less than the claimed 2 hours.
CompactFlash card slot: From a UDMA 7 CompactFlash memory card (SanDisk EXTREME PRO UDMA 7 card rated at up to 160 MB/s read speed) with RAW files (in DNG format), I get an average of about 30 MB/s transfer rate with the thumbnail preview option turned off, which is actually a bit faster than the 27 MB/s transfer rate that the manufacturer claims. Backing up a completely full 64GB card (which is actually about 59GB of image files) takes about 30 minutes. Turning the thumbnail preview option on slows things down marginally, by about 1 MB/s. I’m able to download about 140GB from the CompactFlash slot to the hard drive on a single charge.
SD card slot: The SD slot is quite a bit slower. With a SanDisk EXTREME PRO 64GB UHS-I/U3 SDXC card rated at up to 95MB/s I get an average transfer speed of about 15.4 MB/s for exactly the same files (duplicated on both the 64GB CompactFlash and 64GB SDXC card), taking roughly twice as long as the backup from the CompactFlash card. That’s a pretty normal difference and is similar on other devices. Turning the thumbnail preview option on slowed things down marginally, by about 1 MB/s. With the previews turned off, I’m able to download about 100GB of photos on a single charge from the SD slot.
While the CompactFlash card I used is rated for a much faster read speed than the SDXC card, the speed difference comes down to the card slots themselves. The device isn’t getting close to the maximum read speeds of either card, and you also find this difference between the speeds of the SD and CF slots in the NEXTO ND2901.
During the backup process, the drive itself gets a bit warm, but it’s not hot enough to cause concern.
Functions & Features
Wireless. Using a small dongle that’s included, you can enable wifi access. That’s useful for viewing the photos on a mobile device, sharing the photos for others to see, or even downloading them to your computer.
There are two ways to set up wifi on the device. The simplest is to create its own closed ad-hoc network. On your phone, tablet, or computer, you go into your wifi settings and connect to that network. By default, there’s no password protection, but you can add one.


In a browser window, you then type in the IP address it shoes on the screen of the ColorSpace UDMA2–probably something like 192.168.0.1. You’ll then get a file browser interface that helps you navigate the file structure on the drive.
Down in the bottom left is a settings button where you can specify things like the network name, etc.
There’s a limit to what you can do through the browser–it’s really just for viewing photos. And it doesn’t decode at least some RAW file types, even ones that the device itself can display on its own screen. I haven’t tested it with different RAW types, but with standard DNG files, I get just a question mark icon.

You can also set up the network through your router, which allows you to continue using the internet simultaneously.
A more functional feature than simply browsing is that you can set the device up to be a wireless hard drive and connect to it as a server from your laptop. It works, but for large file transfers, it’s much slower than connecting directly with a cable.
File Recovery. A nice addition to the ColorSpace UDMA2’s feature set is that it can recover photos or videos from your memory card) if you accidentally delete them. It’s not something you’re likely to use every day–here’s hoping, anyway–but it’s a handy thing to have when you don’t have a computer nearby. It basically does a data scan of the card and recovers what it can. It doesn’t work with every file type; the ones that are currently supported for data recovery are JPEG, Canon CR2 / CRW, Nikon NEF, Olympus ORF, Panasonic RAW, and Pentax PEF.
It’s a good initial option, especially if you want to reuse the card quickly while you’re on the road. But it’s not going to solve every problem, and sometimes you need to call in the big guns (here are some options).
File Verification. The original ColorSpace UDMA included several options for different types of CRC checksum file verification to assure that the files were accurately copied from the memory card. The new model doesn’t include those options, so there aren’t any built-in verification options. It seems like an odd omission, and I’m not sure the reasoning behind it. It does, however, include S.M.A.R.T. monitoring, which keeps an eye on the hard drive and tries to head off any mechanical errors with the drive.
Internal Hard Drives
One of the appealing aspects of the ColorSpace UDMA2 is that it comes off-the-shelf in various configurations of internal storage, from a bare casing that you can add your own drive to, up through a 1TB version (and several sizes in between: 120GB, 160GB, 250GB, 320GB, 500GB, and 750GB).
The bare casing version is particularly attractive option for several reasons. It allows you to use drives larger than 1TB (like this one). It also allows you to use drives that you might already have on hand.
Most compellingly, it can save you quite a bit of money to buy the bare ColorSpace UDMA2 casing and buy a hard drive separately. Buying the bare casing and a good-quality 1TB drive separately will set you back around $320 in total. Buying a ColorSpace UDMA2 bundled with a 1TB drive pre-installed will set you back at least $570.
So unless you really don’t want to mess with putting in your own hard drive, you can save a significant amount of money by buying the device and hard drive separately. Unlike some other devices, you won’t be voiding your warranty by doing opening up the ColorSpace UDMA2 to install your own hard drive–that wouldn’t make much sense when they sell a version without a hard drive, after all! And it’s a very easy process, simply requiring a small Phillips head screwdriver (which, in a nice touch, is included) to remove two small screws on the back case. The drive itself just slots in, and there’s no need for soldering or tape or anything else. The whole process takes about 30 seconds.
The device works with 2.5″ SATA III 9.5mm hard drives.
SSD Drives. If you go searching online you’ll find contradictory answers as to whether you can use an SSD drive inside the ColorSpace UDMA2. Some users have reported that they’ve gotten SSD drives to work. Others say they won’t work. So I reached out to Sanho support directly to get an authoritative answer.
The deal is this: Sanho doesn’t recommend putting in an SSD drive, and if you get one to work you won’t get any performance gain–it won’t be any faster. The problem is that SSDs draw power in different ways than regular HDDs, and the device is configured for the way in which HDDs draw power. So the only upside you’ll get in putting an SSD in the ColorSpace UDMA2 is that SSDs are less vulnerable to damage from drops and bumps. If you already have a 2.5″ SATA III 9.5mm SSD on hand (or a 7.5mm SSD with an adapter), by all means plug it in and see how it goes. But it’s probably not a good investment to buy a SSD specifically for this. If you’re looking to do that, another option worth considering is to buy an external SSD and the USB-OTG adapter and sync from the ColorSpace UDMA2 to the external drive. That gives you both the advantage of the shock-resistance of SSDs as well as the extra security of an extra redundant backup.
External Hard Drives
When I’m traveling, I try my best to have at least two copies of all my photos, ideally packed in two separate places. Whether I’m using a laptop or a memory card backup device, I create an extra copy onto a portable hard drive and keep that in my camera bag with me. That way if the original device fails, gets stolen, or my hotel room gets ransacked, I still have a copy of my photos with me. It would be nice to be able to create a backup to the cloud as well, but the reality is that in most of the places I visit I simply don’t have access to the kind of internet bandwidth to make that a practical option.
You can back up from the ColorSpace UDMA2 to another external hard drive, but unlike the NEXTO ND2901, you can’t just plug an external hard drive into mini USB port on the ColorSpace UDMA2. You’ll need to buy a separate mini USB-OTG adapter. (OTG stands for On The Go, and it’s a specification that allows the USB to act as a host for other devices.)
Sanho sells one directly through its HyperShop for $49.95. I’ve tried a couple of cheaper, standard USB-OTG adapters I had on hand, but the Sanho was the only one I founding to be compatible. So your mileage might vary with third-party adapters. If you do try a cheaper third-party adapter, just be sure to get one with a mini USB plug. OTG adapters with micro USB plugs tend to be more common, but they won’t plug into the device.
That adapter works for external hard drives, but you can also use it for flash drives or even an external USB card reader.
If you connect an external drive you’ll need to connect the device to AC power–it won’t work on battery power alone.
Charging and Battery
The primary (and quickest) method of recharging the internal battery is to use the AC adapter. You can charge via USB, but it’s slower and you’re best off using the included mini USB cable. Some other generic mini USB cables aren’t compatible and won’t end up charging.
The internal battery is user replaceable in a very easy process. Here’s the manufacturer’s instructions on how to do it.
Quibbles
- If the device gets bumped or shaken it turns itself off. I assume this is a self-protection mechanism to protect the hard drive, but at least in the copy I’ve been using, it seems unusually sensitive and is pretty easily triggered if you’re backing up in a car in motion or even putting the drive down on a table. While recognizing the likely rationale for it, I find this a bit annoying. Surely there must be a way to pause the hard drive without turning the whole thing off and canceling in the middle of a backup.
- It has locked up on me a few times, especially if I try to interrupt a copy procedure. It becomes completely unresponsive, with none of the buttons working or even the power button having any effect. There’s a reset button inset on the side that you can press with a paperclip or pen point that fixes it. It’s easy to do, but the fact that it’s needed isn’t ideal.
The naming of this device creates unnecessary confusion. UDMA, or Ultra DMA (or Ultra Direct Memory Access), is a technology for transferring data through a computer and an ATA device. It used to be the fastest method, but it has since been superseded by Serial ATA. The problem arises because UDMA has different modes numbered from 0 to 7 (UDMA 7 applies specifically to CompactFlash). So the UDMA 7 you see on faster CompactFlash cards has nothing to do with the UDMA2 in this device’s name. The UDMA 2 in this case simply refers to a second generation, an upgrade from the original ColorSpace UDMA. Even more confusingly, it’s marketed under Sanho’s HyperDrive label. So when you power the device up what you see on the screen is HyperDrive UDMA2, not ColorSpace UDMA2.
What’s in the Box
- ColorSpace UDMA2 HyperDrive
- Charger: AC universal adapter (100 – 240 VAC)
- USB-to-Mini USB cable
- soft case
- wifi adapter
- small phillips head screwdriver
- 2 x spare case screws
- instruction manual

Specs
Memory Cards: Compact Flash Type I, SDXC, SDHC, SD, MMC
File Formats: JPG and RAW
USB: USB 2.0
Hard Drive Size: Various configurations, user replaceable
Hard Drive Type: SATA 2.5″ 9.5mm
LCD Screen: 3.5″ TFT 320×480 pixels Color
Battery: 2600mAh rechargeable Li-on, user replaceable
Wifi Adapter: Wifi 802.11g/b/n, ad-hoc and infrastructure modes (adapter is included)
Dimensions: 5.4 x 3.0 x 1.0″ (13.8 x 7.6 x 2.6 cm)
Weight: 10.2 oz (292 g) (with hard drive and battery)
ColorSpace UDMA2 Manual
You can find the manual here.
Wrap Up
The ColorSpace UDMA2 has been out since 2012, and while there are a few areas where it’s showing its age, such as the lack of support for SSD drives and using USB 2.0 rather than USB 3.0, it’s still the most feature-rich option among its direct competitors. (There are video field backup devices, but they’re in a whole different ballpark in terms of price.) Overall, it has the best screen and the most features. It’s also the most flexible because it proactively supports switching out the hard drive or battery. But depending on the configuration you go for, it can also be the most expensive, and there are a few areas where there’s room for improvement.
Available At
In late-2015, Sanho released a new model: the ColorSpace UDMA3. You can find my detailed review here.
The ColorSpace UDMA2 is available in various storage configurations, ranging from casing only so you can add your own hard drive, all the way up to 1TB drives. The most convenient way to buy one is with a hard drive pre-installed. The cheapest way to buy one is to buy the empty casing and a hard drive separately and install yourself.
More to Explore
If you enjoyed this post, you might also find these of interest:
- Review of the ColorSpace UDMA3 Portable Memory Card Backup Device
- How to Recover Photos & Videos from a Memory Card with Disk Drill
- NextoDI NVS2801 Portable Memory Card Backup Device Review
- Digital Foci Picture Porter Advanced – Hands-on Review
- WD MyPassport Wireless Review
- NextoDI ND2901 Portable Memory Card Backup Device
Images and product information from Amazon PA-API were last updated on 2024-05-14 at 18:10. Product prices and availability are accurate as of the date/time indicated and are subject to change. Any price and availability information displayed on Amazon Site at the time of purchase will apply to the purchase of this product.