How to Use a Nikon D3400 as a Webcam for Live Video Streaming
Whether you’re looking to upgrade your home office for Zoom meetings or building a basic home vlogging studio, you can use a Nikon D3400 as a webcam or for real-time video capture to a computer. But it’s not quite as simple as just plugging your camera in with a USB cable. Here’s a guide on how to do it and what you’ll need to make it work.
Yes, you can certainly use a Nikon D3400 as a webcam or for real-time video capture on a computer.
But it’s not quite as simple as just plugging your camera in with a USB cable. And due to a limitation of the camera, you’ll need to reset the Live View auto-off timer every 30 minutes manually.
But if you want to connect your D3400 to use as a webcam, here’s how to do it and what you’ll need to make it work.
Table of Contents
There Are Good Reasons to Use a Nikon D3400 as a Webcam
You might be wanting to use your D3400 as a traditional webcam for videoconferencing Zoom meetings or classes.
Or a vlogger broadcasting from home.
Or maybe you’re a teacher wanting to record home-schooling classes or tutorials.
Or have a virtual visit with your doctor or family member.
Or an artist or craftsperson creating how-to videos.
Basically, there are a bunch of different reasons you might want to do this. But the good news is: it’s very doable with a Nikon D3400.
And it can give you much better quality and more flexibility than your computer’s built-in webcam. You can point the camera wherever you like and even move it a short distance away from the computer (you can get longer HDMI cables). And you’ll still have full control over things like focus, depth-of-field, and zoom, just as you normally would.
Photo by David Coleman / Have Camera Will Travel
There are Alternative Methods for Setting It Up
There are two methods to doing it.
One is simple and just uses a USB cable, but there are limitations: the video quality isn’t great quality and often has a lag, which negates the point of using your DSLR in the first place, and, for now, at least, it’s only an option for Windows users. It’s often known as the plug-and-play method, and you can find details on Nikon’s own beta software enabling it here. There are some other alternatives by other software developers mentioned in the “Things Worth Knowing” section at the bottom of this page.
The other method has better video quality and little to no lag, but it requires an extra accessory between your camera and the computer. It’s the method I’m focusing on here. And if you’re going to the effort of connecting your D3400 to your computer, there’s a good chance you’re doing it to improve the video quality. Which is what this method offers.
The second method is better, but it does some with a couple of catches. One is that due to a hard-coded limitation, you’ll have to manually reset the Live View every 30 minutes.
The other is that you’ll need an extra accessory to make it work. Specifically, you’ll need:
Professional Webcam: easily connect your DSLR; camcorder or action cam to your PC or Mac.
Stunning Quality: broadcast live or record in 1080p60 or even up to 4K at 30 fps.
How to Connect a Nikon D3400 to a Computer
Most cameras won’t connect directly to a computer. At least, not to transmit a live video feed—most can either charge or transfer saved photos and videos over a USB connection. But to get that live video feed, you’ll need something in between that takes the video stream from the camera and turns it into something that the computer can work with over the USB connection.
Once you have that video stream going to the computer, it’s available to your computer as a video input source. That means that you can use your preferred app or service to work with it. None of these require special, dedicated software. I have a few software alternatives below, but I’m focusing here mainly on getting the video stream to your computer so that your software or service can use it, whether that’s Zoom, Skype, VLC, QuickTime, or a high-end video editing suite.
HDMI Out vs Tethered Shooting
It’s worth mentioning that this is not quite the same thing as tethered shooting. With tethered shooting, you can connect the camera to a laptop or desktop with either a wired or wireless connection. That lets you control the camera’s settings, remotely press the shutter, and have the images transferred quickly to your computer. They will also give you a live preview feed.
In a pinch, you might be able to use that for live streaming, but there are two main issues with that. One is that the video feed is often jerky, has a low framerate, and has a lag. All of those things can be distracting. The other issue is that it can be hard to get that video feed available to other apps such as Zoom or Skype.
Tethering is especially useful in a studio setting or for macro or product photography. But with live video streaming, which is what I’m focusing on here, you’re sending only video and audio signals from your camera to your computer. There’s usually much less of an issue with lag and jerkiness, and it makes the feed available easily to other apps.1 So tethering and the type of video output I’m focusing on here are similar but not the same.
HDMI Video Capture Cards
Video signals in modern cameras are sent over HDMI video cables.2
It’s the standard used for HD TVs as well. The Nikon D3400 has a built-in HDMI-out port that can send the video signal out of the camera. But most computers can’t take that HDMI video signal as is. (Some laptops have an HDMI-out port, which is useful for connecting a laptop to a projector or display for Powerpoint presentations, but what’s needed here is an HDMI-in, which most computers don’t have as standard.)
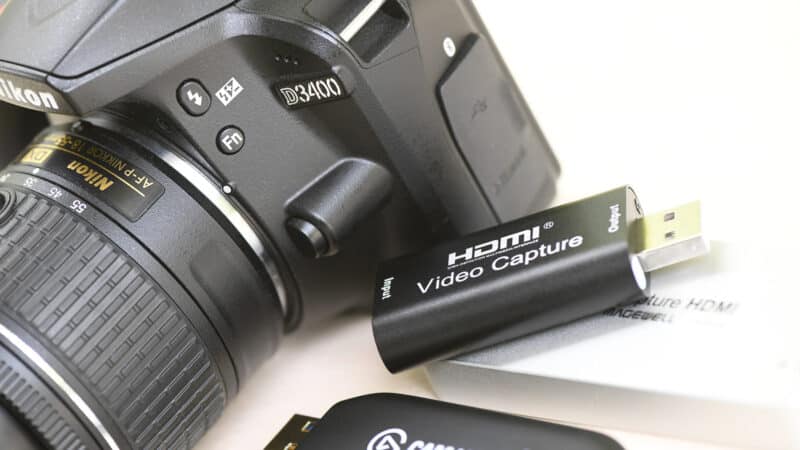
So, to get that video signal from your camera to your computer, you’re going to need some hardware: an HDMI video capture device. It’s a small device that sits between your camera and your computer. It takes the HDMI video signal and converts it to a USB signal.
There are a few different HDMI-to-USB converters on the market. In general, they’ll work with any camera or computer or gaming console with HDMI-out, so these aren’t specific to the D3400. Some that I’ve found to work well and have personally used with the Nikon D3400 are:
My top pick, for a combination of performance, features, and price, is the Elgato Cam Link 4K. I own a few different capture cards, but this is the one I use most often. I’ve found it to be reliable and good quality.
Professional Webcam: easily connect your DSLR; camcorder or action cam to your PC or Mac.
Stunning Quality: broadcast live or record in 1080p60 or even up to 4K at 30 fps.
There are cheaper and fancier (as well as more expensive options), but this is a good combination that I’ve found to perform reliably. It looks like a slightly oversized USB thumb drive. It plugs directly into your computer. You then use an HDMI cable to connect the camera to the Cam Link.
With so many more people working from home late, capture devices have been in high demand, and stock levels are sometimes low at retailers. But good places to look whether they’re in stock are Amazon and B&H Photo.
It doesn’t require an external power source—it draws its power via the computer’s USB connection. It doesn’t come with an HDMI cable, so you’ll have to pick one up separately (see below), but it does include a short USB extension cable, which is handy when you’ve got a crowded row of USB ports on your computer.
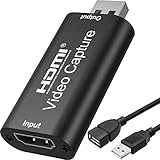
MavisLink HDMI Capture
The MavisLink HDMI capture dongle is one I’m including as a budget option that’s readily available (and seems to turn up under different brandnames). I’m including it here not because it’s the best quality of the ones here–it doesn’t–but because the others are hard to find and expensive. This is much cheaper and easier to find.
It looks very similar to the Elgato and works the same way. I’ve found it to work well enough, but it’s basically a cheap knockoff that is not the same quality as the others I mention here. Most noticeably, the picture quality is much harsher and more contrasty. But it connects and works with the D3300 and will get the job done at a much lower price. You can find them at Amazon.
The input end accepts a full-size (type A) HDMI connector. There are no buttons or switches.
It can accept a 4K30 input, but its maximum output is 1080p30. It’s compatible with Windows, Mac, and Android (but not iOS). And it doesn’t require an external power source. It also doesn’t come with an HDMI cable—you’ll have to pick one up separately.
Easily connect your DSLR, camcorder, or action Cam to your PC or Mac
Magewell USB Capture HDMI Gen 2
The Magewell USB Capture HDMI converter is one I’ve covered in detail before. It’s very similar feature-wise, but instead of plugging directly into the camera itself, you use a USB cable to go from the device to your computer.
I’ve been using this capture device for several years; it’s what I’ve used to capture the camera settings menu examples I use on this site. It works very well, and I have no complaints about using it.
There are two reasons it’s not my top pick here. The first is that it doesn’t plug directly into your computer. Or, more precisely, what I mean is that you need to use a separate USB cable to go directly from the capture device to your computer. That adds flexibility in that you can use different kinds of cables, but it’s also another moving piece. By contrast, the other options I’m focusing on here plug in directly without the need for an extra USB cable.
The second reason is the price. It’s a very good product, but you pay a premium price for it. In terms of what you get, it’s hard to justify paying double the price of the Elgato Cam Link 4K for this kind of use. Unless you’re putting it to use that demands the highest-quality output, it’s probably not worth it (I’d go with the Elgato instead).
In addition to requiring a separate USB cable, this one is a little larger than the others mentioned here. A USB cable plugs in one side, and an HDMI cable plugs in the other. It doesn’t require a separate power source.
Again, they’re in high demand, but good places to look are at Amazon and B&H Photo.
You’ll also need an HDMI cable. This is the type of cable that transmits video and audio signals. It’s possible that your capture card will include the right cables in the box, but don’t count on them being included. And the cable you have on hand to connect a DVR or BluRay player to your TV probably won’t work because it doesn’t have the right connector on one end. So you’ll probably have to pick one up separately.
Just like with USB, there are a few different sized plugs for HDMI, and you just have to make sure you get the right cable for your camera.
For the Nikon D3400, that means one with a Type C Mini HDMI connector on one end (for the camera) and a Type A HDMI connector on the other (for the capture device). Note that there are also HDMI to USB Type C connectors–they’re not the same thing. When searching for the ones you need, they’re most often listed as “HDMI to Mini-HDMI cables,” and you can often find them in lengths ranging from 3 feet to 15 feet. There is no need to invest in one of the super-expensive HDMI cables that some brands offer. You can also get bidirectional cables, which are often more expensive–you don’t need one of those for this purpose since the signal is in only one direction.
IN THE BOX: 3-foot high-speed Mini HDMI to HDMI TV adapter cable, A to C type
DEVICE COMPATIBILITY: Works with HDTVs, digital cameras/camcorders, MP3 players, and other HDMI devices
How to Start Streaming
Once you have the necessary hardware, it’s a pretty straightforward process to get up and running, but there are a few things to watch out for.
Connect the Capture Device to Your Computer
Connect the HDMI capture device to one of your computer’s USB ports.
It’s best to use one of the computer’s own USB ports rather than through a USB hub (especially an unpowered one).
Connect the HDMI Cable
With the camera powered off, connect the HDMI cable to the capture device (the larger connector goes into the device) and the camera’s HDMI port.
The micro-USB port is on the left. The HDMI port is on the right. Photo by David Coleman / Have Camera Will Travel
Power On the Camera
You need to put the D3400 in LiveView mode. If you don’t, it will only show the menus on the screen, not the through-the-lens view.
To put the camera in LiveView mode, press the LV button on the back (just above the OK button and dial).
Change the Input Video and Audio Sources in Your Software
In whatever software you’re planning to use, change the video source and audio source to the capture device. Precisely how you do that varies by software or service. Here are some of the common ones:
Zoom: Go to Settings (the cog icon at top right) > Video > Camera. From the drop-down list, select the one matching your capture device (it won’t be named after the camera)
Skype: Go to Settings > Audio + Video > Camera.
QuickTime Player: Go to File > New Movie Recording. Then change the video and audio input sources by clicking on the small down arrow to the right of the red record button.
VLC: Go to File > Open Capture Device.
Webex: Go to the video icon > Video Connection > click on the drop-down menu.
Tweak the Output Settings
Once you can see the camera’s output on the screen, there are some things you can tweak.
Live View Auto-Off Timer
By default, the Nikon D3400’s Live View will turn itself off after 10 minutes. You can bump that up to 30 minutes. While it’s still certainly not ideal, it is an improvement over 10 minutes.
You can find this setting under Settings > Auto Off Timers > Custom > Live View > 30m.
Video Output Settings
On the D3400, the HDMI settings are in the menu system under the Setup Menu: Setup Menu > HDMI.
There you can set the resolution/framerate output and the device control.
For the output resolution, Auto is a good place to start and will work in most cases. If you need to tweak it for some reason, there are some other options as well.
The Device Control option refers to being able to use a TV remote to control playback via the HDMI-CEC standard. So it’s not really relevant to this process.
One other thing you’ll probably want to tweak is the display style. Most likely, you’ll want a full clean view of the image rather than one surrounded by icons on indicators. You can toggle whether you get a clean live view screen (i.e., just the image, no icons or status indicators) or status items are around the image by pressing the info button on top of the camera near the shutter button. Note that this is not the same as the i button on the back of the camera—they don’t do the same thing.
How to Prevent Live View From Turning Off
Once you’ve changed the Live View auto-off setting to 30 minutes, you’ll still need to manually keep it active every 30 minutes.
You’ll get a small 30-second countdown as it leads into the auto-off. It shows on-screen (and will show on the video feed). Like this:
You don’t need to turn the Live View on and off to reset the clock. You can tap just about any button, and it will gracefully reset the clock without blacking out the feed. The two options for doing that that I’ve found that are least likely to have any effect or interruption are to tap:
The exposure compensation button (next to the shutter with the +/- icon. This is easily accessible when the camera is facing you.
The AE-L/AF-L button on the top of the back panel (less convenient when the camera is facing you).
You can also lightly tap the shutter with a half-press, but this risks throwing off the focus.
If you forget to keep Live View active, it will automatically black out the video feed but won’t cut it off. What I mean by that is that viewers won’t be able to see you, but it shouldn’t disconnect you from the meeting session.
Optional Extras & Other Considerations
With that setup, you’re good to go for basic streaming. There are some other optional extras that can improve the experience of using your DSLR as a webcam.
External Power
One important consideration is keeping the camera powered. The HDMI port does not convey power, and you can’t power the D3400 with the USB port. For short sessions, you can run the camera from its regular battery. For longer or more frequent recording, you might want to look at connecting the camera to an external power source.
With the Nikon D3400, you’ll want what’s known as a dummy battery with an AC power adapter. There are a number of different ones available. They all do basically the same thing, but some don’t come with an AC adapter included. So that’s something to watch for when choosing one (you can still add an AC adapter to the others, but you’ll have to pick that up separately).
[COMPATIBLE WITH MODEL:] The EN-EL14 / EN-EL14A dummy battery dc coupler dc connector EP-5A EP5A power...
[STEPS FOR USAGE:] Remove the EN EL14 original battery, Replace with EP-5A virtual battery, and cover the...
An External Microphone Will Give You Better Sound Quality
The microphone built into the Nikon D3400 is OK but not great. It’s the row of three small dots just above the Nikon D3400 badge on the front of the camera.
The single best thing you can do to get better sound quality in your recordings is to add an external microphone.
In general, there are two ways to go here. One is to add an external microphone to the camera. The other is to run the external microphone directly to your computer.
But the Nikon D3400 doesn’t have an input for an external microphone, so you’re limited to connecting a microphone directly to your computer and running the audio as a separate stream. That ultimately gives you more control and flexibility, but it also introduces complications in syncing the audio with the video. So it can be done, and it will potentially give you much better sound, but it is an added level of complexity.
There’s a huge range of microphones that can work, and covering them is far beyond the scope of this post. With the boom in podcasting in the last few years, there has been a corresponding boom in equipment for it. So you can get high-quality podcasting microphones. But you can also keep things simpler (and cheaper) with more basic models. After all, it’s something you can upgrade later if you want.
Lighting. Lighting can be tricky. If you have the D3400 in any of the auto-exposure modes (P, S, A), it will adjust automatically for the available light. But a better-lit scene will still look more professional than when you’re talking from the shadows.
If the whole scene is too light or too dark, you can still use the D3400’s exposure compensation slider to brighten or darken the whole scene. You can also set a manual exposure for even finer control.
That said, it’s usually better to start with decent lighting. You usually want the light source in front of you, not behind you.
There’s no one-size-fits-all solution, and you can probably get good results from what you have before investing in more lighting gear. It might be natural window light (face the window or have it to a side from a front angle rather than have your back to it), a desk lamp (in front of you, slightly off to the side), or room lights (turn them on). In general, more light is better than less, and dispersed light or multiple light sources will help minimize harsh shadows.
Mounting. While it’s convenient to just set the camera on top of the computer or on your desk, that limits the angle of view and tends to emphasize every little bump or keystroke. So, for better quality, you’ll probably want the camera standing separately or at least on some kind of absorbing layer. Aside from that, you can use any of the usual photography mounts or other photography tripods—there’s nothing specific about this use that requires a specialized type of mount.
Things Worth Knowing
It’s getting hot. Is that normal?
It’s normal for the capture devices to get pretty warm when connected. If it becomes a concern, disconnect it between sessions.
What is the maximum output resolution of the Nikon D3400?
The maximum HDMI output resolution of the D3400 is 1080p30.
Does an SD card need to be inserted?
No, you don’t need an SD card in the camera for this process. It’s not actually saving anything to the memory card. You can save the video/audio feed using your computer, if you like, but that’s not a requirement.
Is it possible to enable Live View for longer than 30 minutes at a time?
While you can change the default Auto-Off time for the Live View up to a maximum of 30 minutes (see above), I’m not aware of a way to keep it active longer than that.
Other Alternatives
If you’re using Windows, there’s another option that might be worth trying if you’re willing to tinker with beta software. Its less-well-tested for now, and your mileage might vary. The developer of digiCamControl tethering software has released digitCamControl Virtual Webcam software that is designed to let your DSLR emulate a webcam. The Nikon D3400 is listed as compatible. As a tethering approach, it might suffer from lag and jerky framerate–common issues with cameras tethered to computers–but it’s definitely worth a try if you’re looking for another option. And it’s free. One potentially very useful feature is that it’s designed to automatically restart the Live View when it times out.
More to Explore
If you enjoyed this post, you might also find these of interest:
The HDMI cables that you’ve used with your TV or DVR most likely won’t work with your camera. That’s because those usually take a full-size HDMI plug (aka Type A). [↩]
HDMI stands for High-Definition Multimedia Interface. It’s a standard in consumer electronics that is designed to both transmit AV data as well as control signals in the one cable. Some older cameras have RCA-style outputs (i.e., the yellow, white, and red ports). [↩]
Images and product information from Amazon PA-API were last updated on 2024-05-10 at 12:39. Product prices and availability are accurate as of the date/time indicated and are subject to change. Any price and availability information displayed on Amazon Site at the time of purchase will apply to the purchase of this product.
I'm a professional photographer based in Washington, DC. Seven continents, up mountains, underwater, and many places in between. I've been shooting for 30+ years, and my photos and time-lapse videos have appeared in a bunch of different publications, from major newspapers to magazines and books, billboards, TV shows, professional sports stadiums, museums, and even massive architectural scrims covering world-famous buildings while they're being renovated. You can see some of my travel photography here and here.