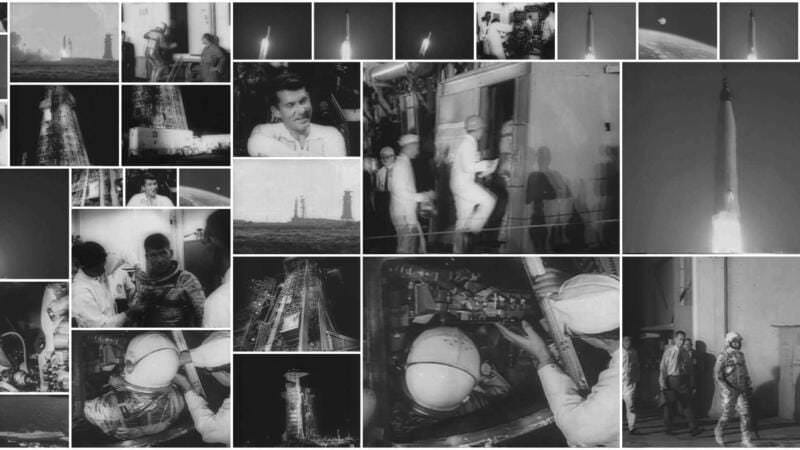
If you need to extract a sequence of still images from a video at a specific interval, the various app stores are flooded with paid utilities claiming to do the job. However, you don’t need a premium subscription to execute what is fundamentally a basic rendering task.
Why would you want to extract image sequences, anyway?
If you have never needed to decouple a video into its constituent frames, the use case might not be immediately obvious. However, batch extraction is incredibly useful for a few specific workflows:
- Visual Proof Sheets for Archival Footage: I regularly use this technique to generate static contact sheets of historical footage. If I am analyzing archival reels, for instance, extracting a frame every ten seconds gives me a highly scannable grid. It allows me to rapidly spot structural architectural changes, geographical shifts, or specific historical markers without constantly scrubbing back and forth through a muddy, low-contrast video timeline.
- Time-lapse and Hyperlapse Assembly: You can convert standard, real-time video into a time-lapse by extracting one frame every second (or slower), and then compiling that newly extracted image sequence back into a 24fps video file.
- High-Resolution Frame Grabs: With hybrid cameras now shooting 4K and 8K 10-bit video, individual frames contain enough data to be used as standalone photographs. If you need to pull high-res reference frames for a client web gallery or a storyboard, batch extraction is significantly faster than manually hunting for frames and hitting the screenshot key.
- Focus Stacking: Macro photographers frequently shoot 4K video while racking focus through a subject. They then extract the video as an image sequence and load those hundreds of JPEGs into stacking software like Helicon Focus to build a single file with infinite depth of field.
You might initially reach for a popular transcoder like HandBrake to do this. Unfortunately, HandBrake is strictly a video-to-video encoder designed to compress files into MP4 or MKV containers; it fundamentally lacks the architecture to output still image formats. And while VLC Media Player has a “Scene Filter” buried deep in its advanced preferences that can technically extract frames, it is exceptionally clunky to configure and prone to crashing on longer files.
Instead, a great choice for this job is FFmpeg.
Below are two free, highly reliable ways to use it: a modern graphical interface for those who prefer visual menus, and the raw command-line syntax for those who want maximum speed and scriptability.
Method 1: The visual approach (Shutter Encoder)
For years, MPEG Streamclip was my go-to tool for this, but because it is a 32-bit application, it’s dead on modern macOS systems.
Its spiritual successor is Shutter Encoder. It is a free, open-source GUI wrapper for FFmpeg available for both Mac (including Apple Silicon) and Windows. And it also happens to be way more powerful and versatile.
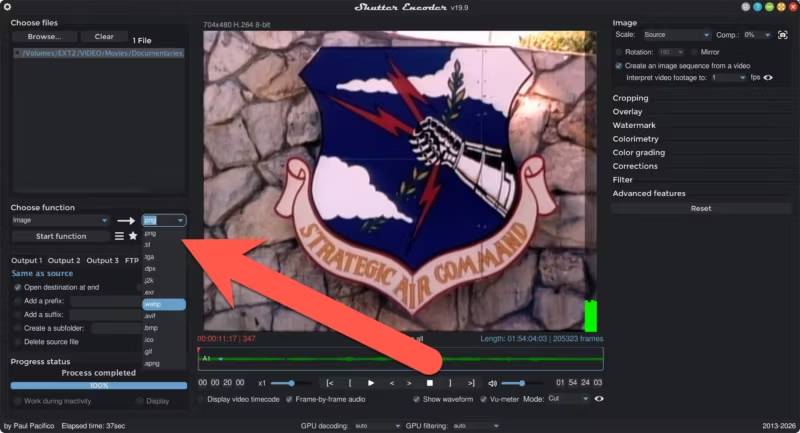
1. Load your video & select the format
Drag and drop your video file directly into the main “Choose files” panel on the top left. Next, look down at the “Choose function” dropdown menu.
You have two ways to proceed here, depending on your required output:
For quick JPEGs: Select JPEG from the function list. A slider will appear directly to the right, allowing you to set the compression quality (it usually defaults to 90%).
For lossless or web formats: Select Image from the function list. A secondary dropdown menu will appear to the right, allowing you to choose exactly which format you want the sequence rendered in (e.g., .png, .tif, .webp, .tga, .avif).
2. Define the extraction interval
Look to the parameters panel on the right side of the window. Open the “Image” section and check the box labeled “Create an image sequence from a video”.
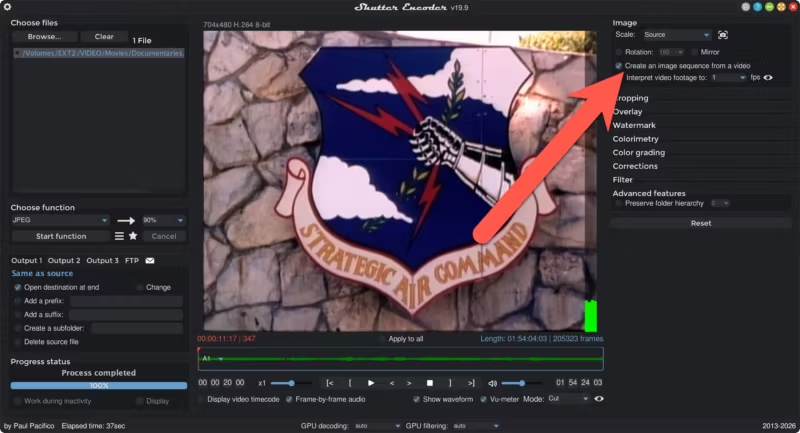
This reveals the “Interpret video footage to:” control, which dictates your extraction frequency based on frames per second (fps). The dropdown menu provides standard whole numbers — selecting 1 will extract exactly one frame every second.
However, you can manually type decimals directly into this box to force wider intervals. To extract one frame every five seconds, simply click into the box and type 0.2 (1 frame divided by 5 seconds = 0.2 fps). To extract one frame every ten seconds, type 0.1.
Once your parameters are set, verify your output destination folder on the lower left panel (it defaults to the same directory as the source video) and click “Start function”. The FFmpeg engine will rapidly dump your sequential image files into the folder.
Method 2: The pure command-line approach (FFmpeg)
If you regularly work with command-line utilities to manage metadata, you will likely find opening a GUI tedious. Running raw FFmpeg in your Terminal or Command Prompt is the fastest, lowest-overhead way to pull frames from almost any modern codec, including 10-bit HEVC.


A Quick Prerequisite: For these scripts to execute exactly as written below, your system needs to know where FFmpeg is. If you installed it via a package manager like Homebrew on a Mac (
brew install ffmpeg) or added it to your Windows Environment Variables, it is already in your system’s global PATH.
If you simply downloaded the standalone binary and dropped it in a random folder, the terminal will throw a “command not found” error.
To fix that without altering your system variables, just replace the wordffmpegin the scripts below with the absolute file path to your executable (e.g.,/Users/YourName/Downloads/ffmpegorC:\ffmpeg\bin\ffmpeg.exe).
To extract one frame every five seconds, navigate to your directory and use the following syntax:
ffmpeg -i input_video.mp4 -vf fps=1/5 output_frame_%04d.jpgThe Technical Breakdown:
-i input_video.mp4: Defines your source file.-vf fps=1/5: This applies a video filter instructing the engine to extract exactly one frame every five seconds. While you will sometimes see tutorials suggest altering the output frame rate (e.g.,-r 0.2), using the dedicatedfpsvideo filter is mathematically superior because it actively synchronizes the extraction against the video’s presentation timestamps (PTS), preventing dropped or duplicated frames.- NB: this syntax doesn’t work in the Shutter Encoder GUI. It will fail if you try that, so you have to use the decimal format such as
0.2.
- NB: this syntax doesn’t work in the Shutter Encoder GUI. It will fail if you try that, so you have to use the decimal format such as
output_frame_%04d.jpg: Instructs the engine to output JPEG files utilizing a 4-digit, zero-padded sequential naming convention (e.g.,output_frame_0001.jpg,output_frame_0002.jpg).
Advanced batch processing with FFmpeg command line
If you have a directory containing dozens of historical video clips and you want to generate sequential proof sheets for all of them, doing it one by one is tedious.
Instead, we can write a simple loop that tells the computer to process the entire folder, create a dedicated sub-directory for each video, and dynamically name the extracted images based on the original source file.
Mac and Linux workflow (Zsh/Bash)
If you are on a Mac, open your Terminal application.
- Navigate to your folder: First, you need to point the terminal to the directory holding your videos. Type
cdfollowed by a space, then drag the folder containing your videos directly from Finder into the Terminal window and hit Enter. This will automatically fill in the correct file path. - Run the loop: Copy and paste the following block of code into your terminal and hit Enter:
for f in *.mp4; do
  filename="${f%.*}"
  mkdir -p "$filename"
  ffmpeg -i "$f" -vf fps=1/5 "$filename/${filename}_%04d.jpg"
done
The Mechanical Breakdown:
for f in *.mp4; do: This tells the system to find every MP4 file in your current folder and run the following commands on each one sequentially. If your footage uses a different container, simply change*.mp4to*.movor*.avi.filename="${f%.*}": This strips the file extension (the.mp4part) off the name, capturing just the base name of your video. Because the variables are wrapped in quotes, it safely handles filenames with spaces.mkdir -p "$filename": This creates a new folder using that exact base name."$filename/${filename}_%04d.jpg": This is the destination route. It tells FFmpeg to drop the extracted JPEGs into that newly created folder, and dynamically prefix every single image with the original video’s title.
Windows workflow (PowerShell)
If you are on a Windows machine, the core logic is identical, but the syntax is tailored for PowerShell.
- Navigate to your folder: Open PowerShell. Type
cdfollowed by a space, then the path to your folder (e.g.,cd C:\Users\YourName\Videos\Archive) and hit Enter. - Run the loop: Paste this script into PowerShell and execute it:
Get-ChildItem -Filter *.mp4 | ForEach-Object {
    $basename = $_.BaseName
    New-Item -ItemType Directory -Force -Path $basename
    ffmpeg -i $_.FullName -vf fps=1/5 "$basename\${basename}_%04d.jpg"
}
Just like the Mac version, $_.BaseName captures the file name without the extension, New-Item generates the sub-folder, and the FFmpeg command automatically routes the frames into it.
Wrap up
Whether you use a modern GUI wrapper like Shutter Encoder or script it out in the terminal, extracting image sequences does not require a bloated, expensive editing suite. Both of these methods bypass the overhead of heavy video software and give you exactly the frames you need for a proof sheet, a time-lapse build, or a web gallery.
If you are looking for a slightly different workflow, I’ve also written a guide on how to save individual JPEG frames from video directly inside Lightroom.


