The Fujifilm X100VI has a number of shortcuts built in. For instance, there’s a shortcut button combination for going straight to the SD card format screen, which I’ve covered before.
You don’t have to use it — you can go through the regular menu system instead, if you prefer. But the shortcuts can be really useful when you’re out shooting and wanting to focus more on taking photos than navigating menu screens.
There’s also a simple built-in shortcut to take you straight to the custom buttons and dials screen. It’s not something I use every day, but I find it useful sometimes when I’m out shooting and want to quickly change the functionality of a button for a particular purpose. Especially in the early stages of getting the X100VI set up to my own preferences.
The Shortcut: Long Press
DISP/BACK(2 Seconds)
Function: OpensBluetooth & FUNCTION (Fn) SETTING
Benefit: Instantly reassign buttons while shooting
Note:DISP/BACKis also the Bluetooth button, so the Bluetooth options appear at the top
How to do it
Press and hold the DISP/BACK button on the back of the camera, in shooting mode.

That opens a screen called Bluetooth & FUNCTION (Fn) SETTING. The Fn part shows each customizable button and what it does, and you can reassign any of them from there.
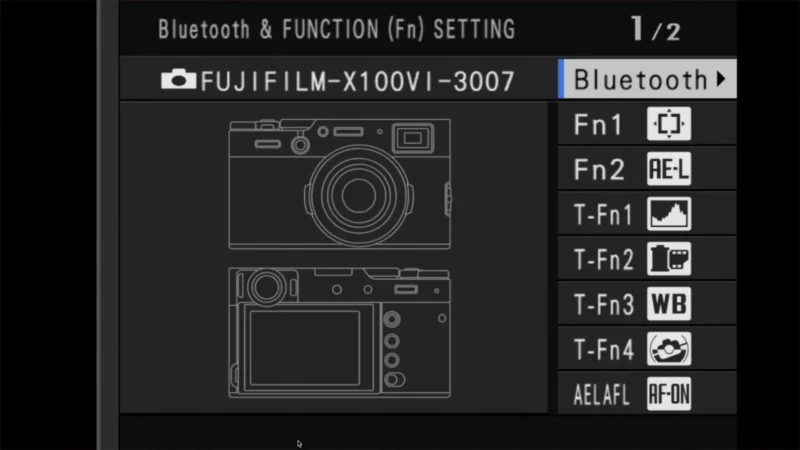
The Bluetooth part is there because DISP/BACK doubles as the X100VI’s Bluetooth button; it has a small Bluetooth icon beside it.
Alternative method
You can reach the same button list through the menus:
MENU > SET UP > BUTTON/DIAL SETTING > FUNCTION (Fn) SETTINGThe difference is that the menu version doesn’t include the Bluetooth option at the top.
What the buttons do by default
Fujifilm’s factory assignments:
| Button | Where | Default role |
|---|---|---|
| AEL/AFL | Back | AE/AF LOCK |
| Center of the rear command dial (press) | Back | FOCUS CHECK (zooms in to check focus) |
| Fn1 | Top plate | FACE DETECTION ON/OFF |
| Q | Back | QUICK MENU |
| Fn2 | Front, the button in the viewfinder selector lever | CONTROL RING SETTING (chooses what the lens’s control ring does) |
| Viewfinder selector (rotate and hold) | Front lever | ND FILTER |
There are four more “buttons” on the touchscreen: flicking up, left, right, or down (T-Fn1 to T-Fn4) can each be given a role the same way. They’re off by default. Turn them on with BUTTON/DIAL SETTING > TOUCH SCREEN SETTING > TOUCH FUNCTION.
A few limits, from Fujifilm’s manual: FACE DETECTION ON/OFF can’t be toggled from a button while the optical viewfinder is showing, and the AE, AF, and AWB lock roles and AF-ON can’t go on the viewfinder selector.
What to assign
The list of roles is long. Rico Pfirstinger’s suggestions are a sensible place to start:
- Fn1:
HISTOGRAM. The live histogram with overexposure warnings is only reachable from a button. - Fn2:
ELECTRONIC LEVEL SWITCH, for the two-axis level. He notes the 3D level turns off the optical viewfinder. - AEL/AFL:
AF-ON, for back-button focus. I’ve covered that setup in back-button focus on the X100VI. - Leave the rear dial’s
FOCUS CHECKand the viewfinder selector’sND FILTERas they are.
Two roles worth knowing about if you use them: ISO AUTO SETTING, for switching Auto ISO presets without the menu, and SELECT CUSTOM SETTING, for your C1–C7 banks.
More press-and-hold shortcuts
The X100VI has several of these. Each one opens a setup screen directly from the shooting display.
| Press and hold… | Opens |
|---|---|
DISP/BACK | Bluetooth & FUNCTION (Fn) SETTING (button assignments) |
| Center of the front command dial | COMMAND DIAL SETTING (what each dial does) |
| Focus stick (press it in) | FOCUS LEVER SETTING (what the stick does) |
Q | Editing the Quick menu |
Q again, with the Quick menu open | EDIT/SAVE CUSTOM SETTING (your C1–C7 banks) |
MENU/OK | Locks the controls you’ve chosen in LOCK; hold again to unlock |
DRIVE/DELETE and the center of the rear command dial, together | The memory card format screen |
A few notes on these.
The front command dial. This is the counterpart to the button screen, for the dials. The front dial can hold up to three roles (FRONT COMMAND DIAL 1, 2, and 3), and a short press steps through them. That’s why the front dial sometimes changes something you didn’t expect.

For setting up aperture or exposure compensation on the dials, see aperture via the front dial and exposure compensation.
Q, then hold Q. Press Q to open the Quick menu, then press and hold Q. The camera jumps to EDIT/SAVE CUSTOM SETTING, where you save and edit your custom settings banks. Holding Q without the Quick menu open does something different: it opens the Quick menu editor, covered in the X100VI Quick menu.
The focus stick. Pfirstinger recommends PUSH → EDIT FOCUS AREA and TILT → DIRECT AF POINT SELECTION, which isn’t the factory setting.
MENU/OK. You choose what gets locked here:
MENU > SET UP > BUTTON/DIAL SETTING > LOCKFormat. Covered in full in formatting SD cards on the X100VI.
If a shortcut doesn’t work. Several of these depend on the button’s current role. If you’ve reassigned Q or the rear dial, their shortcuts may change with them. Check FUNCTION (Fn) SETTING first.
Frequently asked questions
How do I customize the buttons on the Fujifilm X100VI?
Press and hold DISP/BACK in shooting mode, or go to MENU > SET UP > BUTTON/DIAL SETTING > FUNCTION (Fn) SETTING, then pick a button and a role.
What do the X100VI’s buttons do by default?
AEL/AFL locks exposure and focus, the rear dial’s center zooms to check focus, Fn1 toggles face detection, Q opens the Quick menu, Fn2 sets the control ring’s role, and holding the viewfinder selector toggles the ND filter.
How do I change what the command dials do on the X100VI?
Press and hold the center of the front command dial to open COMMAND DIAL SETTING.
Explore the Fujifilm X100VI
Here’s a tool I created to help identify which buttons and dials are where — and what they’re called, because every brand has their own dialect and jargon.


