
The HERO7 Black shoots 12MP photos as JPG or RAW (.GPR), with Wide and Linear fields of view, SuperPhoto automatic processing, Protune manual controls, digital zoom, and Burst/Continuous/Night/time-lapse modes. What each does, and its limits, is below, along with sample photos.
The HERO7 Black is long discontinued but still a capable used buy for stills. Related: HERO8 Black photo modes (its successor), JPG vs RAW, Protune explained, and photos taken with the HERO7 Black.
GoPro cameras are best known for shooting video, but they can be surprisingly good at taking photos too. So long as you’re willing to work with their quirks and limitations rather than fighting against them, you can get some awesome photos out of them that will be quite different from what you’d get from a smartphone or “normal” camera.
GoPros don’t do everything the same way as other cameras. That can be both a plus and a negative.

Have Camera Will Travel Newsletter
Practical field notes, hands-on gear tests, and the fun of exploring the world with a camera in hand.

All GoPros work by default in fully automatic mode; some let you take some–but not full–manual control. The ultra-wide fisheye lens isn’t a good fit for traditional people photos because it makes their features look distorted, but it can be super effective if you’re in close to the action or are looking for a dramatic wide look.
The battery life on GoPros isn’t as good as on many compact cameras, and there’s no control over focus or (real) zoom. But they’re also tiny, rugged, and waterproof, and those features mean you can shoot photos in many places where other cameras would give up the ghost.
GoPro model names can be confusing, and they’re not always consistent from generation to generation.
There are three cameras in the HERO7 lineup: Black, Silver, and White. The Black is the flagship model and has the best options for taking photos. It’s that model I’m focusing on here. The Silver and White models shoot 10MP photos and have more limited options–I have a separate post on their photo features and specs.
The still photo modes on the GoPro HERO7 Black are very similar to those of its predecessor, the HERO6 Black. It’s still a 12MP sensor that produces images at 4000×3000 pixels. There’s still the option to use JPG or GoPro’s RAW photo format. And there’s still that distinctive super wide-angle field of view as well as the option to reduce the lens distortion into a linear field of view.
But there’s also a handful of new features. So here’s a rundown of the photo modes available on the HERO7 Black.
Related: GoPro RAW (.GPR) files explained — RAW availability by model and mode.
12MP image sensor
The HERO7 Black has a 12-megapixel sensor for still photos, producing 4:3 aspect ratio images that are 4000×3000 pixels. That’s on the smaller end compared to many other cameras, but it’s still comfortably big enough for prints larger than 8×10 at full resolution, and more than big enough for sharing online. For comparison, the leading smartphones of its day, like the Pixel 3 and iPhone XS, also produced images around 12MP.
Some earlier models of GoPro had the option to save smaller images of, say, 7MP or 5MP. There’s no option for that on the HERO7 Black.
File formats: RAW & JPG
GoPro introduced their own RAW image format back with the HERO5 Black. It’s based on Adobe’s DNG format and has a file extension of .gpr.
These make available more of the information that was captured by the camera’s sensor. With all that extra image data available, it’s possible to produce better image quality. At least in theory. In practice, I’ve found that the in-camera processing does a pretty good job in creating the JPG versions and that the RAW data doesn’t preserve as much extra dynamic range in the shadows and highlights as you might hope or expect compared to some other cameras.
There are also two catches in using the RAW files. The first is that you really need to process RAW files and export them in another format such as JPG before you can do much with them. That’s partly to make them look better–unprocessed RAW data doesn’t look very good–and partly to put them in a file format that other people, labs, and online services can actually use.
This is where the second catch comes in: even though .gpr are based on Adobe’s dng format, there aren’t many imaging apps that can work with them. Lightroom is a notable exception. If you don’t use Lightroom, I’ve posted a workaround that uses a free app to convert GPR files to DNG.
The folks at GoPro also built in a safety net: when you shoot in RAW, it also saves a JPG version automatically alongside it. So you can use that if you’re stuck; it’s also what the GoPro app uses. So selecting the RAW image option is the same as choosing RAW + JPG on other cameras.
I generally use the RAW option when it’s available, but it isn’t available in every photo shooting mode on the HERO7 Black. It works in Photo, Night, Time Lapse Photo, and Night Lapse Photo, but not in Burst or when you hold down the shutter for Continuous photos. It’s also blocked by anything that involves in-camera processing: SuperPhoto, the digital zoom, or the Linear FOV. You can use it for Time Lapse Photo, but only if the interval is at least 5 seconds. For Night Lapse Photo, the shutter has to be set to at least 5 seconds.
One downside to using the RAW setting is that it’s slower to save the files than when using just JPG (oddly, though, the filesizes often end up smaller). After all, it’s crunching the RAW and saving a JPG version.
Manual exposure controls / exposure control
GoPros are designed to work well on automatic everything right out of the box. If you want more control over the exposure when shooting photos, you can control two of the three sides of the exposure triangle.
Using the Protune options (more on those below), you can manually set the ISO and shutter speed. The one you can’t control is the aperture; GoPros have a fixed-aperture lens that’s rated at f/2.8.
There’s also another option that gives you some control over the exposure that’s kind of semi-manual. That’s a feature called Exposure Control. Other modern cameras have this too–it’s when you can touch the back screen to choose a specific area within the frame that is used to calculate the automatic exposure. An example might be if you’re photographing a person on the snow but it’s exposing for the whole scene and therefore their face is dark. You can select the face as the area to expose for so that it brightens that up (and will probably overexpose the background at the same time).
Focus
Like every other GoPro, the HERO7 Black has a fixed-focus lens. So you can’t adjust the focus. But the upside is that it has an extraordinarily deep focus. It’s very hard to take a photo with a GoPro that’s out of focus (motion blur is a different issue), even if the subject is right up close to the camera.
SuperPhoto
One of the important considerations when shooting photos with a GoPro is that their sensors don’t have a particularly wide dynamic range. That’s not a problem in brightly and evenly lit scenes, but if you have a lot of shadows and highlights you can end up with some less than ideal exposures.
To help with that, GoPro started adding in-camera photo processing to its flagship models, and it got better with each one. With the HERO5 Black, they introduced a setting called WDR, for wide dynamic range. The results were okay–not great. The HERO6 Black improved on it with what they now called HDR. The HERO7 Black’s HDR takes several photos and combines them into one that holds more detail in both the bright and dark areas. You can use it either as a standalone feature or as part of a broader suite of enhancements GoPro calls SuperPhoto.
SuperPhoto is a small collection of tools rather than a single image enhancement technique. Alongside the HDR element are local tone mapping and multi-frame noise reduction. The camera analyzes the scene and decides which of the tools to use, if any. Aside from using just HDR or turning the whole thing on or off, you don’t have any other control over the tools in SuperPhoto.
The results aren’t always dramatic, but they’re usually an improvement. The contrast tends to be better and the colors richer. But there’s something important to know: SuperPhoto isn’t compatible with the RAW format. I generally shoot RAW when possible, and while the benefits of SuperPhoto do often result in a somewhat better image, they’re not really anything that you can’t do in an imaging editing app worth its salt (such as Lightroom Classic or a Lightroom alternative). If you’re sharing your photos straight out of the camera, it’s a nice feature to have, but if you’re already planning to process your photos in another desktop imaging app (or something like SnapSeed on mobile), it’s less compelling.
One important consideration with using SuperPhoto is that it’s slow. So you’ll likely be waiting for at least a few seconds before you can take the next shot.
I have a more detailed post on SuperPhoto here which includes several more examples.
Digital zoom
The lens on GoPros is fixed. While it’s technically possible to attach an external lens, I’ve yet to come across one that actually works well. So for the most part, you have to work with a fixed ultra-wide focal length.
Like the HERO6 Black before it, the HERO7 Black does have a zoom. But that’s not as exciting as it might sound at first, because it’s a digital zoom, not an optical zoom. That means it’s basically a glorified crop.
You access it with a slider on the back screen.
Zoomed in, the camera will still create images that are 4000 by 3000 pixels, but they don’t have any more detail than you’d get by cropping a non-zoomed image. You can find more details on GoPro zoom and examples here.
Fields of view: Wide & Linear
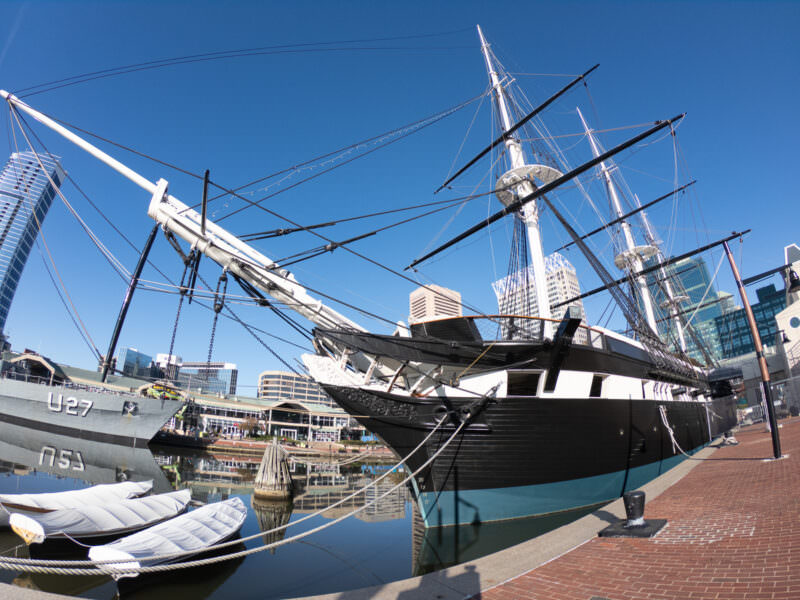
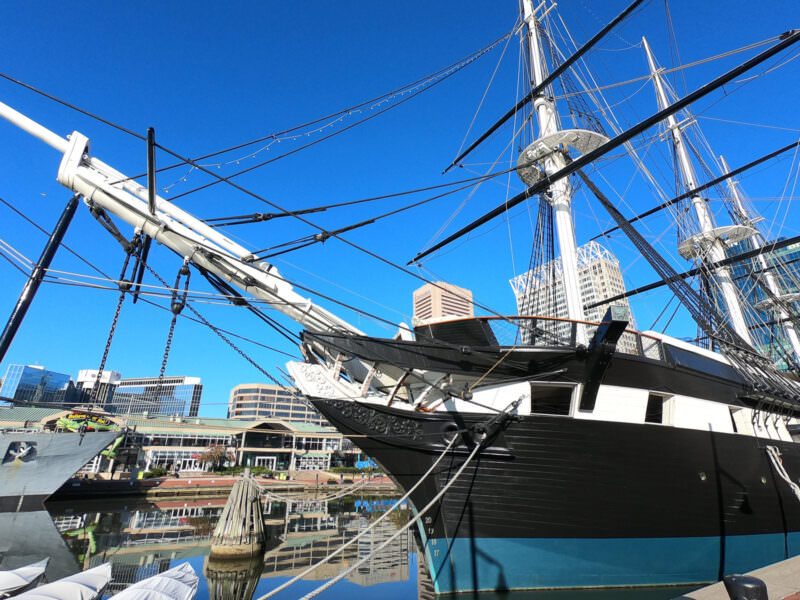
That distinctive fisheye look is the default again with the Wide field of view. But there’s also an option to use Linear FOV that greatly reduces the lens distortion. It will straighten lines so that you can deal with bow-legged building walls or massively curved horizons.
The Linear FOV is a software solution, not an optical one: the camera stretches and reshapes the original image according to an algorithm to reduce the distortion, and it takes in a narrower view than Wide. You can get a similar effect in post-production using shots taken in the Wide FOV. And the Linear FOV is only available when shooting JPG, not RAW (but here’s a workaround if you’re using Lightroom).
Here’s a practical example:
Burst mode and continuous shooting
The HERO7 Black has two ways to capture rapid sequences of images.
The first is the Burst mode. It captures a predefined number of images over a predefined length of time. The fastest is 30 images in 1 second. The slowest is 3 images in 1 second. The options are: 30/1, 30/2, 30/3, 30/6, 10/1, 10/2, 10/3, 5/1, and 3/1. There’s also an Auto option, which works slightly differently in that it will capture as many images as it can while still prioritizing exposure. I have a more detailed explanation and examples here.
A similar feature is Continuous photo. Rather than capturing a predetermined number of photos, the Continuous capture feature will keep shooting while you hold down the shutter button. It can shoot at either 3 or 30 photos per second, depending on the lighting conditions.
Night photos, time-lapse photos, and the timer
Night mode keeps the shutter open longer to let in more light, for dim or dark scenes. GoPro doesn’t recommend it handheld or on a moving mount, so use a tripod or a steady surface. You can set the shutter to Auto (up to 30 seconds) or to 2, 5, 10, 15, 20, or 30 seconds. When you switch to Night mode, the camera automatically sets the photo timer to 3 seconds to help prevent blurry shots.
Time Lapse Photo takes a continuous series of photos at a set interval, so you can concentrate on what you’re doing and pick the best shots later. The intervals are 0.5 seconds (the default), 1, 2, 5, 10, 30, and 60 seconds.
Night Lapse Photo does the same thing in dark scenes, with the shutter held open longer. It has the same shutter options as Night mode. The interval can be Auto, 4, 5, 10, 15, 20, or 30 seconds, or 1, 2, 5, 30, or 60 minutes. On Auto (the default), the interval follows the shutter setting: with a 10-second shutter, the camera takes a photo every 10 seconds.
Both time-lapse photo modes can use the Wide or Linear FOV, and both have Protune. RAW works in both too, within the limits covered above.
The Photo Timer delays the shot by either 3 seconds (handy for selfies) or 10 seconds (for group shots).
ISO range
The HERO7 Black doesn’t break any new ground over its predecessor regarding ISO. The range is still 100 to 3200. It’s still working within the confines of a small sensor, though, so the image quality at high ISOs is decent but not great.
Protune
The HERO7 Black has Protune options available when shooting photos (as well as video). These are useful for controlling things like manually assigning ISO, shutter speed, exposure compensation. You can also set white balance, sharpness, and color mode–these three only affect JPGs, not RAW.
Here’s the full list of photo Protune options available:
| Protune Option | HERO7 Black |
|---|---|
| Color | GoPro Color (default), Flat |
| White Balance | Auto (default), 2300K, 2800K, 3200K, 4000K, 4500K, 5500K, 6000K, 6500K, Native |
| ISO Minimum | 100 (default), 200, 400, 800, 1600, 3200 (ISO behavior depends on the Shutter setting) |
| ISO Maximum | 100, 200, 400, 800, 1600, 3200 (default for photos; the ISO applied may be lower, depending on light) |
| Shutter | Auto (default), 1/125, 1/250, 1/500, 1/1000, 1/2000 (Photo mode only; Night mode has its own Shutter setting) |
| EV Comp | -2.0 to +2.0 (default 0) |
| Sharpness | High (default), Medium, Low |
For other GoPro models, see the Protune settings guide.
Responsiveness
One of the things I don’t like about using GoPros for still photos is that they’re sluggish. They’re great at taking rapid bursts of photos in preset sequences in the burst and continuous modes, but if you’re shooting individual photos, the shutter is sluggish and it takes quite long to process and save the image files. The camera also takes too long to power on–much longer than most other cameras. One other consideration is that there’s a single button that’s used as both the shutter button and to start/stop video recording. That means you have to switch the mode in the camera, which can be a pain if you’re trying to switch between videos and photos. One way to streamline it: set the Default Mode to Photo, so the camera wakes up ready for stills when you turn it on with the Mode button. Then, when you want video or a time-lapse, use the QuikCapture feature, which starts recording straight from the camera being off.
For the most responsive shooting, you want the simplest settings. Specifically, you’ll want it to be in JPG-only mode. Several other features slow things down, most notably SuperPhoto and RAW.
Photos taken with a GoPro HERO7 Black
Here are a few sample general travel-style photos I’ve shot with a HERO7 Black. I have more photos taken with a HERO7 Black separately.
Some of these were shot in RAW and some in JPG. Many have been lightly processed, in part because I find that the camera tends to underexpose a little for my tastes, so I’ve often had to nudge up the exposure and contrast slightly. I haven’t used any lens profile corrections to fix the fisheye distortion, although that’s certainly an option available.
You can click on each image to open a full-size version.


Finding a HERO7 Black today
GoPro discontinued the HERO7 Black some time ago, so the used market is the place to look now — sites like MPB and eBay.
GoPro HERO7 cameras compared
| HERO7 Black | HERO7 Silver | HERO7 White | |
|---|---|---|---|
VIDEO SPECS | |||
| Resolution / Max fps | 4K / 60 4K (4:3) / 30 2.7K / 120 2.7K (4:3) / 60 1440p / 120 1080p / 240 960p / 240 720p / 240 | 4K / 30 1440p / 60 1080p / 60 | 1440p / 60 1080p / 60 |
| Stabilization | HyperSmooth | Standard | Standard |
| Max Bitrate | 78 Mb/s | 60 Mb/s | 40 Mb/s |
| FOVs | Wide Linear SuperView | Wide | Wide |
| File Format (Codec) | MP4 (HEVC / H.265) MP4 (H.264 / AVC) | MP4 (H.264 / AVC) | MP4 (H.264 / AVC) |
| Protune | ✓ | - | - |
| Digital Zoom | ✓ | ✓ | ✓ |
| Looping | ✓ | - | - |
| Audio Track | WAV + AAC | AAC | AAC |
| External Mic Compatibility | ✓ | - | - |
| HDMI Video Out | ✓ | - | - |
| Live Streaming | ✓ | - | - |
PHOTO SPECS | |||
| Max Photo Size | 12MP | 10MP | 10MP |
| FOVs | Wide Linear | Wide | Wide |
| File Format | RAW (.gpr) JPG | JPG | JPG |
| Protune | ✓ | - | - |
| In-Camera Image Enhancement | SuperPhoto | WDR | - |
| Top Burst Mode | 30 / 1 | 15 / 1 | 15 / 1 |
| Continuous Photo | ✓ | ✓ | ✓ |
| Night Photo | ✓ | - | - |
| Photo Timer | ✓ | ✓ | ✓ |
TIME-LAPSE SPECS | |||
| Timelapse Photo | ✓ | - | - |
| Timelapse Video | ✓ | ✓ | ✓ |
| Nightlapse | ✓ | - | - |
| TimeWarp Video | ✓ | - | - |
INTERFACE SPECS | |||
| Built-in Touchscreen | ✓ | ✓ | ✓ |
| Front Screen | ✓ | - | - |
| Voice Control | ✓ | ✓ | ✓ |
| WiFi / Bluetooth | ✓ | ✓ | ✓ |
| USB Port Type | USB-C | USB-C | USB-C |
DESIGN & BUILD SPECS | |||
| Waterproof Body | ✓ | ✓ | ✓ |
| Dimensions | 62.3 x 44.9 x 33 mm | 62.3 x 44.9 x 28.3 mm | 62.3 x 44.9 x 28.3 mm |
| Weight | 4.1 oz / 116 g | 3.3 oz / 94.4 g | 3.26 / 92.4 g |
OTHER SPECS | |||
| Battery Type | 1220 mAh | 1220 mAh (non-removable) | 1220 mAh (non-removable) |
| QuikCapture | ✓ | ✓ | ✓ |
| GPS | ✓ | ✓ | - |
| Memory Card | Recommendations | Recommendations | Recommendations |


Can I shoot 360 degree videos in GoPro hero 7 black camera?
No, not in any practical sense. The Fusion is GoPro’s current 360-degree model. It is technically possible to shoot a series of photos with a HERO7 Black and stitch them together, but the results aren’t especially good and it’s quite tedious and time-consuming to do.
Hi, great article. I was wondering, can the Hero 7 Black record video and time lapse photos simultaneously? I would like to be able to record video at 1080/60p, while at the same time capturing time lapse photos at 0.5 secs.
No, it can’t do that, unfortunately. Two alternatives come to mind, but neither of them is exactly what you’re after. An older model, the HERO5 Black has a Video + Photo mode that can shoot video and record interval photos, but it’s more limited than that–the shortest interval is 5 seconds, for instance. And the DJI Osmo Action lets you shoot time-lapse video (but not regular video) simultaneously with saving the individual JPG images.
Hi, this is an excellent article! Just a comment on the following: “Get $100 off HERO7 Black or Fusion with TradeUp deal. GoPro currently has a trade up deal for the HERO7 Black and Fusion cameras where you get $100 by trading in any old GoPro or digital camera in any condition, whether it’s working or not. They cover shipping for your old camera as well as throw in an SD card and 2-day shipping with the new camera.” I just did the TradeUp deal, and it does not come with a microSD card as I too had thought. I called, and they said that the TradeUp deal cannot be combined with other offers. That felt a little misleading to me because on the GoPro website, it says, “Free SD card with all cameras.” I still love my GoPro HERO7 Black, but I just wanted to clarify that the TradeUp deal does NOT include a microSD card.
Thanks for the clarification–I’ve corrected. I thought their “Free SD card with all cameras” applied, but I guess it doesn’t.
Just got a new HERO7 Black after years with an old Hero2 that finally died. One thing that I am wondering about – it seems you are only able to shoot video & pictures in a narrower / square view. I am a terminology novice but with the HERO2 the footage is much wider – both video and photo. I am played in the settings and cant figure out if its a setting issue. Is this just the way the footage is?
By default, you should have that same wide-angle view. There are a few settings that might be causing it, including the Linear FOV setting or using the digital zoom. One option is to reset the camera back to its factory settings. That of course will also wipe any other settings you’re using (but won’t wipe the memory card).
Change the aspect from 4:3 to 16:9 in Video Settings-then RES | FPS, then top right of touch screen